TUTORIALS
From first sound to first show
Twelve short tutorials, each with its steps written out underneath. Step through the real screens in order, or jump to the one you need.
Tutorials 01 and 03 use Pro sounds: start the free trial first, or use The EP and Wave Ambient instead.
Basics
-
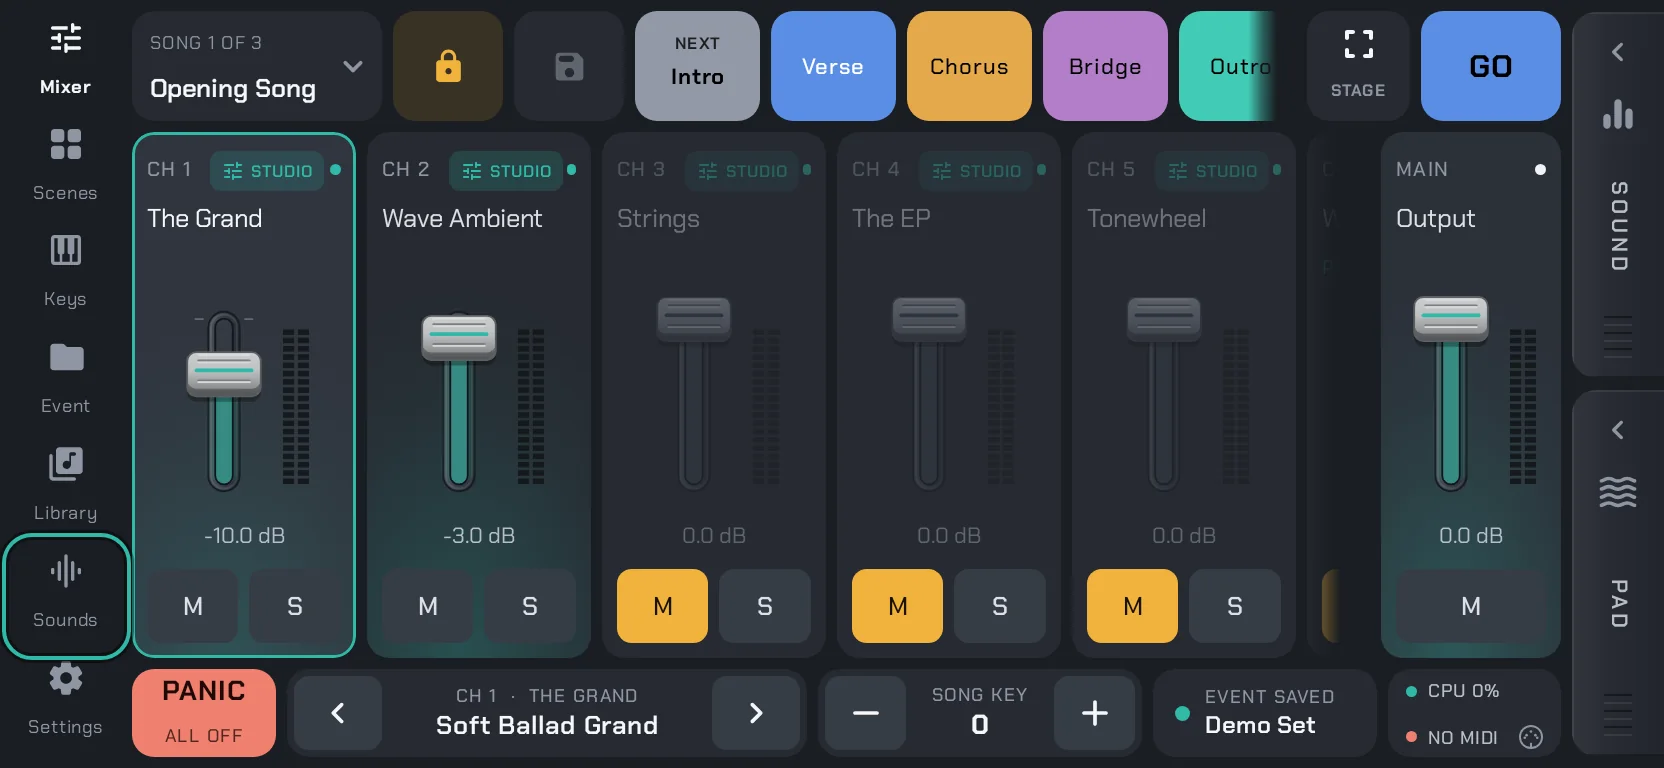
1 · Open Sounds on the nav rail.
-
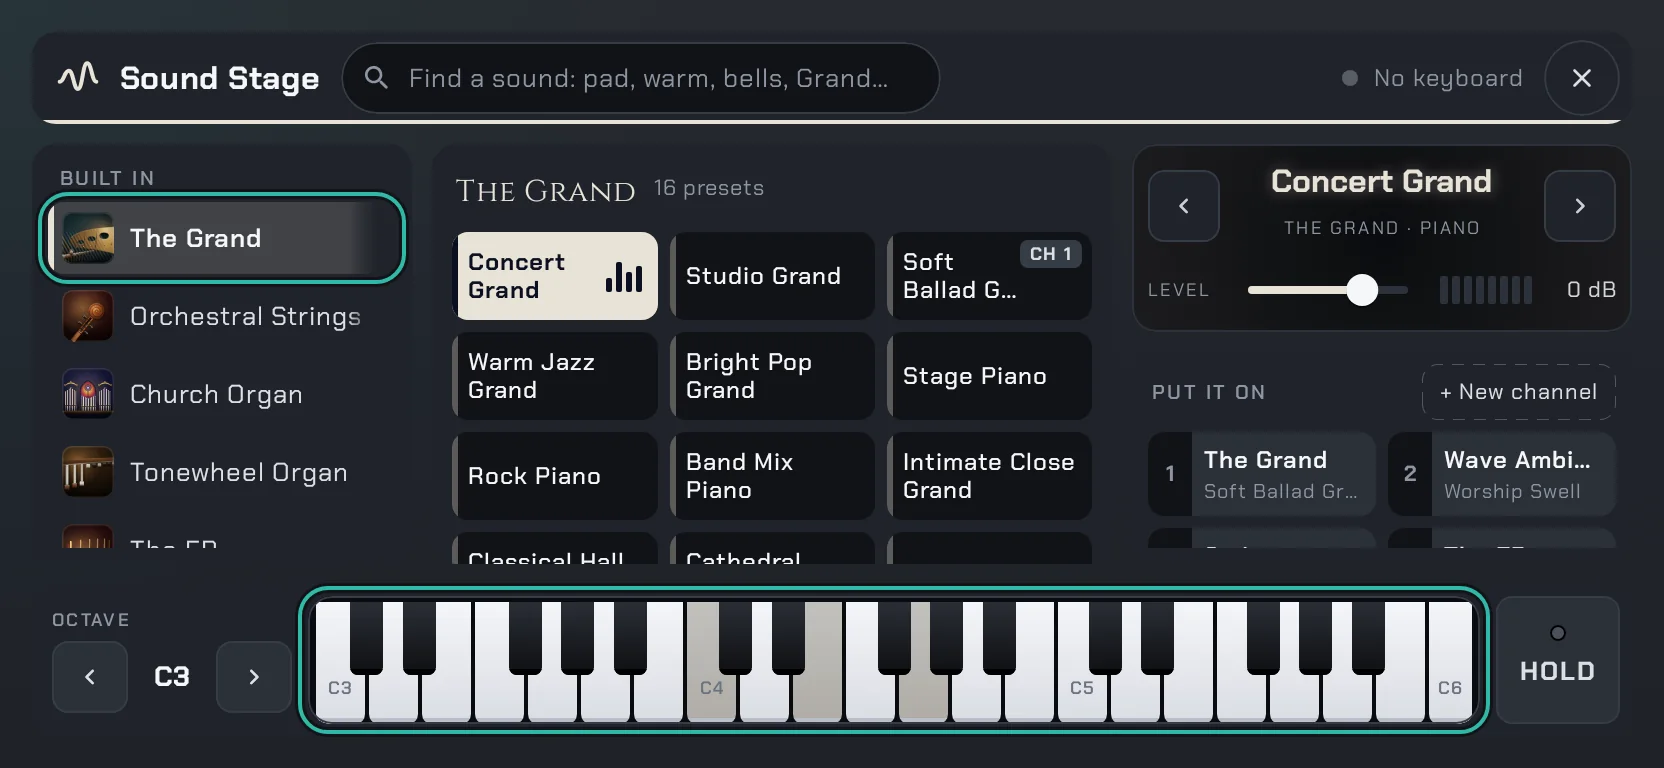
2 · Tap The Grand, then try chords on the on-screen keys.
-
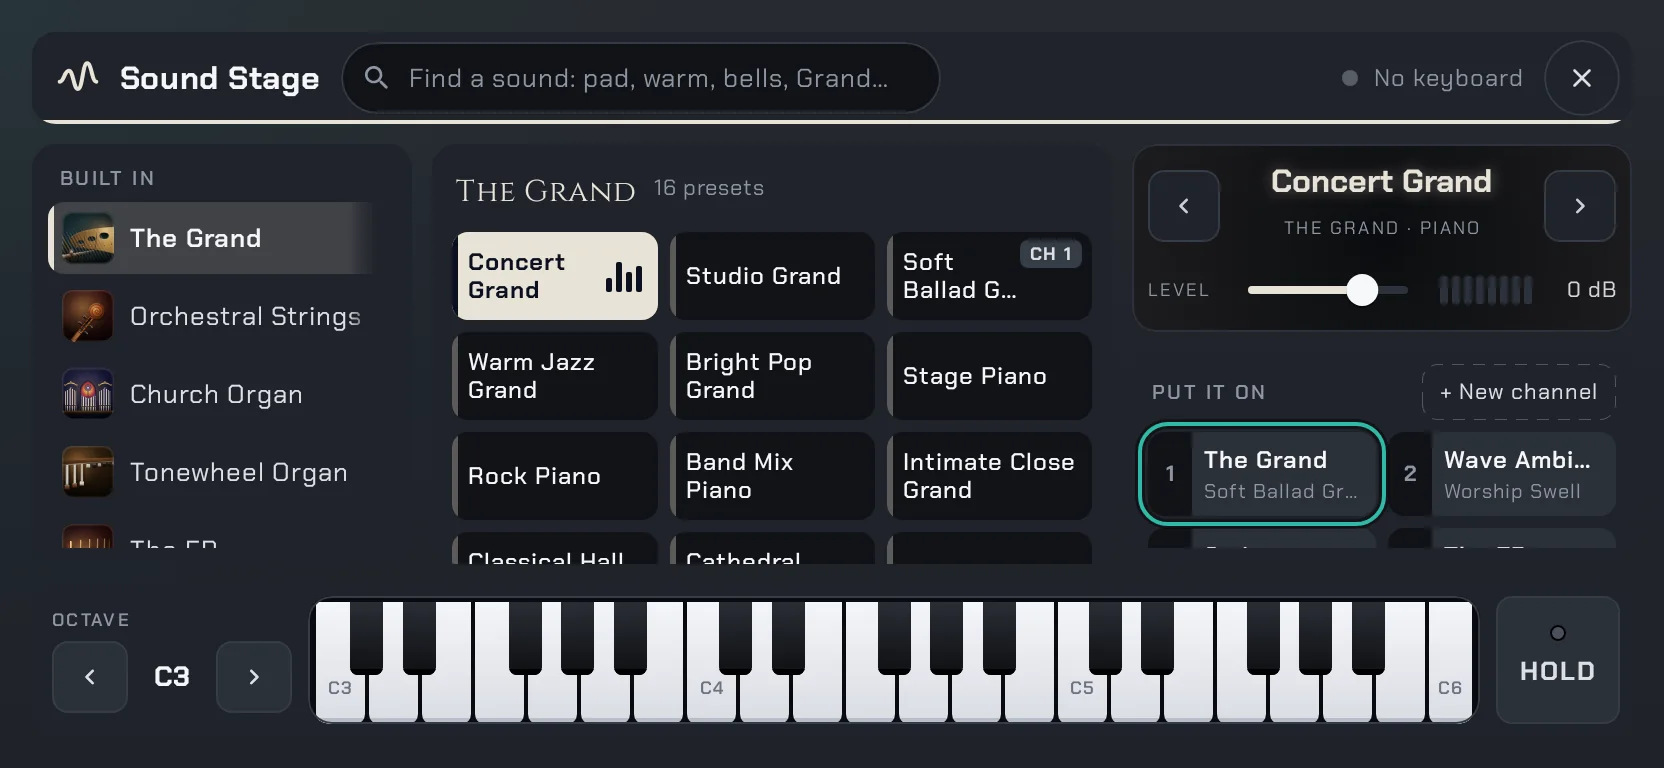
3 · Put it on channel 1.
-
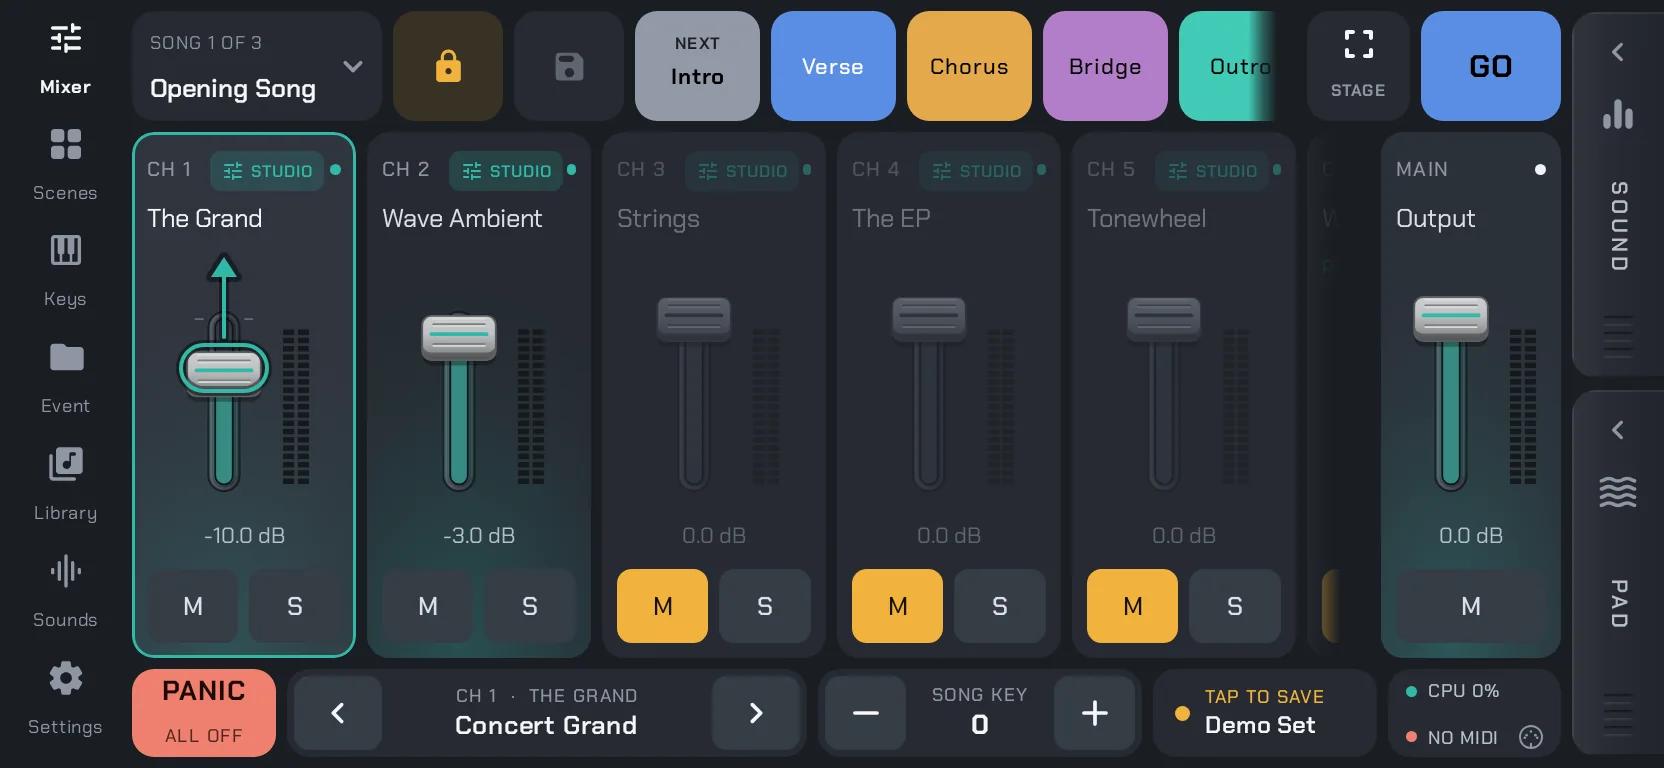
4 · Then bring its fader up on the mixer.
Step 1 of 4
01 · BASICS
Your first sound
The first time you open WaveStage, you’ll land in the Demo Set: three songs ready to play with GO. Try those first. To set up your own:
- Open Sounds on the nav rail.
- Tap The Grand, then try a few chords on the on-screen keys.
- Put it on channel 1 and bring its fader up.
-
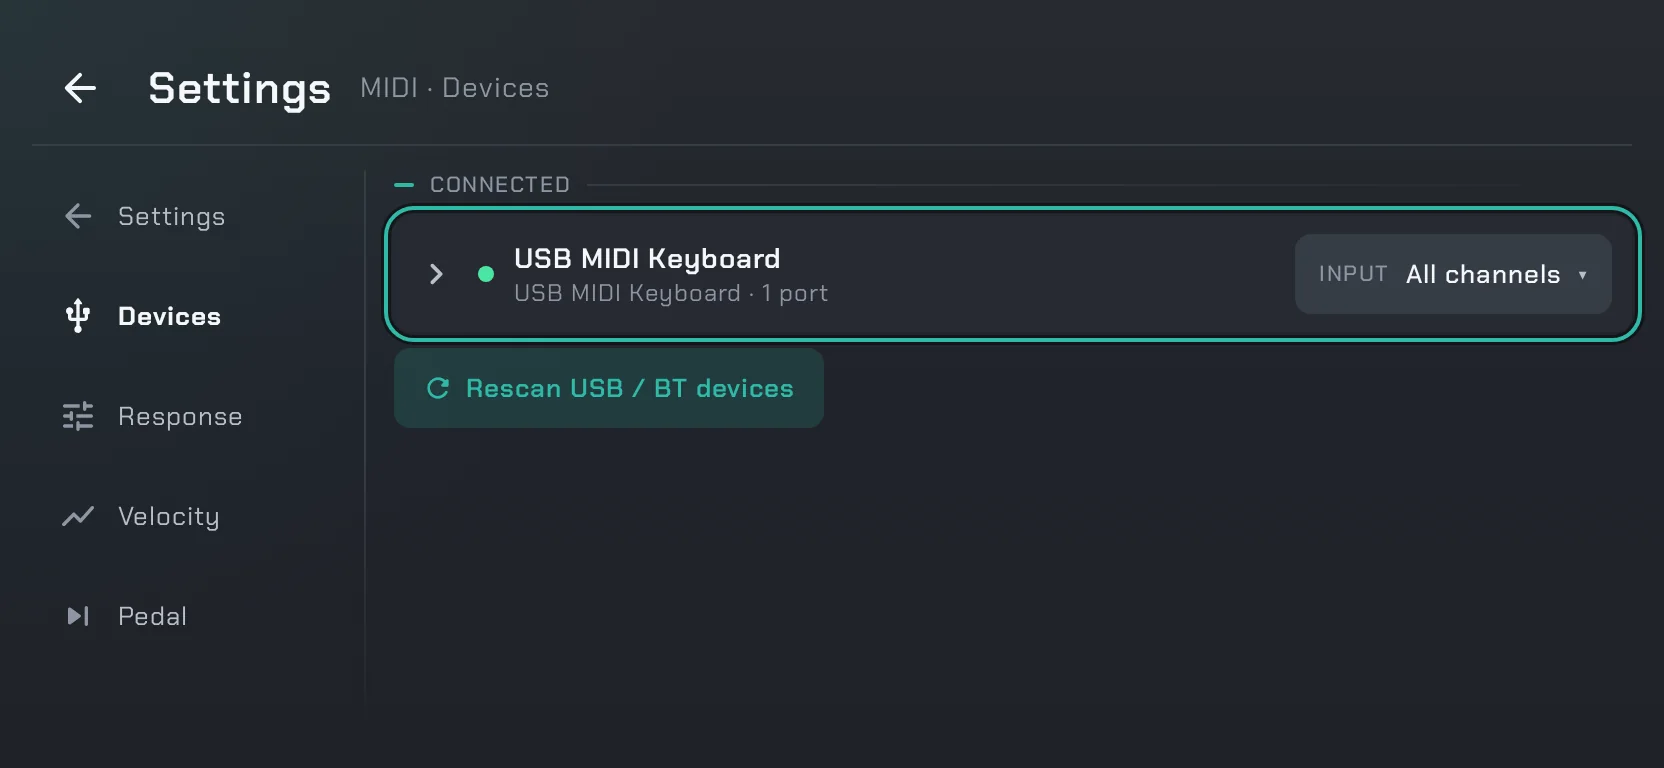
1 · Plug your MIDI keyboard in. It shows in Settings › MIDI › Devices.
-
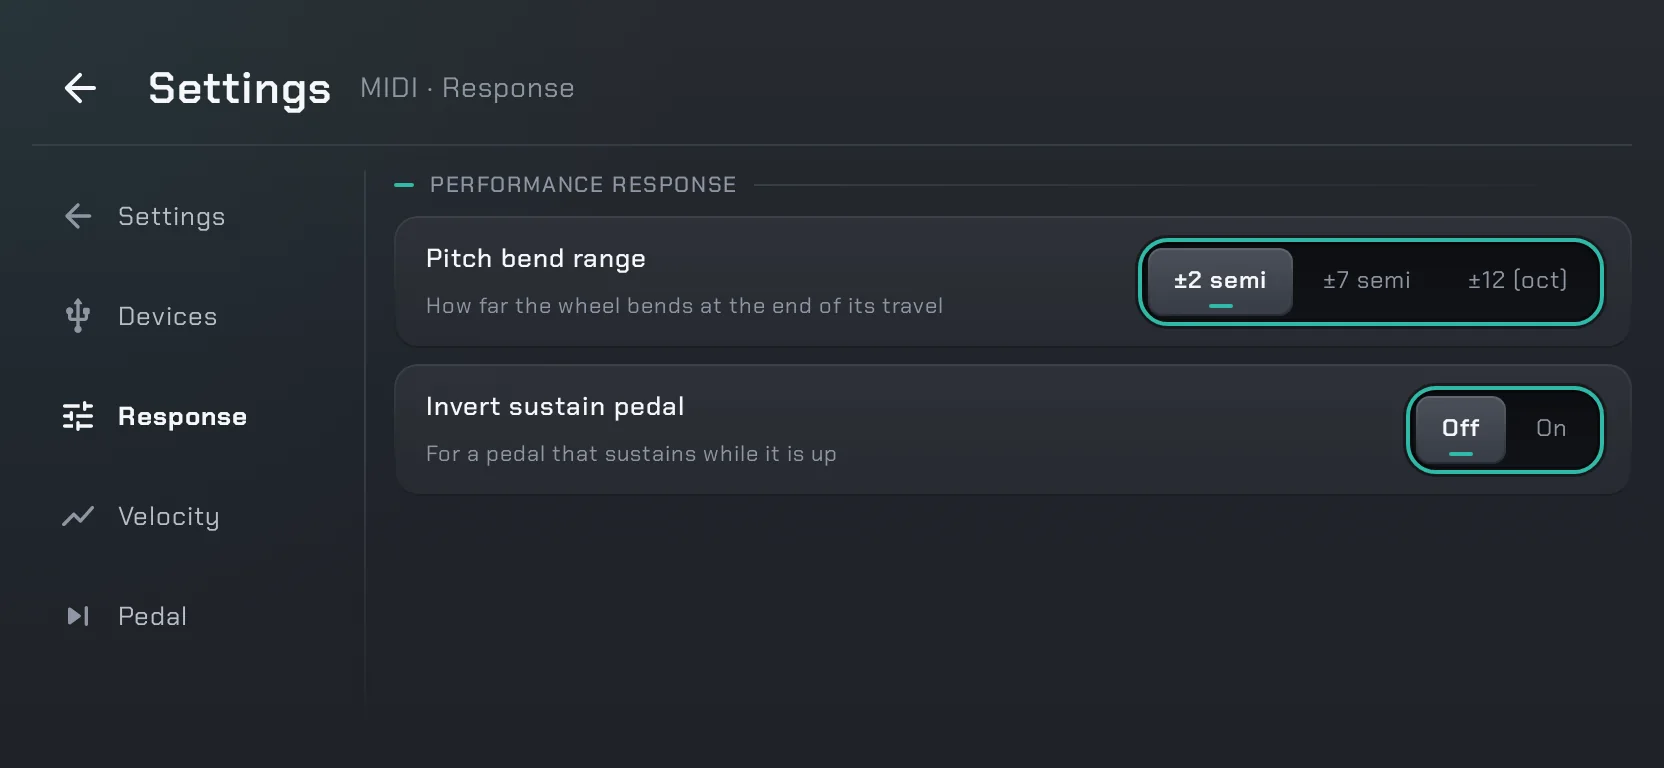
2 · In Response, set the pitch bend range. If your sustain pedal works backwards, turn on Invert sustain pedal.
-
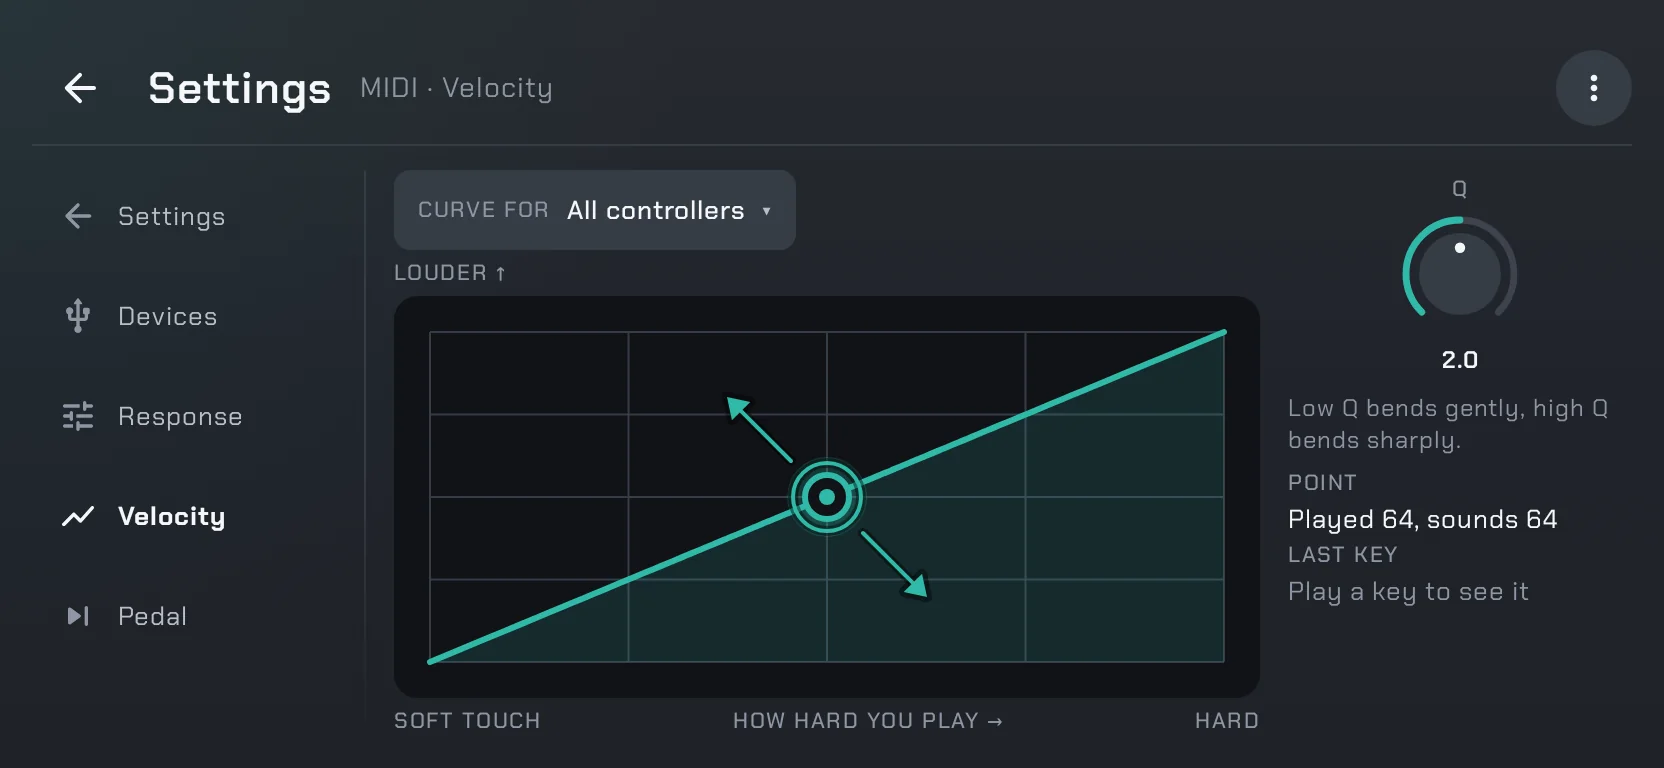
3 · In Velocity, move the curve’s point until soft and hard playing both feel right.
Step 1 of 3
02 · BASICS
Connect your keyboard
- Plug your MIDI keyboard in. You’ll see it in Settings › MIDI › Devices.
- In Response, set the pitch bend range. If your sustain pedal works backwards, turn on Invert sustain pedal.
- In Velocity, move the curve’s point until soft and hard playing both feel right.
-
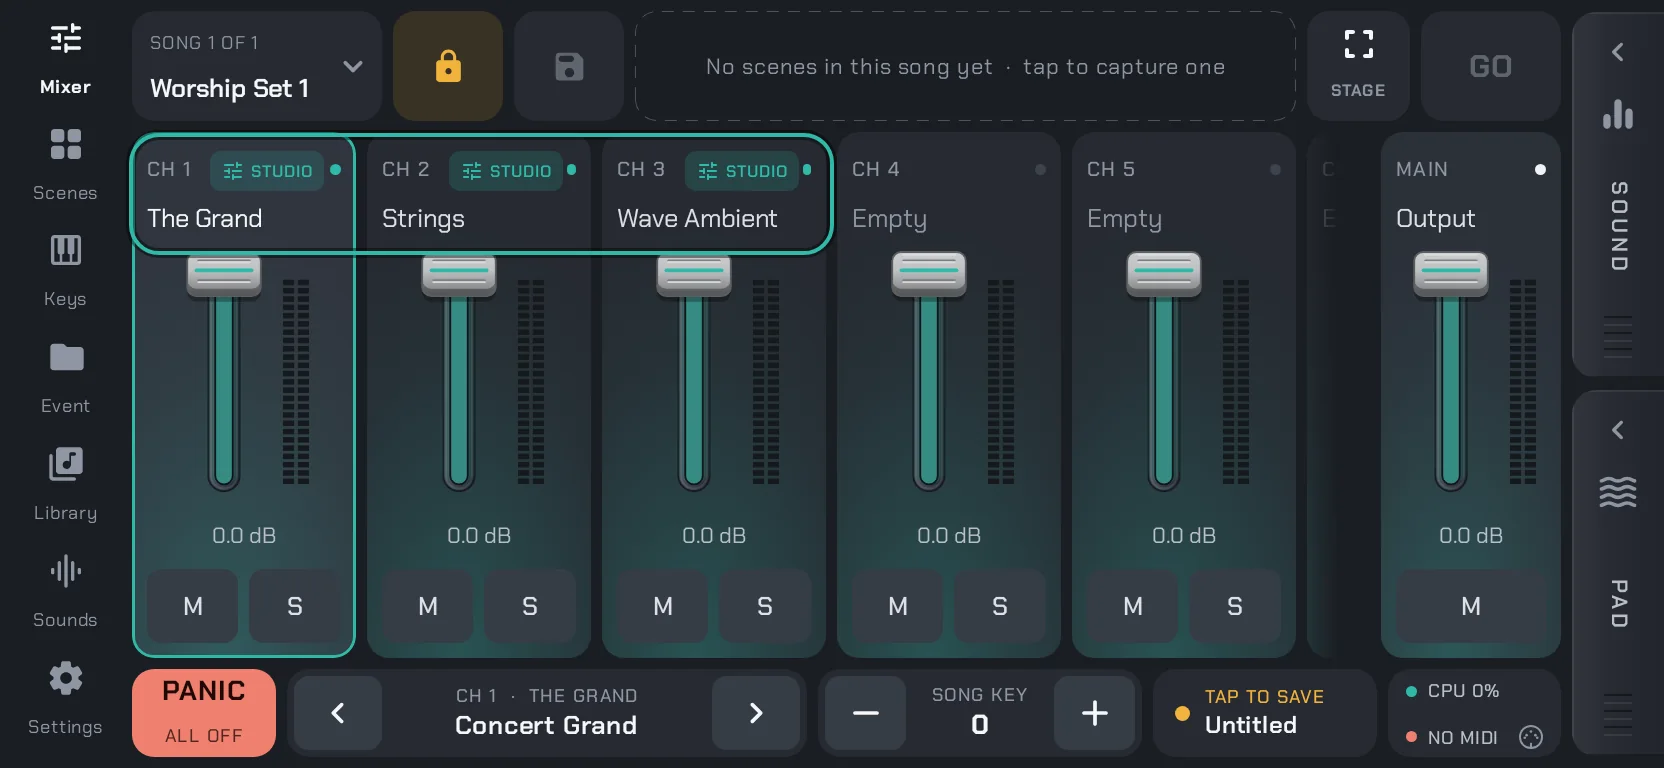
1 · Put The Grand on channel 1, Orchestral Strings on 2 and Wave Ambient on 3.
-
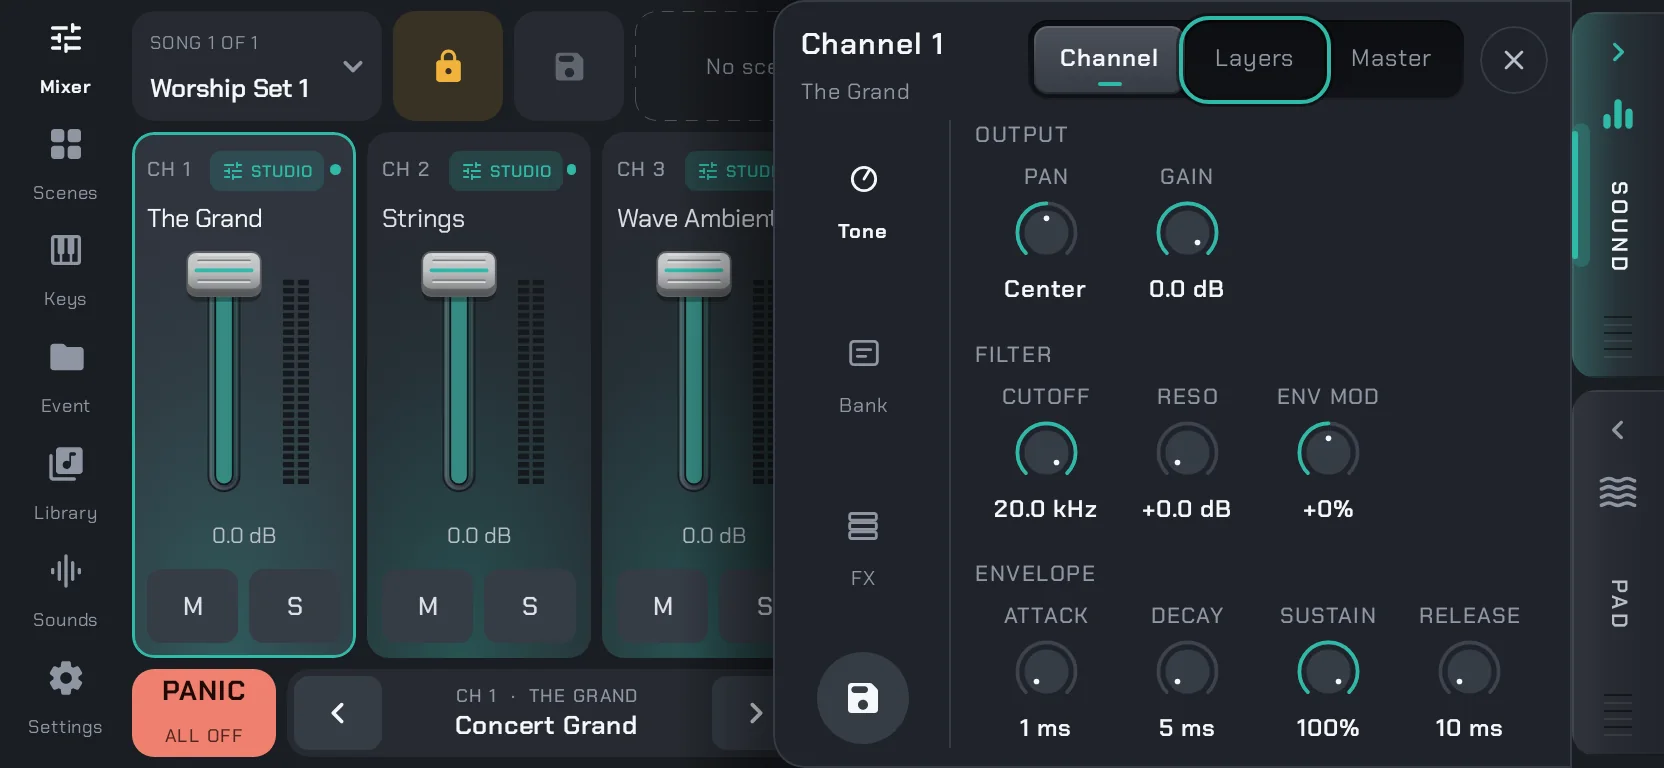
2 · Tap the SOUND handle at the right edge, then Layers.
-
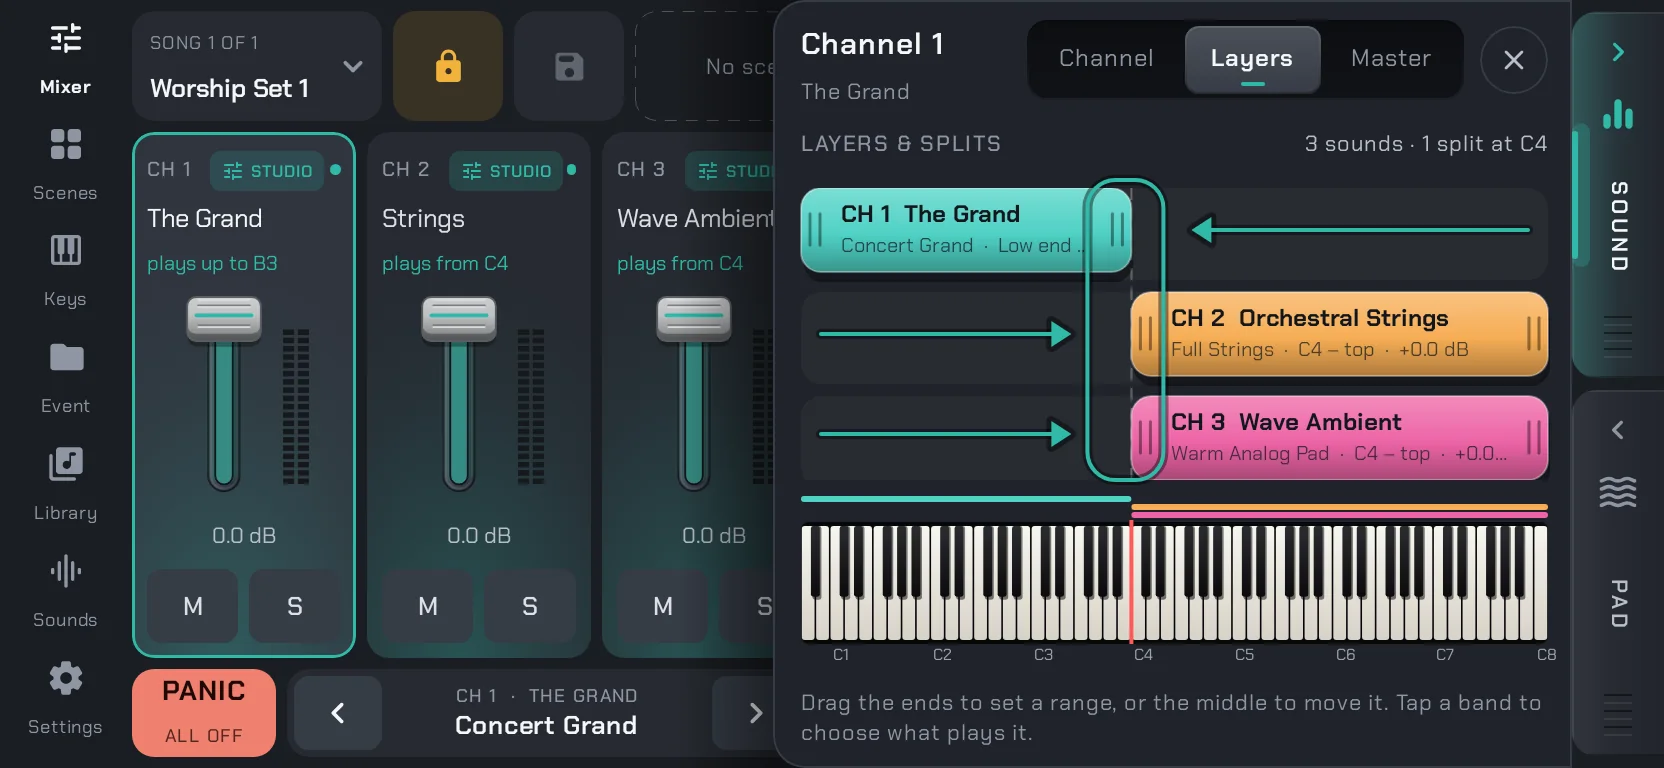
3 · Drag the piano’s right end down to B3, and the strings and pad bands to start at C4.
Step 1 of 3
03 · BASICS
Piano left, strings and pad right
- Put The Grand on channel 1, Orchestral Strings on 2 and Wave Ambient on 3.
- Tap the SOUND handle at the right edge, then Layers.
- Drag the piano’s right end down to B3, then drag the strings and pad bands to start at C4. Now your left hand plays piano and your right hand plays strings and pad.
Building a set
-
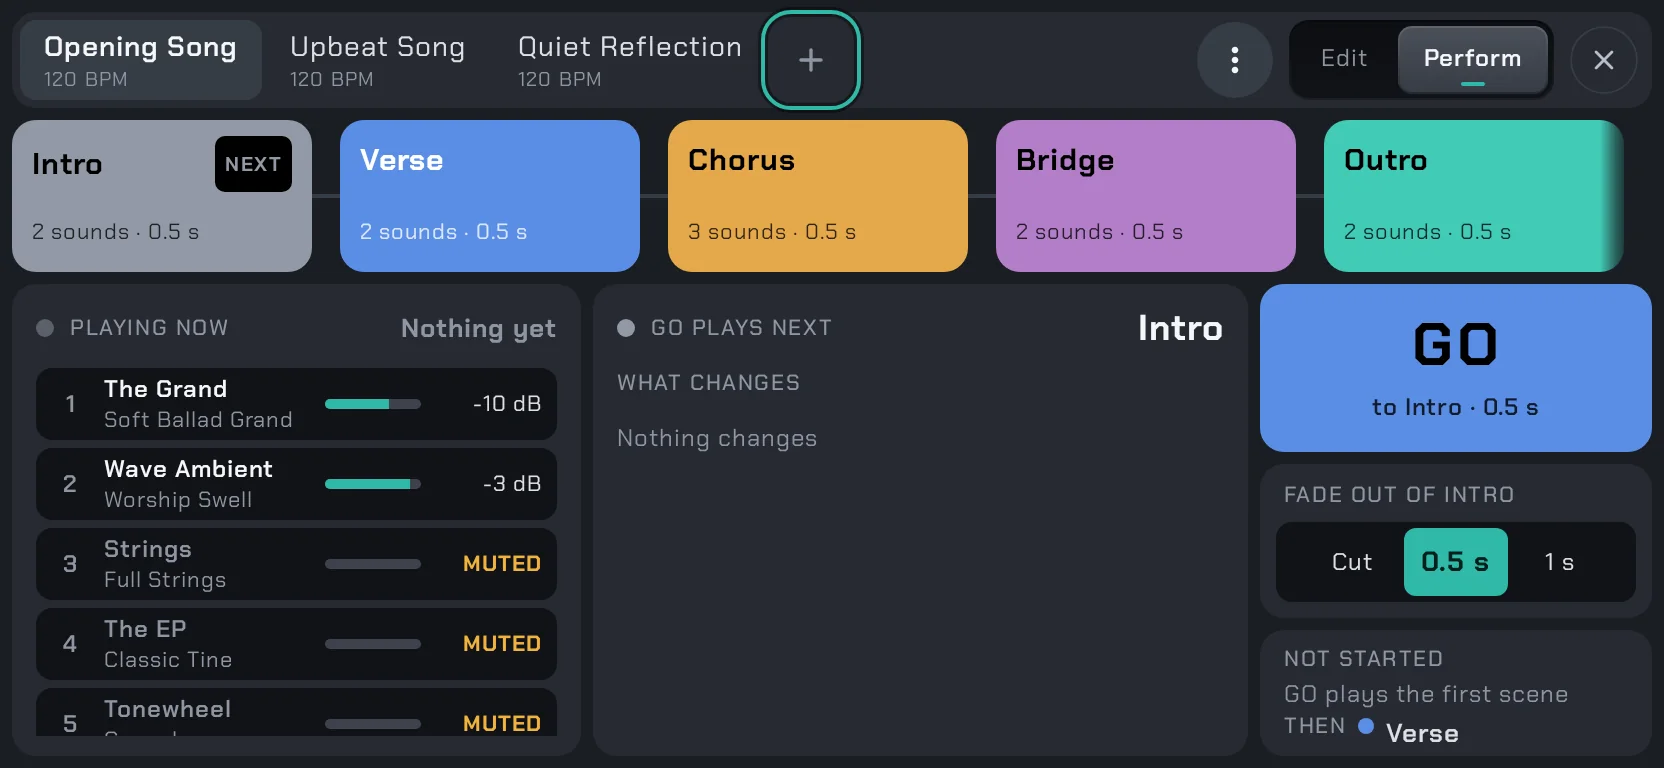
1 · Add a song with + on the Scenes page.
-
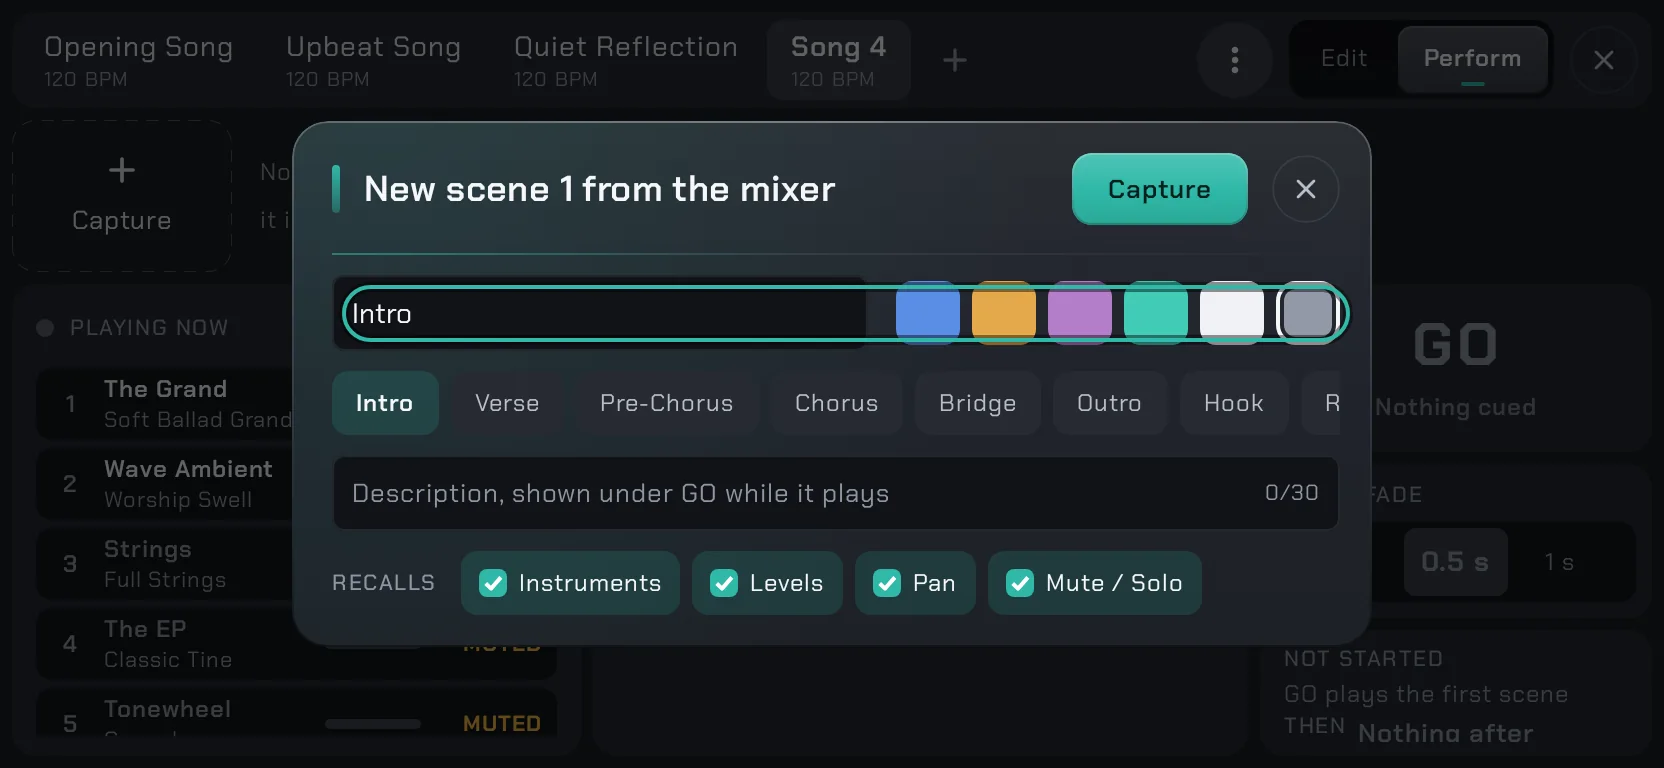
2 · Set the mixer up for the intro, then tap + Capture. Give the scene a name and a colour, and tap Capture.
-
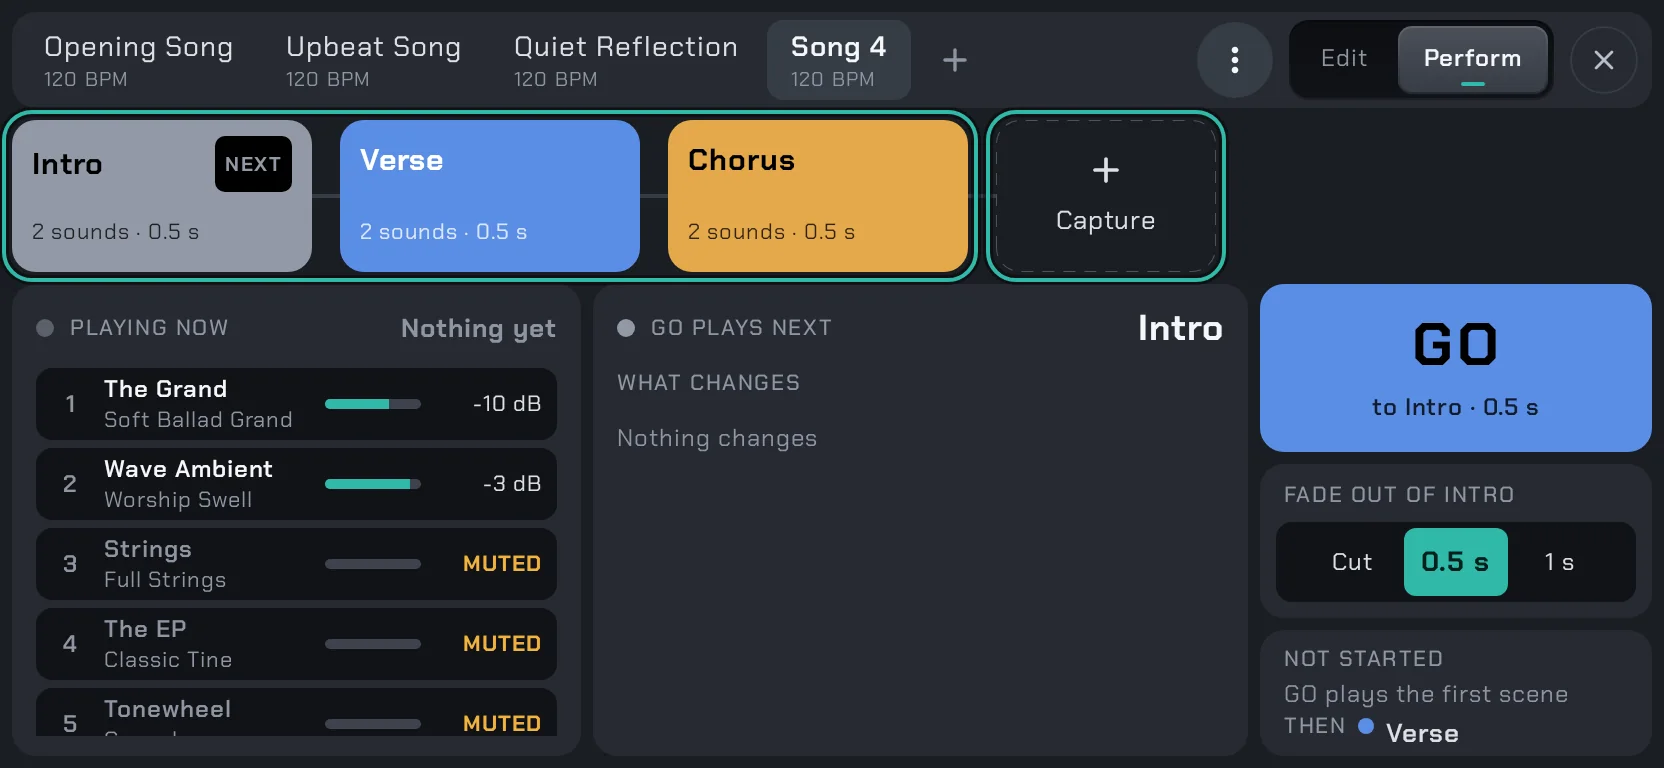
3 · Do the same for the verse and the chorus, one scene each.
Step 1 of 3
04 · BUILDING A SET
Your first song, in scenes
- Add a song with + on the Scenes page.
- Set the mixer up the way you want the intro, then tap + Capture. Give the scene a name and a colour, and tap Capture.
- Do the same for the verse and the chorus, one scene each. Then cue the intro, press GO, and back on the mixer set the song’s key with SONG KEY in the bottom bar. The key stays with the song.
-
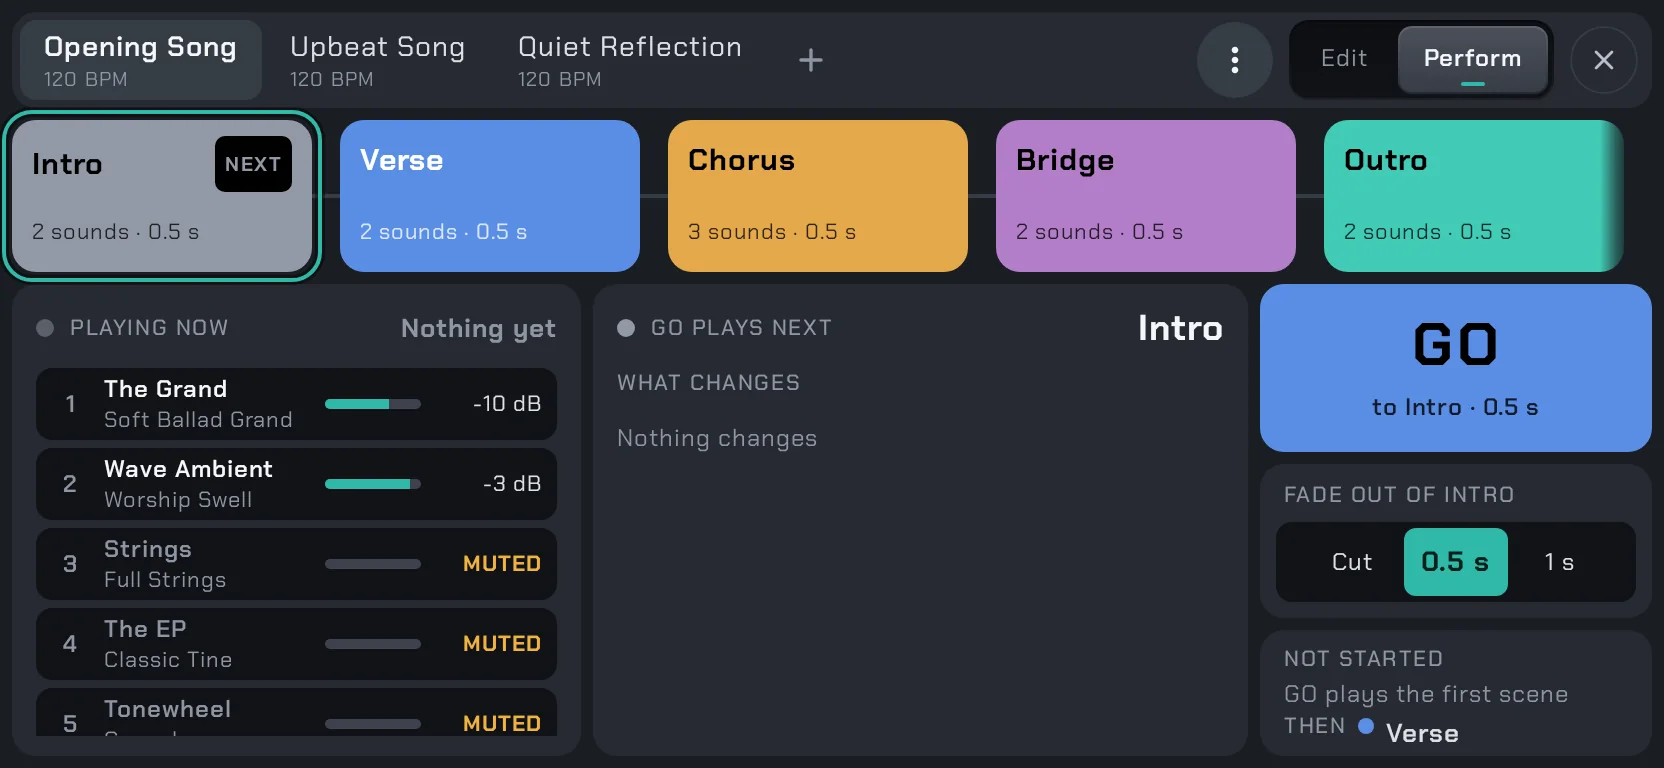
1 · In Perform, tap the first scene to cue it.
-
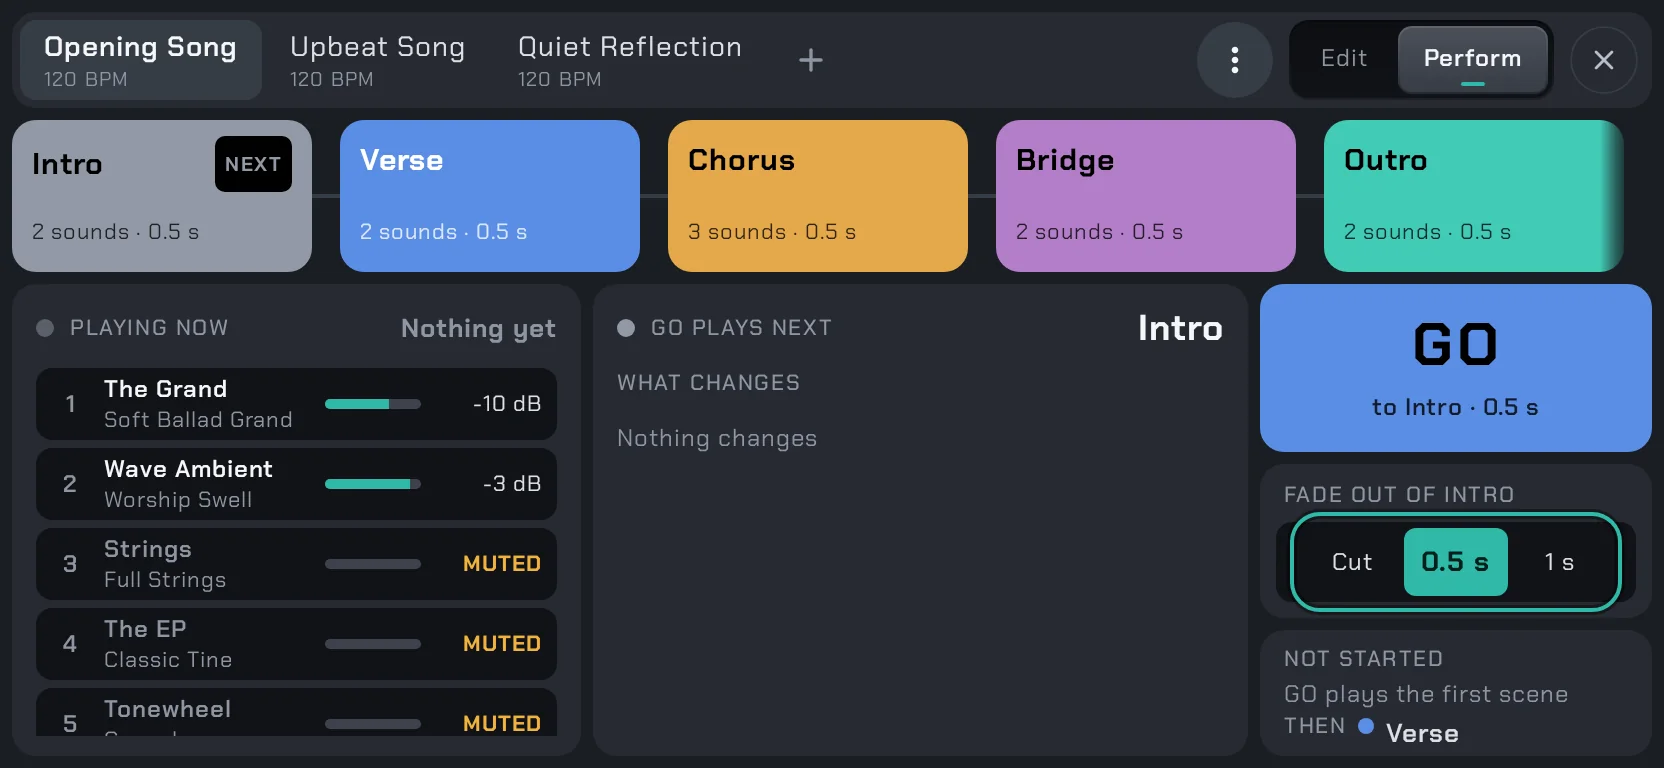
2 · Choose how GO fades: Cut when the band hits together, or swipe along to two to four seconds when you want it to swell.
-
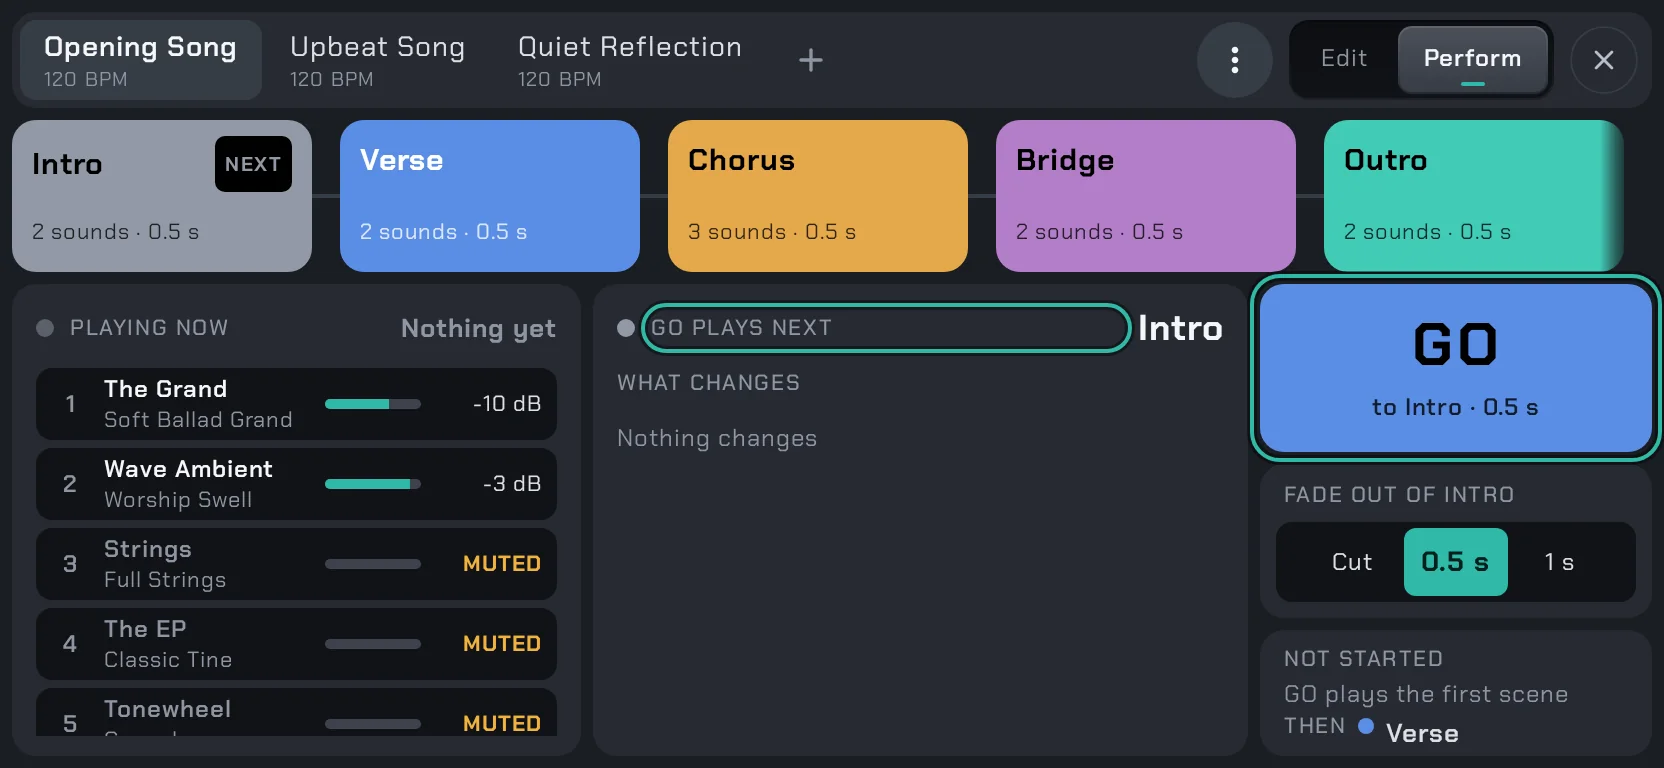
3 · Check GO PLAYS NEXT for what’s about to change, then press GO.
-
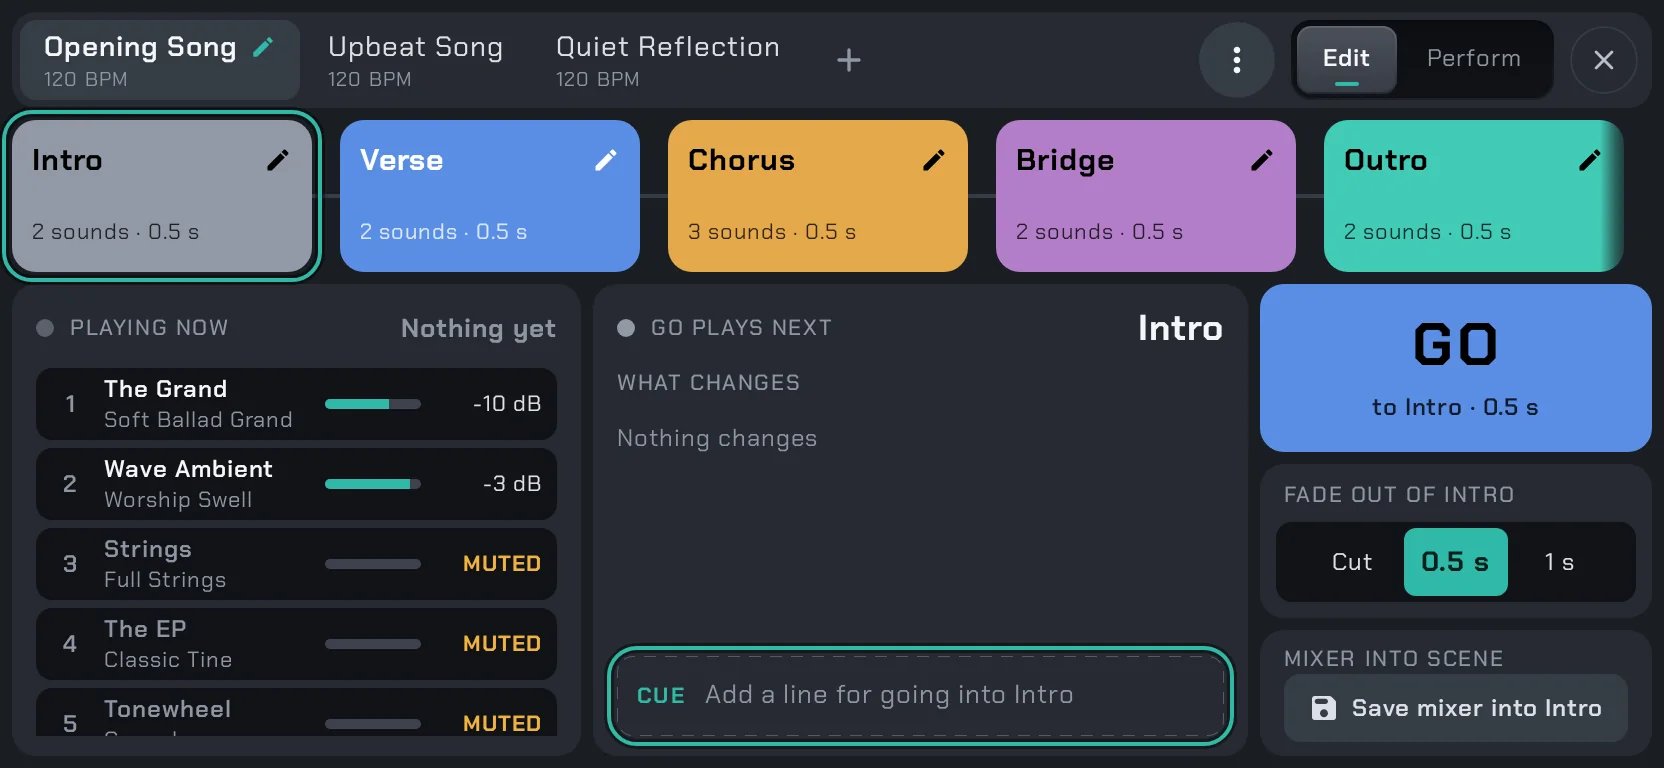
4 · In Edit, write each scene’s cue line under CUE, and tap its card for the words to show under GO.
Step 1 of 4
05 · BUILDING A SET
Playing a song with GO
- In Perform, tap the first scene to cue it.
- Choose how GO fades: a cut when the band hits together, two to four seconds when you want it to swell.
- Check GO PLAYS NEXT to see what’s about to change, then press GO.
- In Edit, give each scene a cue line and a few words to show under GO, so you always know where you are.
-
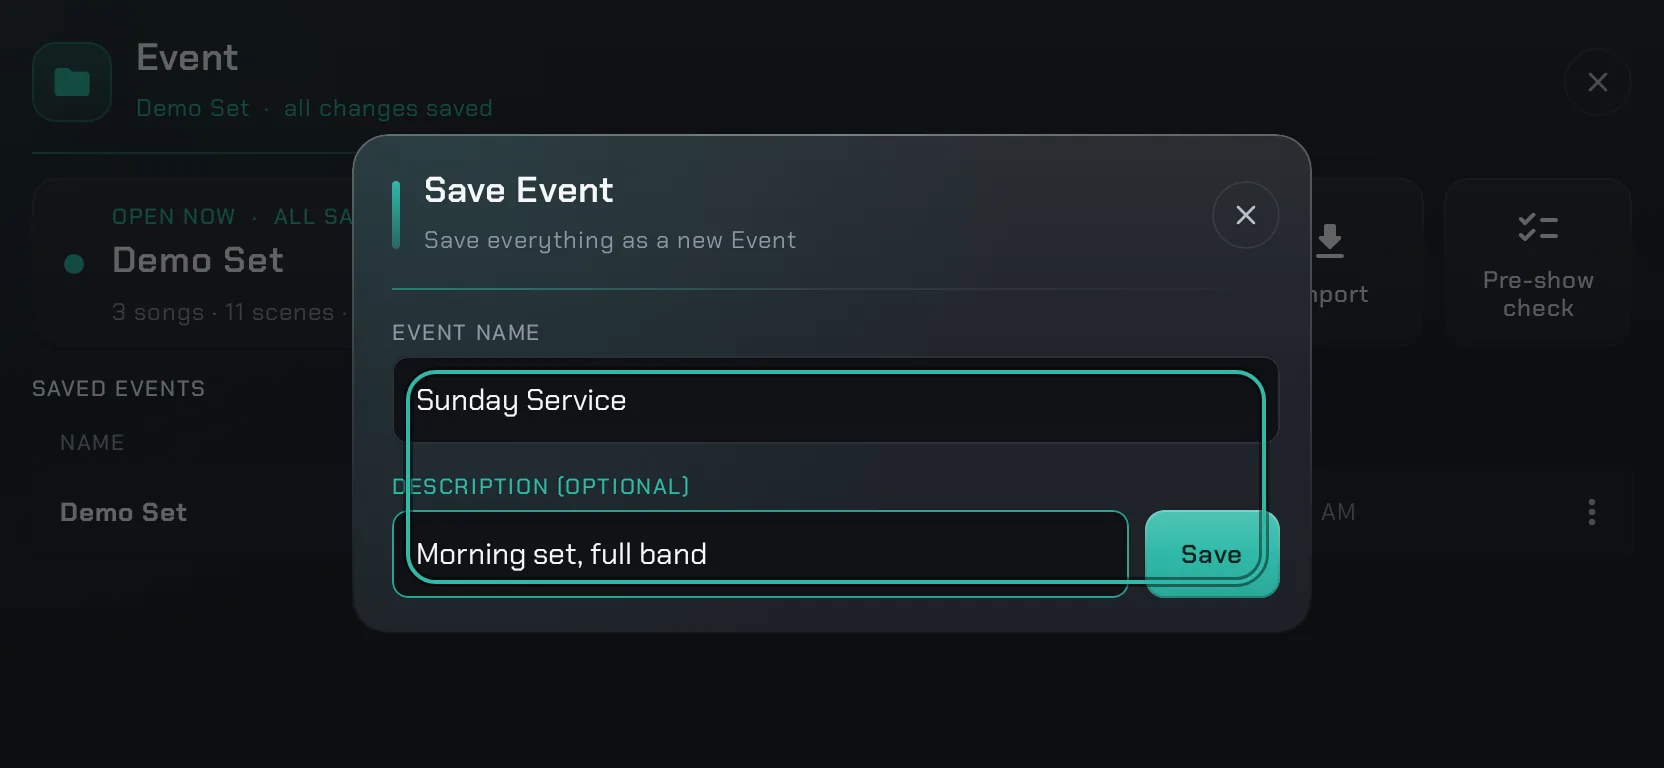
1 · Save the session as a new Event with a short description, so you’ll recognise it later.
-
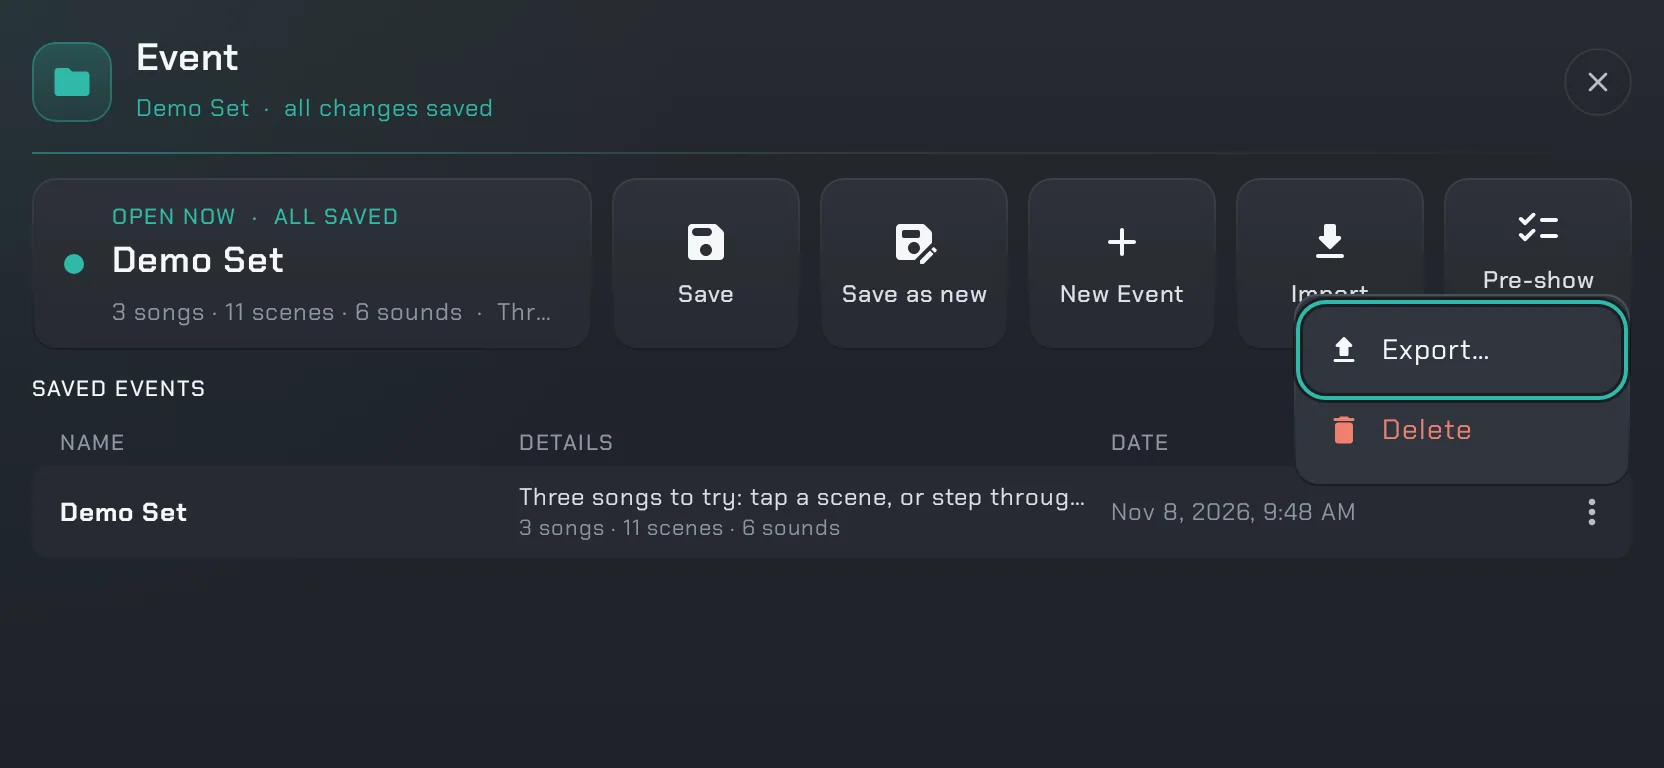
2 · With Pro, tap Export… in a saved Event’s ⋮ menu and send the file to whoever’s covering keys.
-
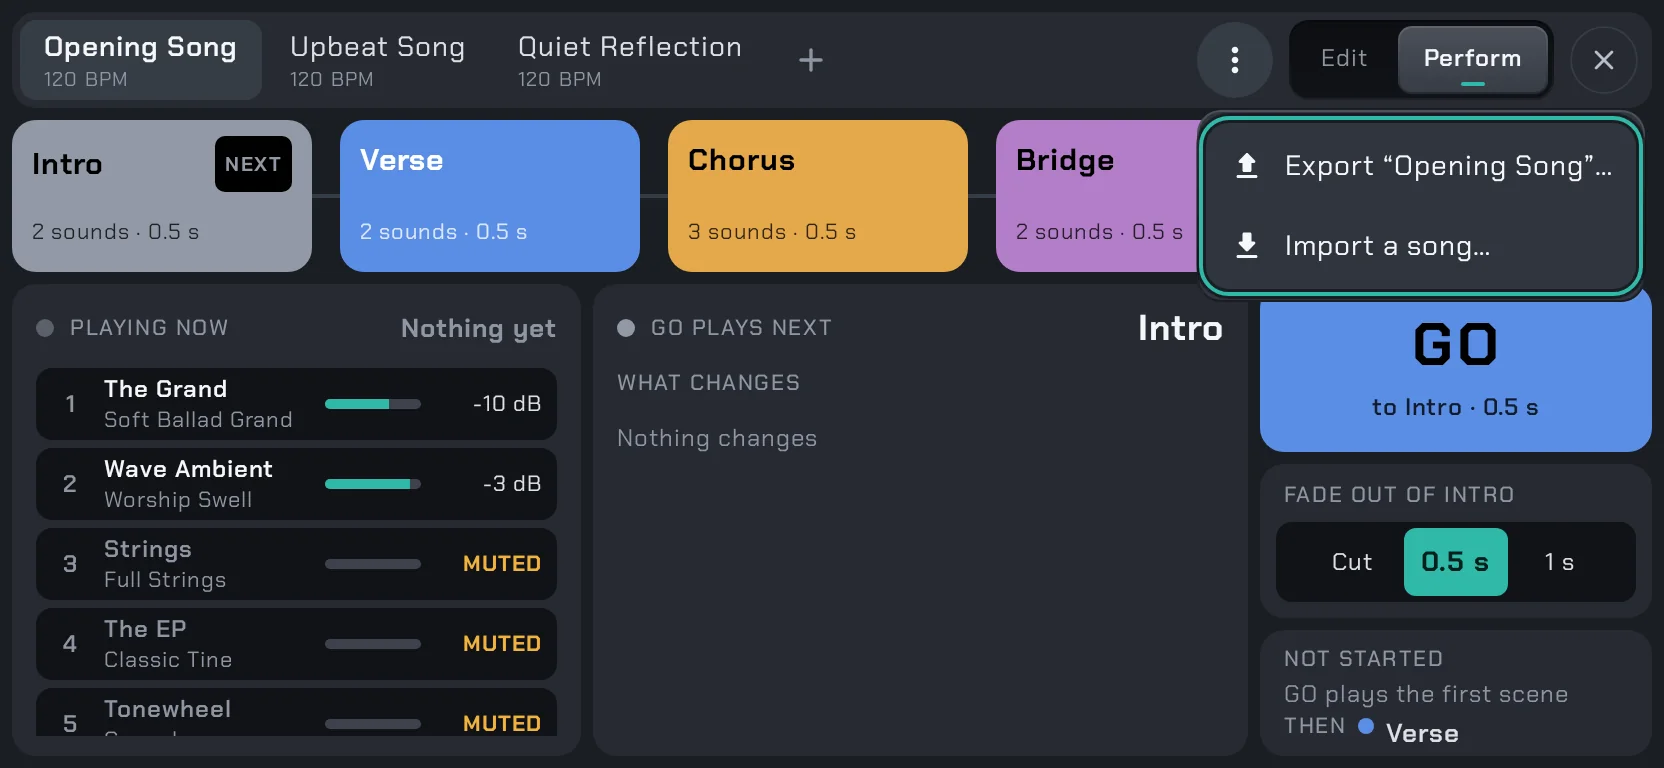
3 · With Pro, export a single song as a .wssong from the Scenes page’s ⋮ menu. Importing is free: bring it into next week’s Event the same way.
Step 1 of 3
06 · BUILDING A SET
Save, share and reuse
- On the Event page, tap Save as new, then give it a name and a short description, so you’ll recognise it later.
- With Pro, tap Export… in the saved Event’s ⋮ menu and send the file to another player, say when someone else is covering keys.
- With Pro, export a single song as a .wssong from the Scenes page’s ⋮ menu. Importing is free: bring it into next week’s Event the same way.
Shaping the sound
-
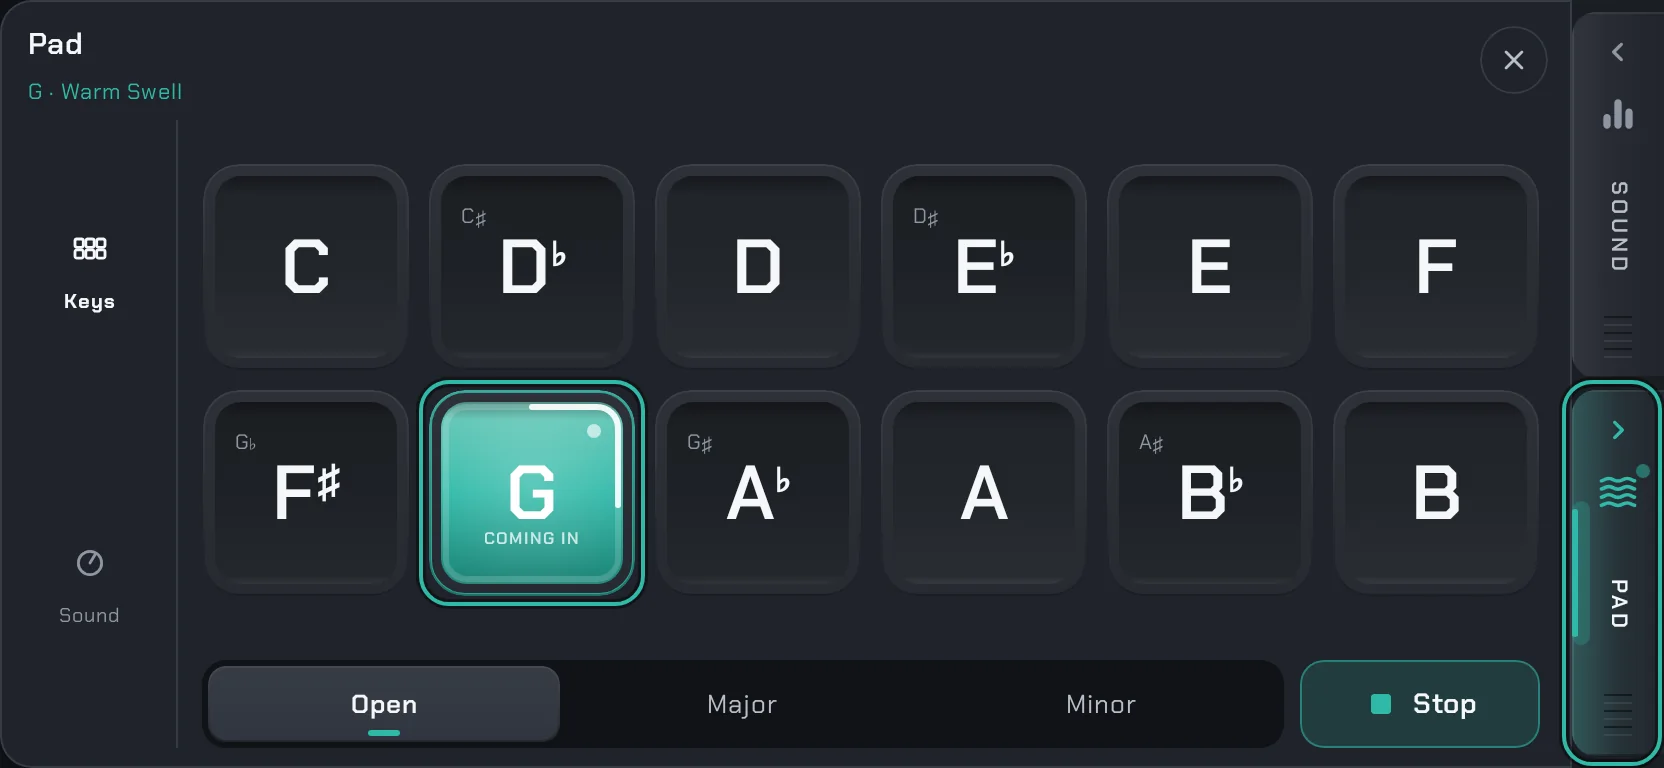
1 · Open Drawer 2 with the PAD handle at the screen’s right edge, then tap G. It lights up and comes in.
-
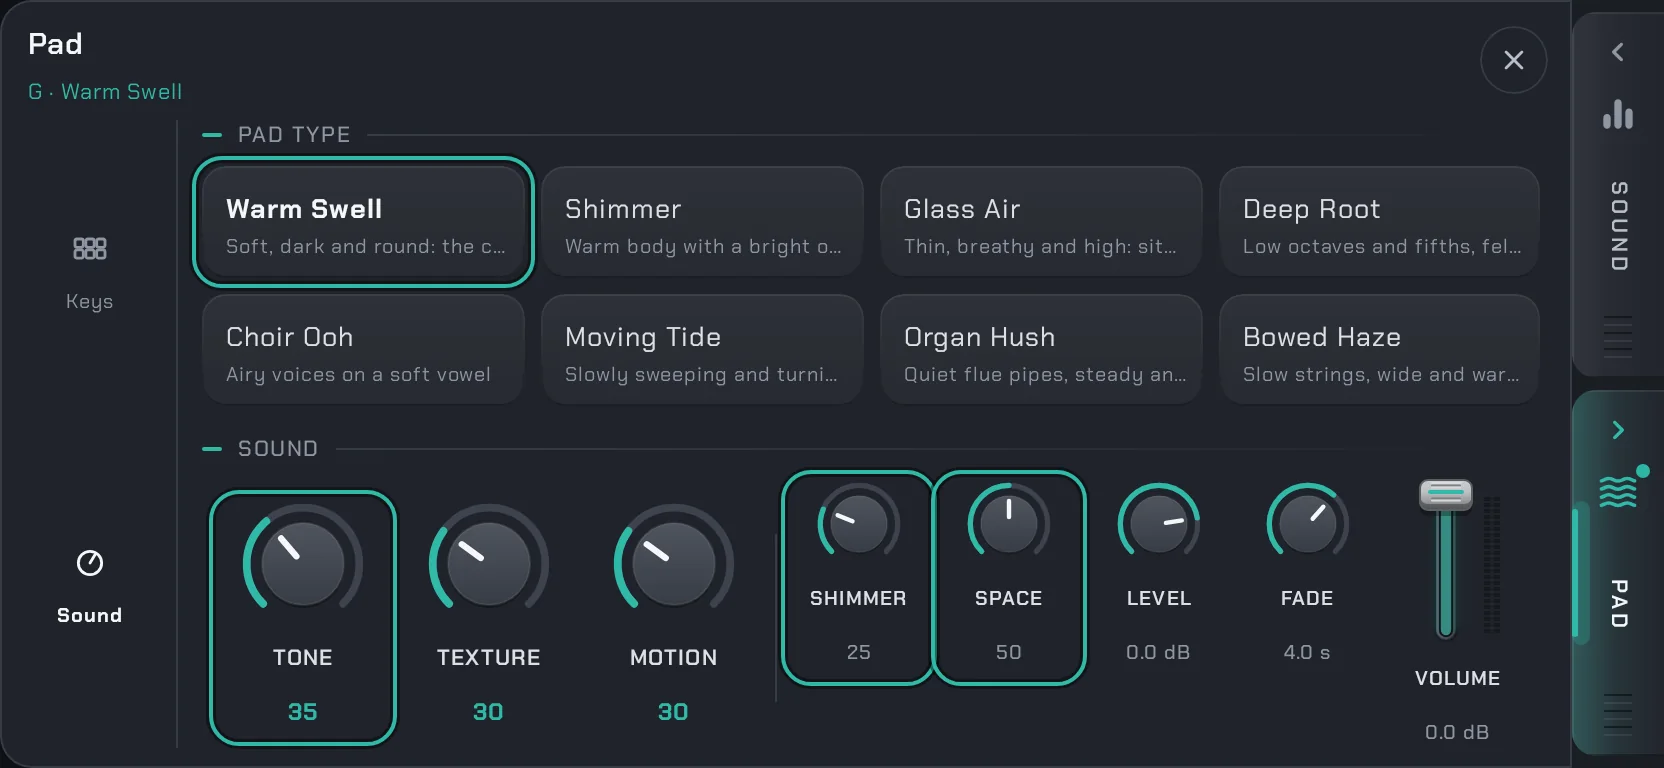
2 · Tap Sound, pick a pad type, then set TONE, SHIMMER and SPACE until it sits right in the room.
-
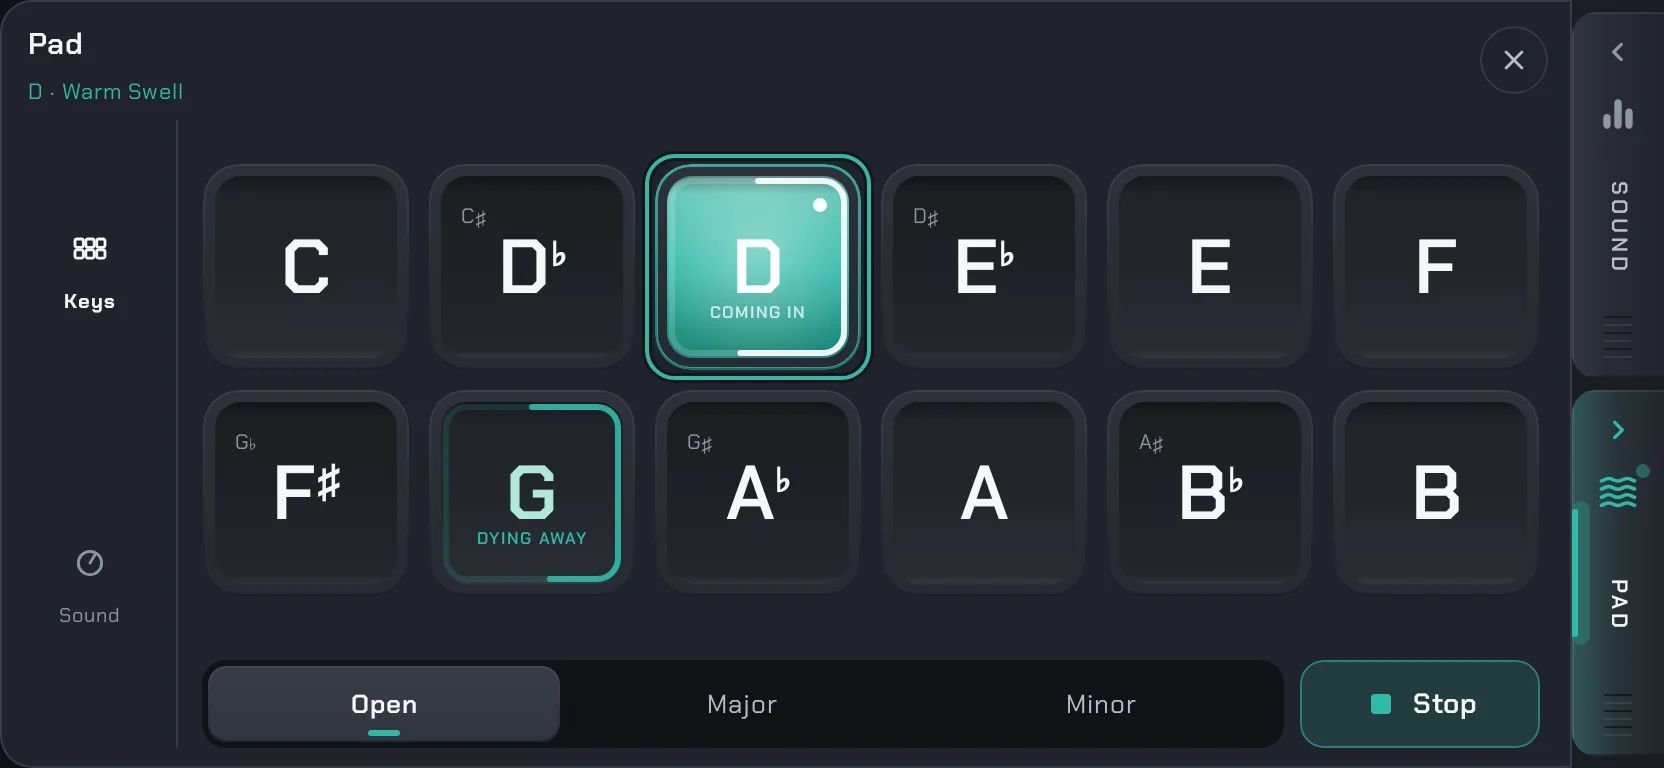
3 · When the song changes key, tap Keys, then D. It comes in while G dies away underneath.
Step 1 of 3
07 · SOUND
A pad under the whole set
- Tap the PAD handle at the right edge, then tap G.
- Pick a pad type in Sound, then set TONE, SHIMMER and SPACE until it sits right in the room.
- When the song changes key, tap Keys, then D. G fades out underneath.
-
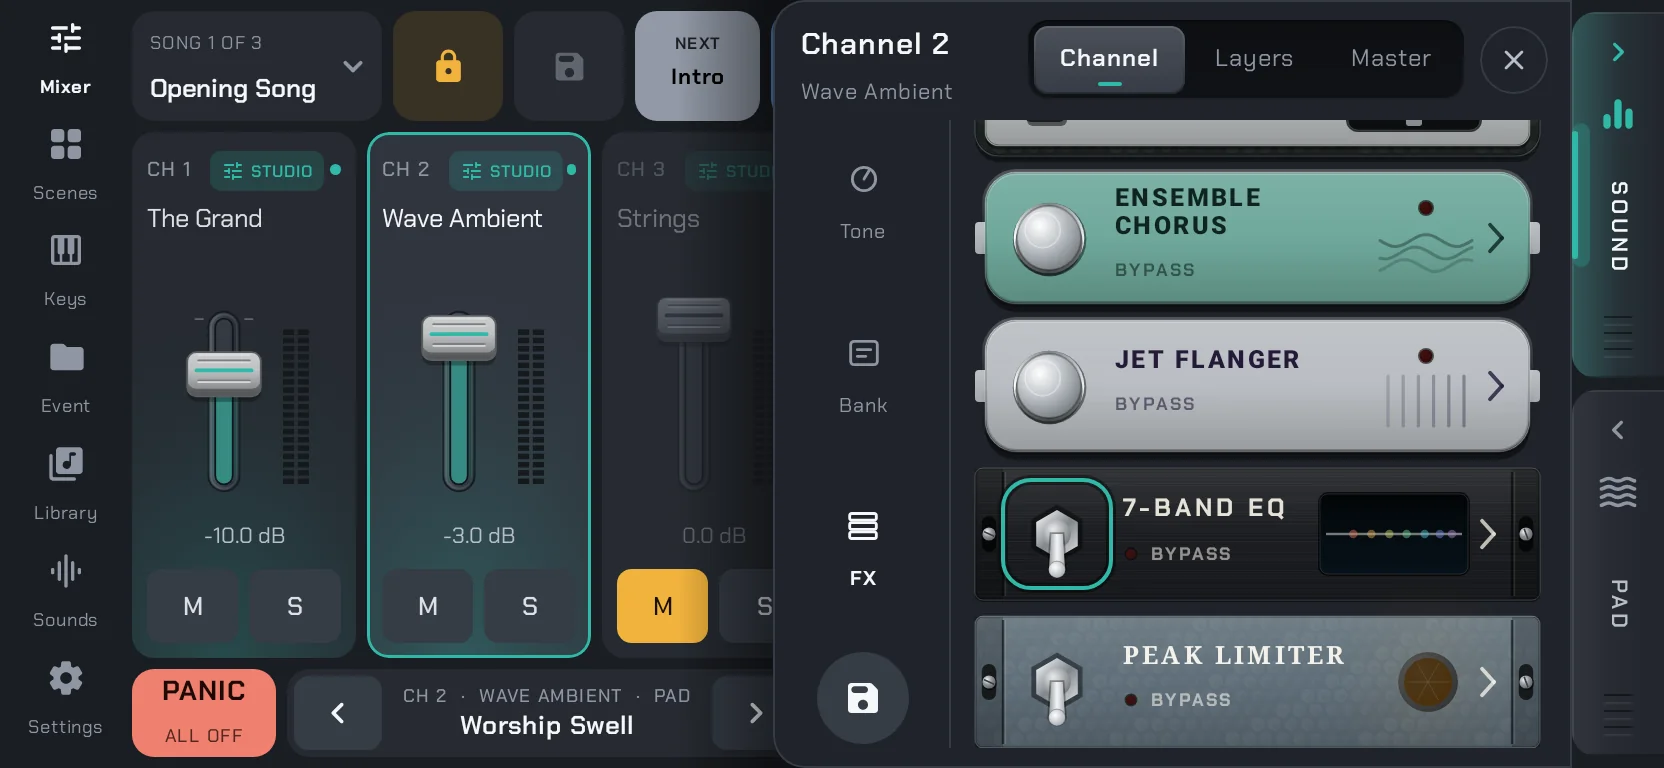
1 · Select the pad’s channel (Wave Ambient on the Demo Set), open SOUND › FX, and switch on the 7-BAND EQ near the foot of the rack.
-
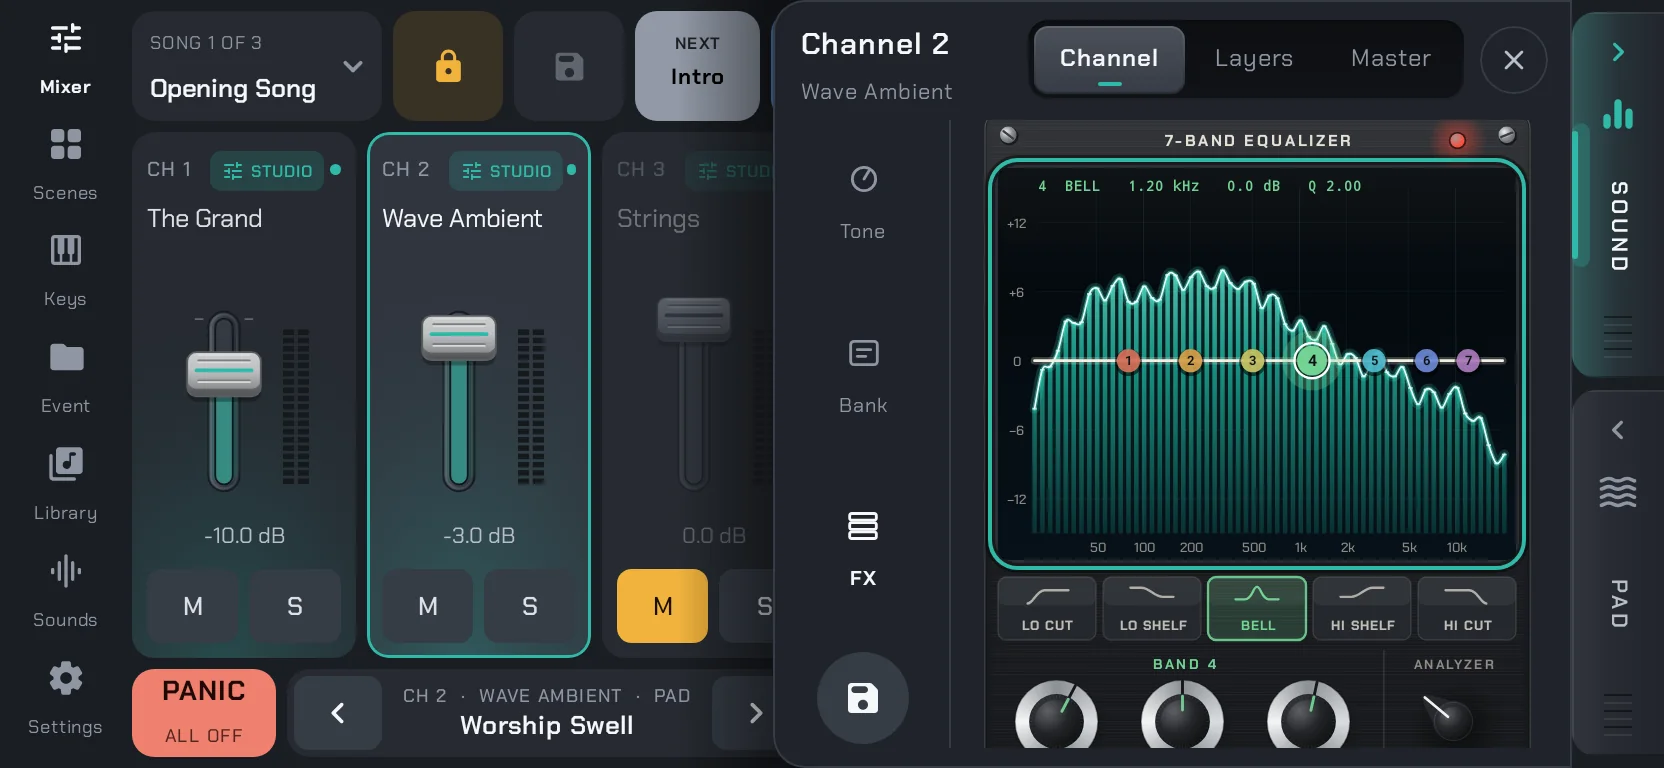
2 · Open the EQ’s page, then play along with the piano and keep an eye on the analyzer.
-
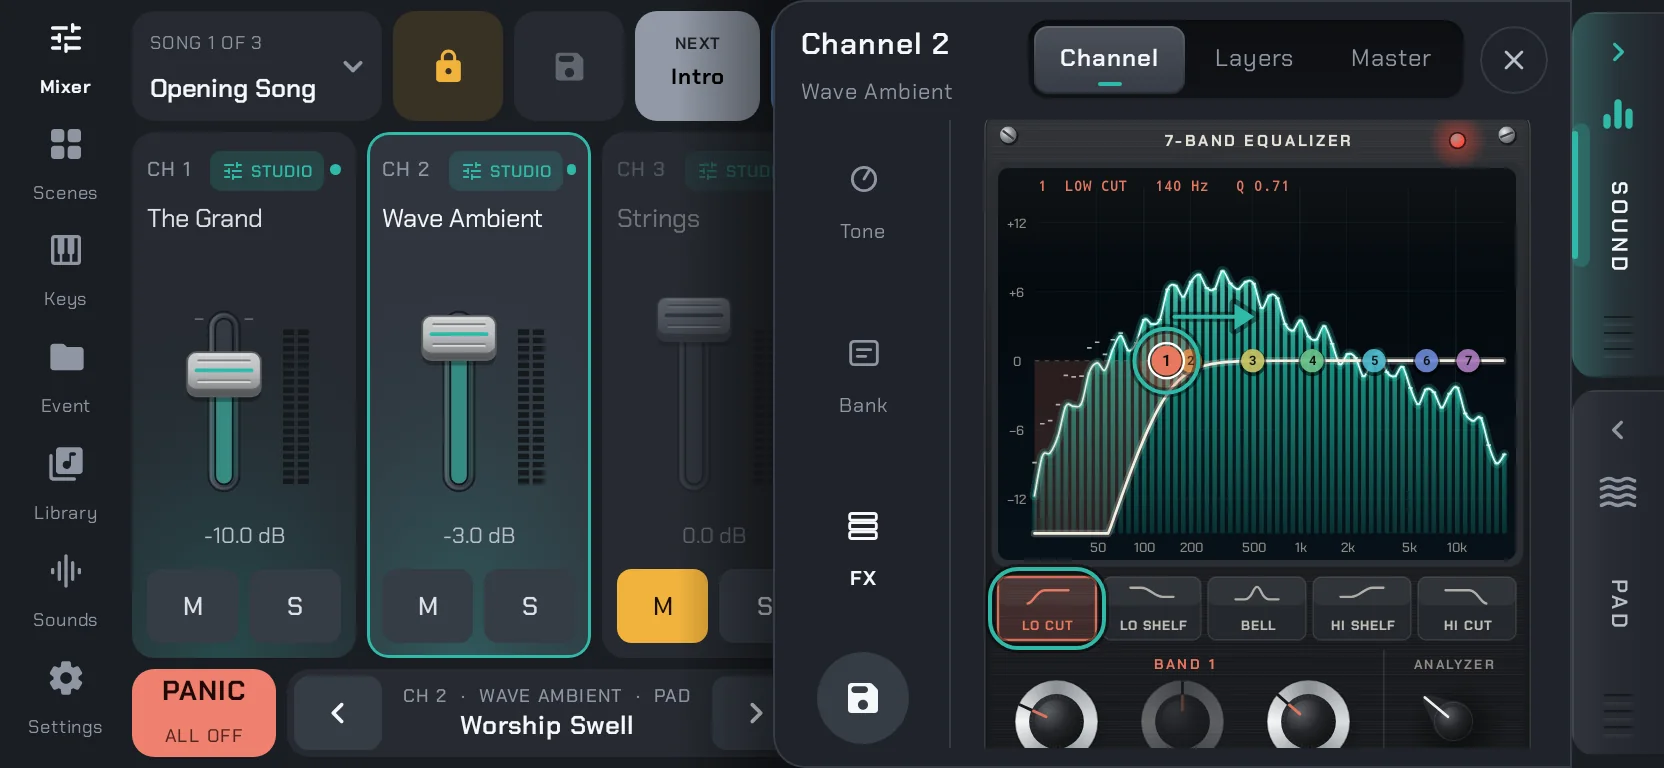
3 · Tap point 1, choose LO CUT, and drag it to the right until the pad stops getting in the way of the bass (140 Hz here).
Step 1 of 3
08 · SOUND
Making room with the EQ
- Tap the pad’s channel (CH 2 on the Demo Set), tap the SOUND handle, then FX, and switch on the 7-BAND EQ near the foot of the rack.
- Tap the EQ’s strip to open its page, then play along with the piano and keep an eye on the analyzer.
- Tap point 1, choose LO CUT, and drag it to the right until the pad stops getting in the way of the bass.
-
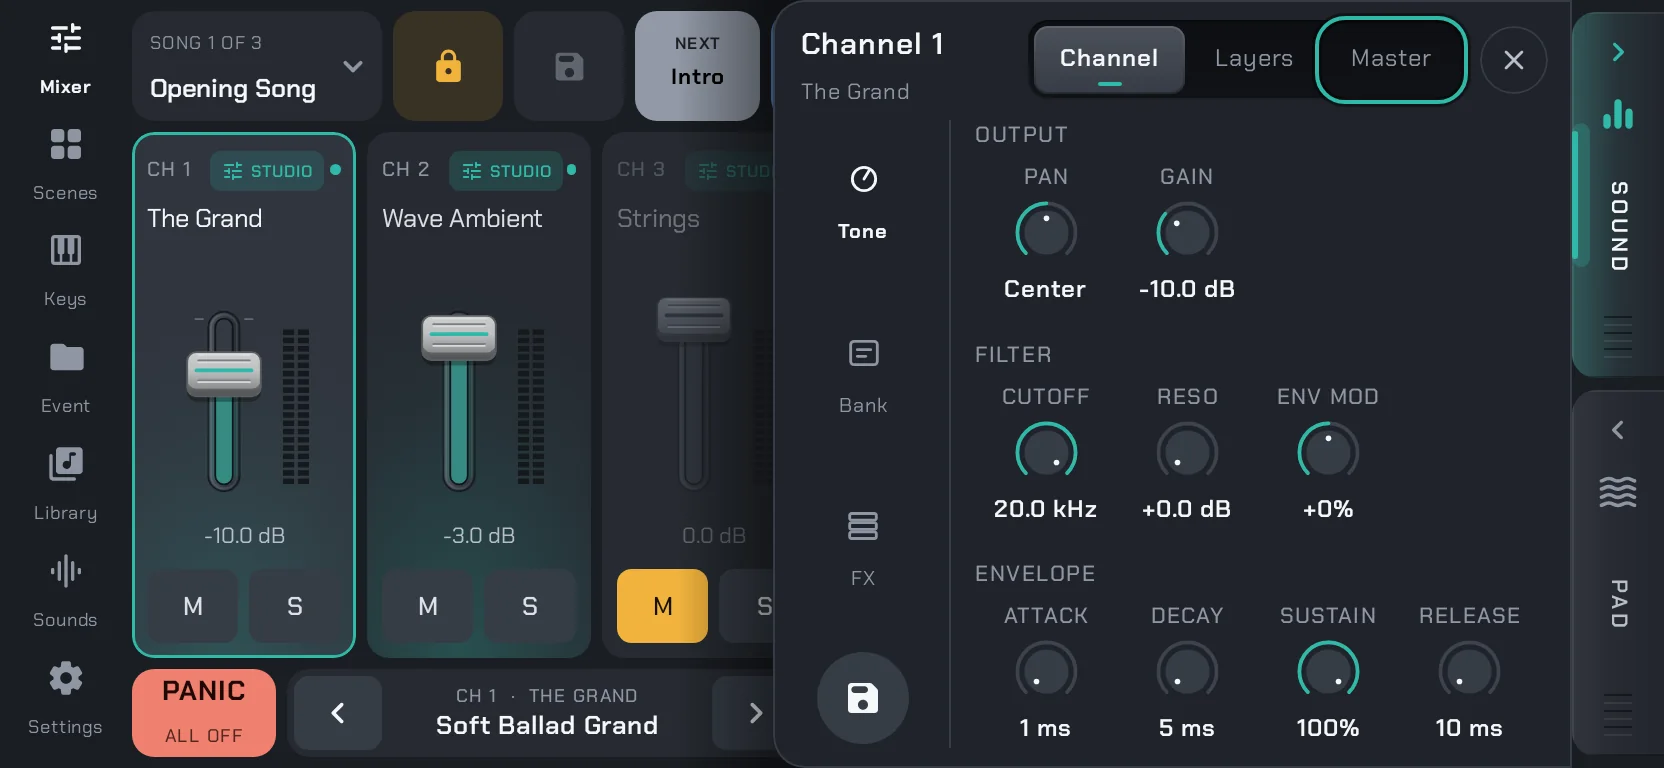
1 · Tap the SOUND handle at the right edge, then Master, and play your busiest, thickest layer.
-
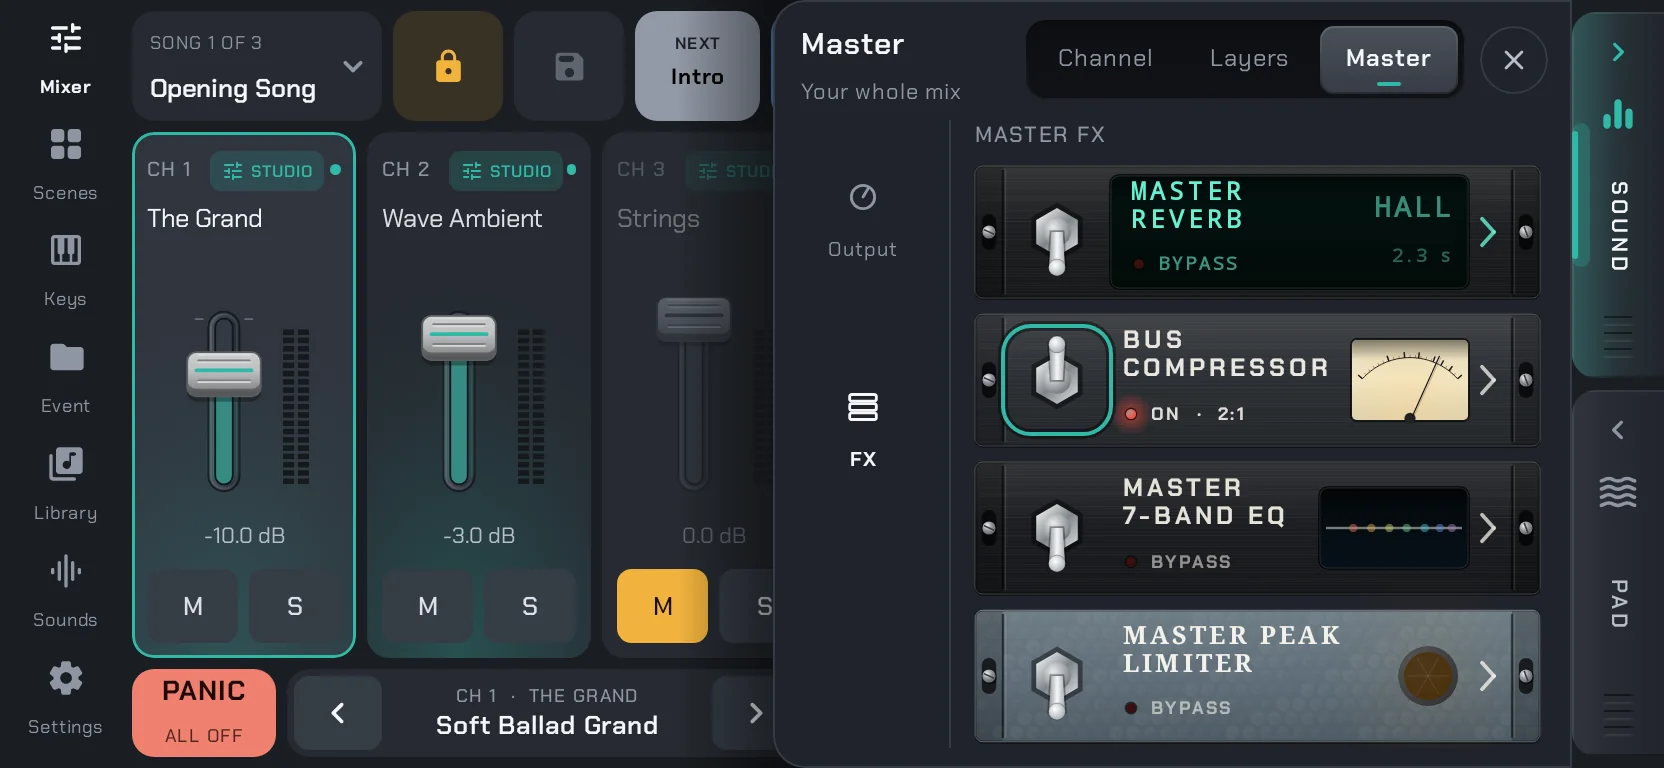
2 · Tap FX, then switch on the Bus Compressor and listen to the layer pull together. It’s level-matched, so the volume won’t jump.
-
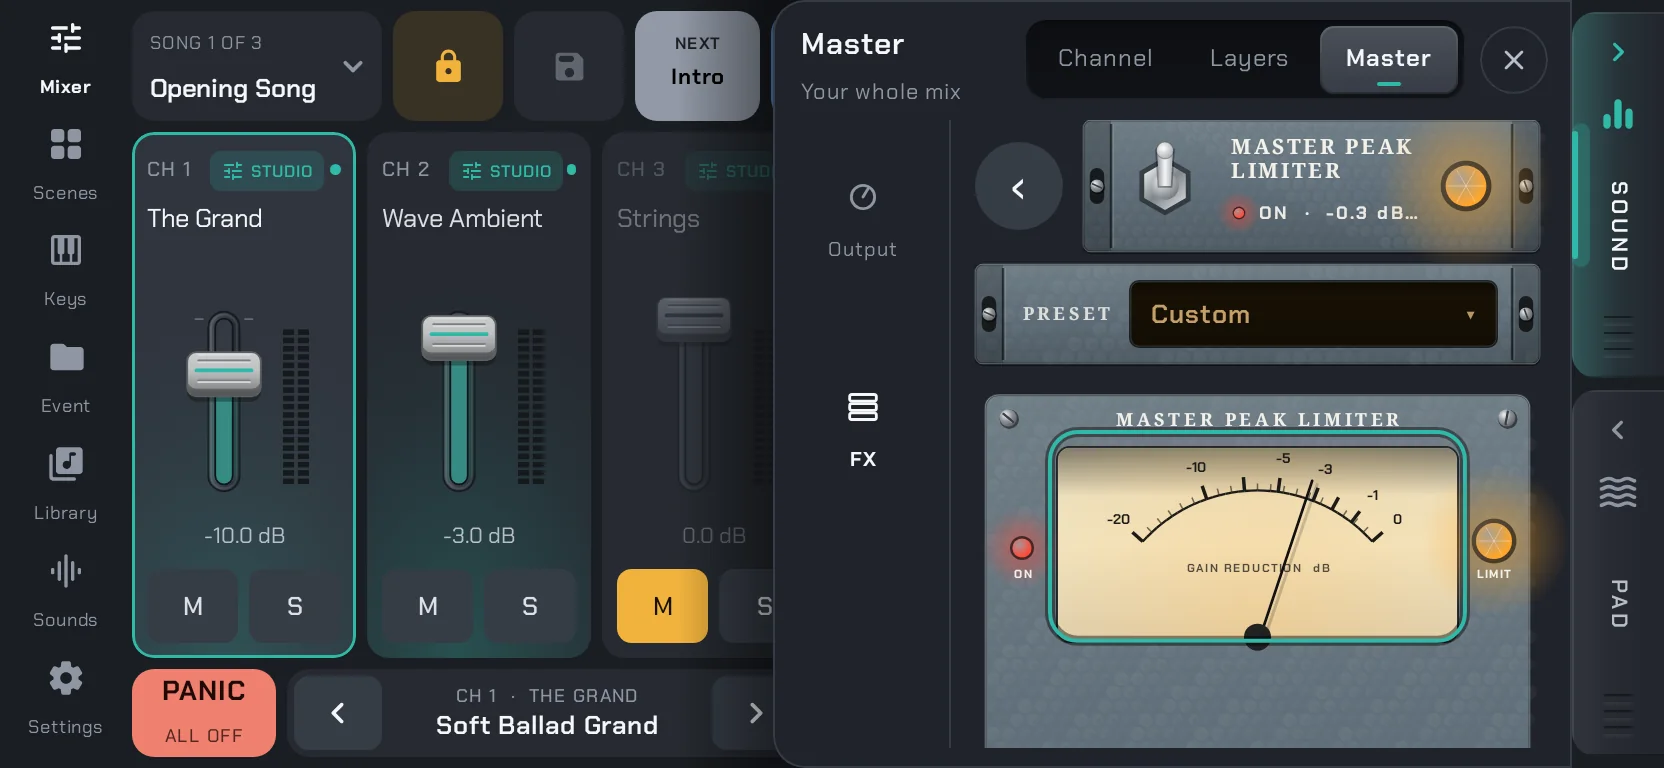
3 · Switch on the Limiter and tap its strip to open it: the meter shows how much it’s catching.
Step 1 of 3
09 · SOUND
Glue the mix on the Master page
- Tap the SOUND handle at the right edge, then Master, and play your busiest, thickest layer.
- Tap FX, switch on the Bus Compressor and listen to the layer pull together. It’s level-matched, so the volume won’t jump.
- Switch on the Limiter and tap its strip: the meter shows how much it’s catching.
Controllers and the stage
-
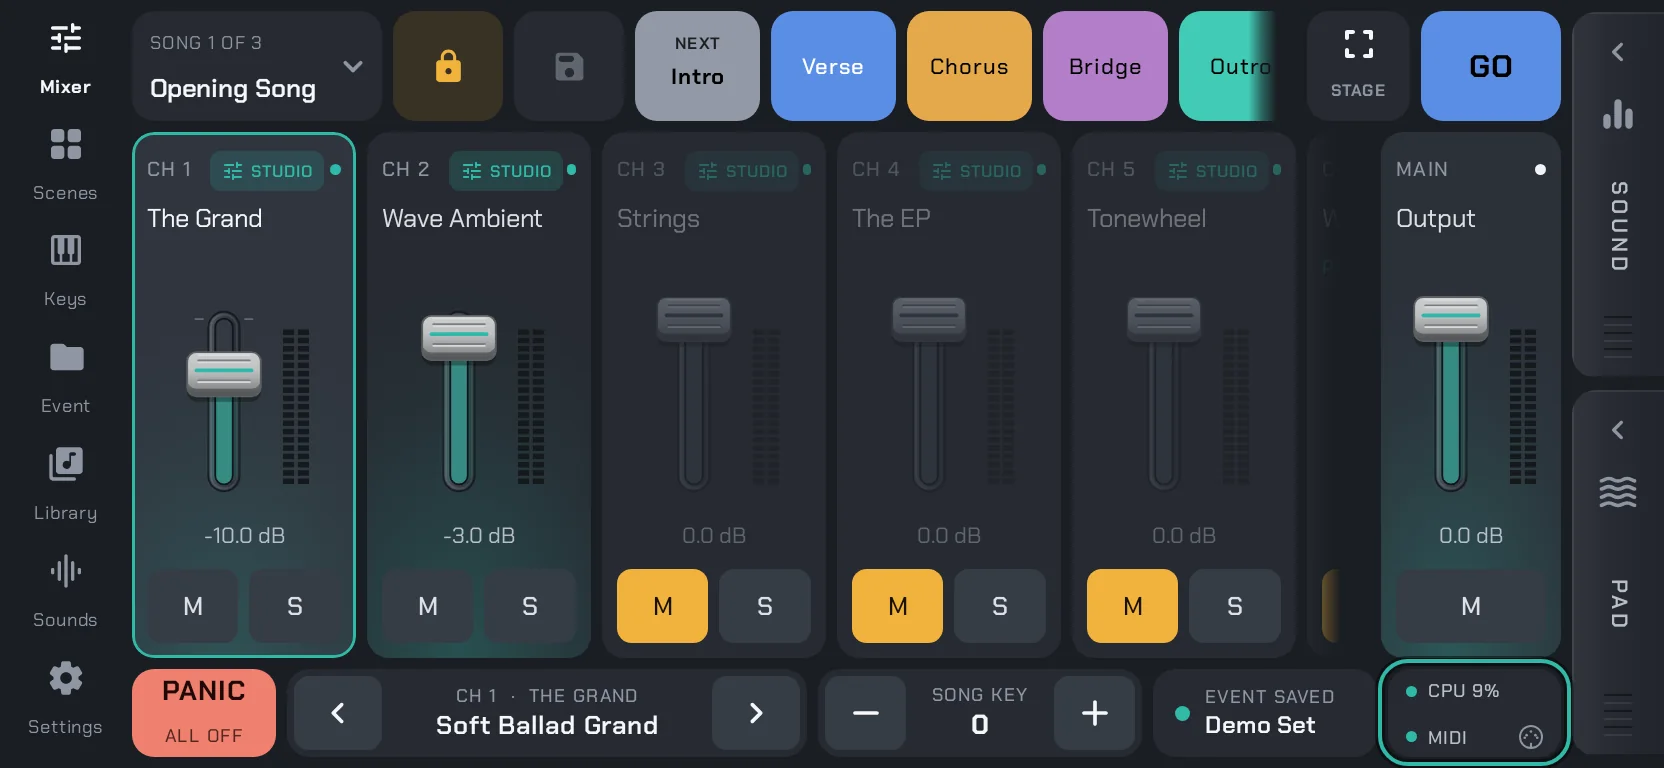
1 · Tap the status tile at the right end of the bottom bar, the one with the CPU and MIDI lights. The screen greys out, and everything you can assign gets an outline.
-
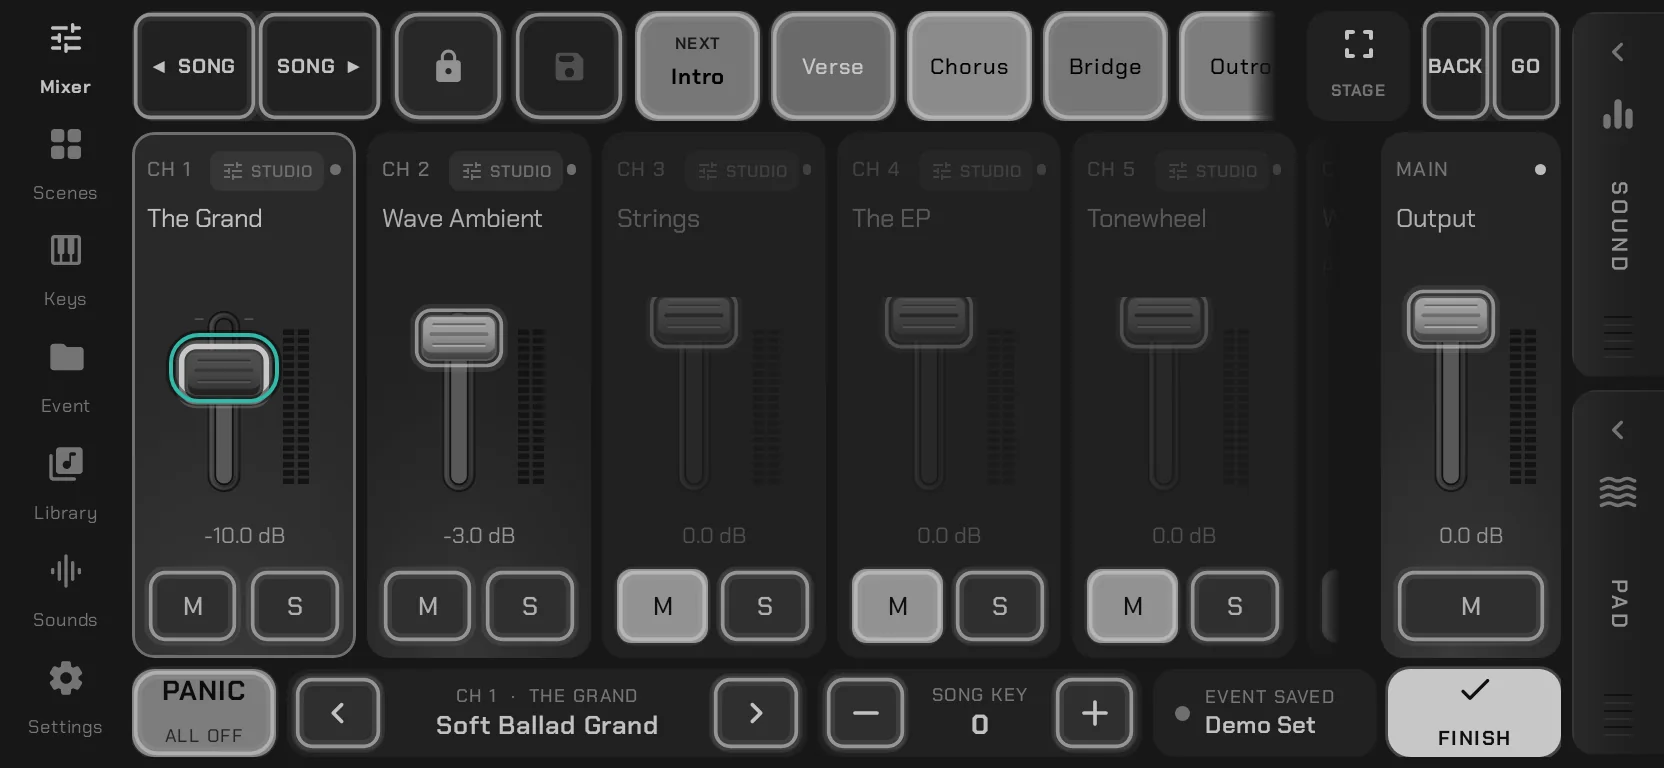
2 · Tap channel 1’s fader. Its outline pulses while it waits: move a fader on your controller, and that fader drives it from now on.
-
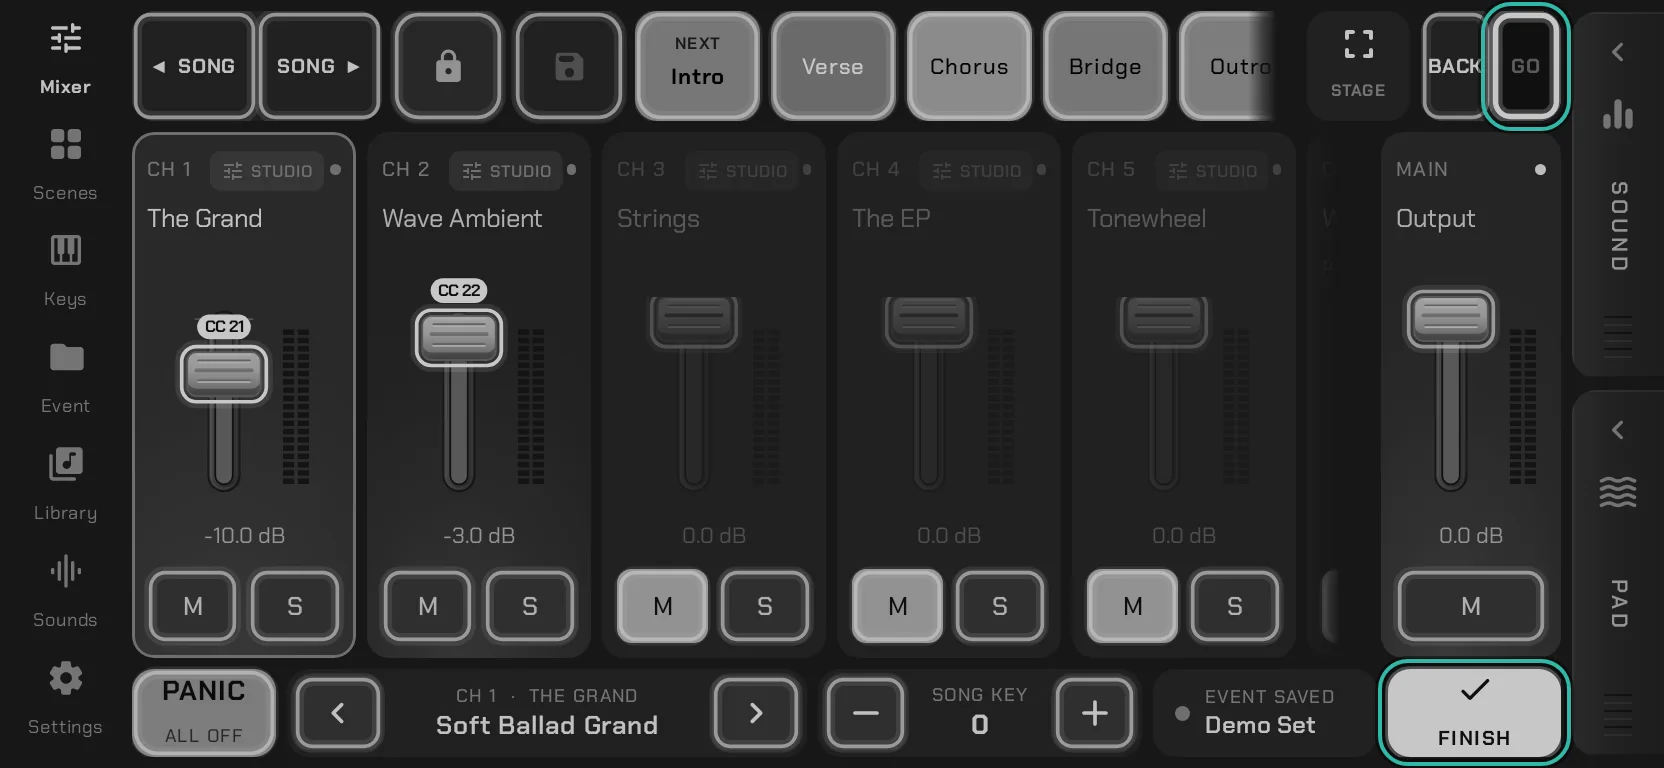
3 · Do the same for the other channels, then tap GO (in MIDI Assign it splits into BACK and GO) and press a pad. Tap FINISH, on the same tile, and you can mix without touching the screen.
Step 1 of 3
10 · CONTROLLERS
Faders on your controller
- Tap the status tile (CPU and MIDI) at the right end of the bottom bar.
- Tap channel 1’s fader, then move a fader on your controller.
- Do the same for the other channels, then tap GO and press a pad. Tap FINISH, on the same tile, and you can mix without touching the screen.
-
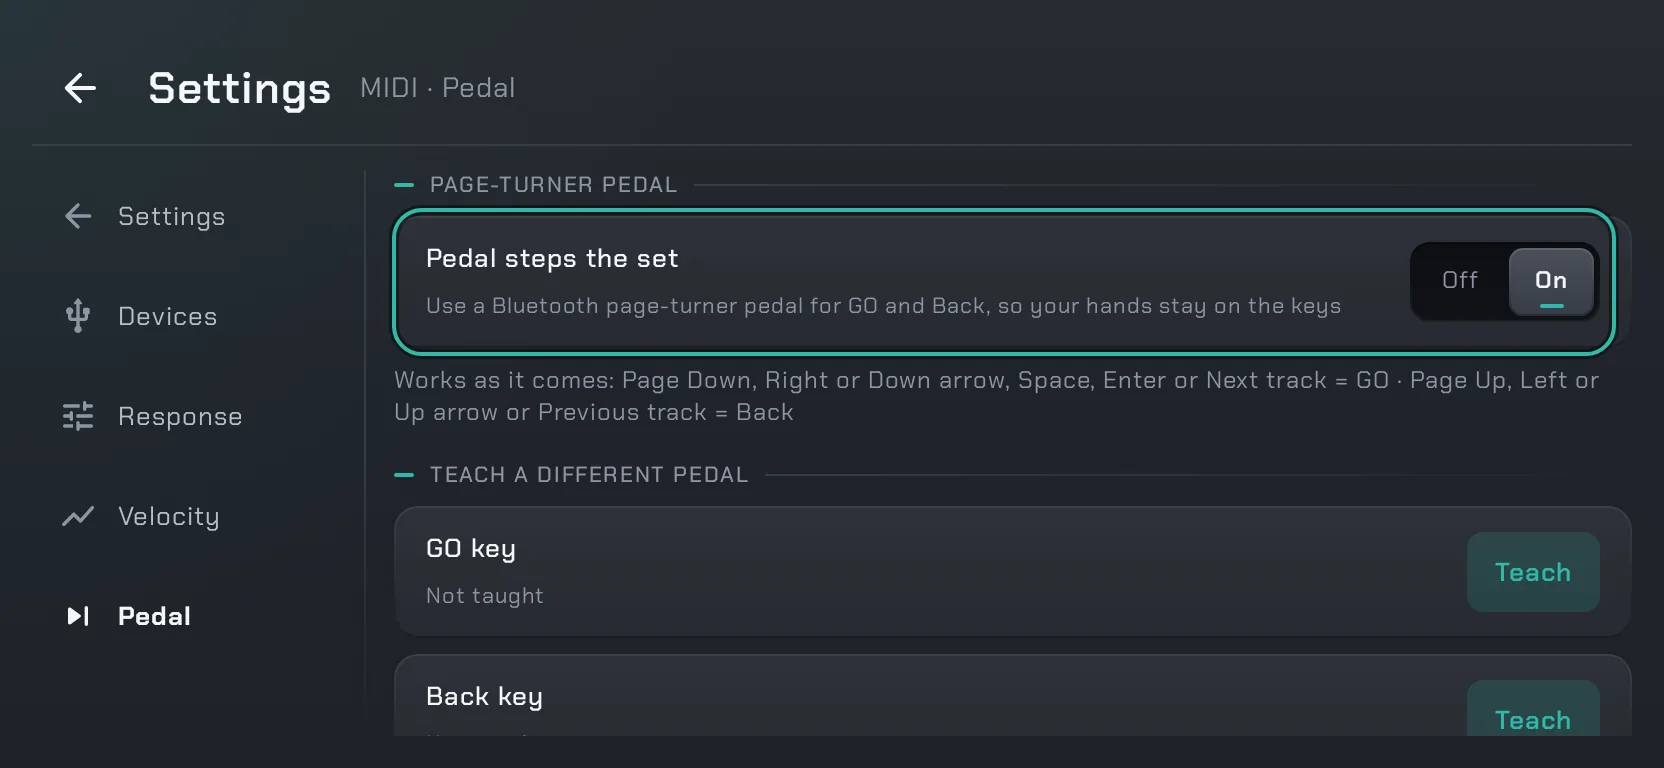
1 · Pair your Bluetooth page-turner pedal with the phone, then open Settings › MIDI › Pedal. “Pedal steps the set” is already on.
-
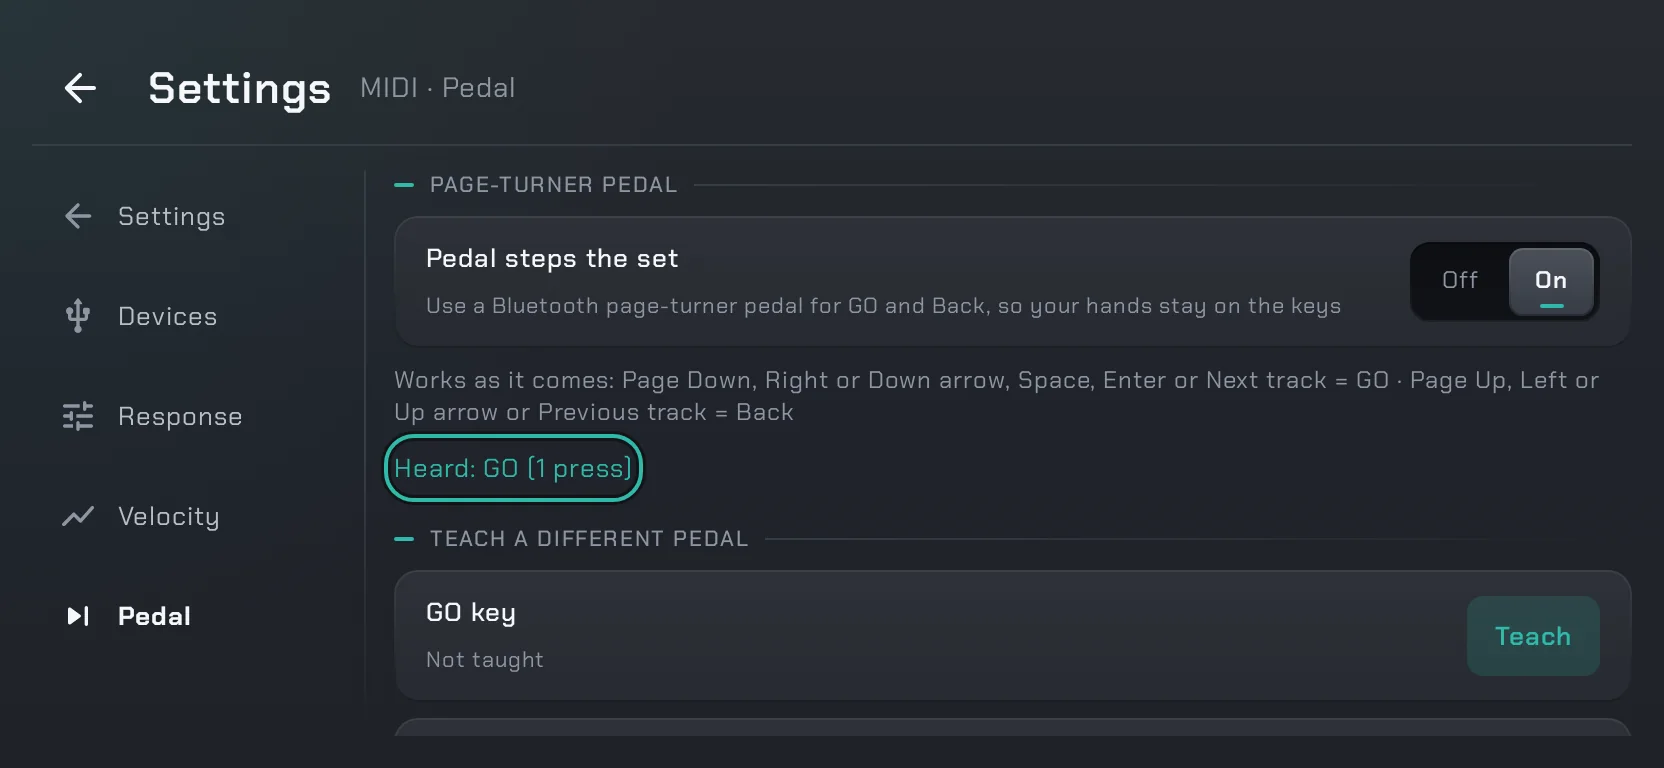
2 · Give it a press. Page Down, the arrow keys and the media keys work as GO and Back straight away, and the page shows what it heard.
-
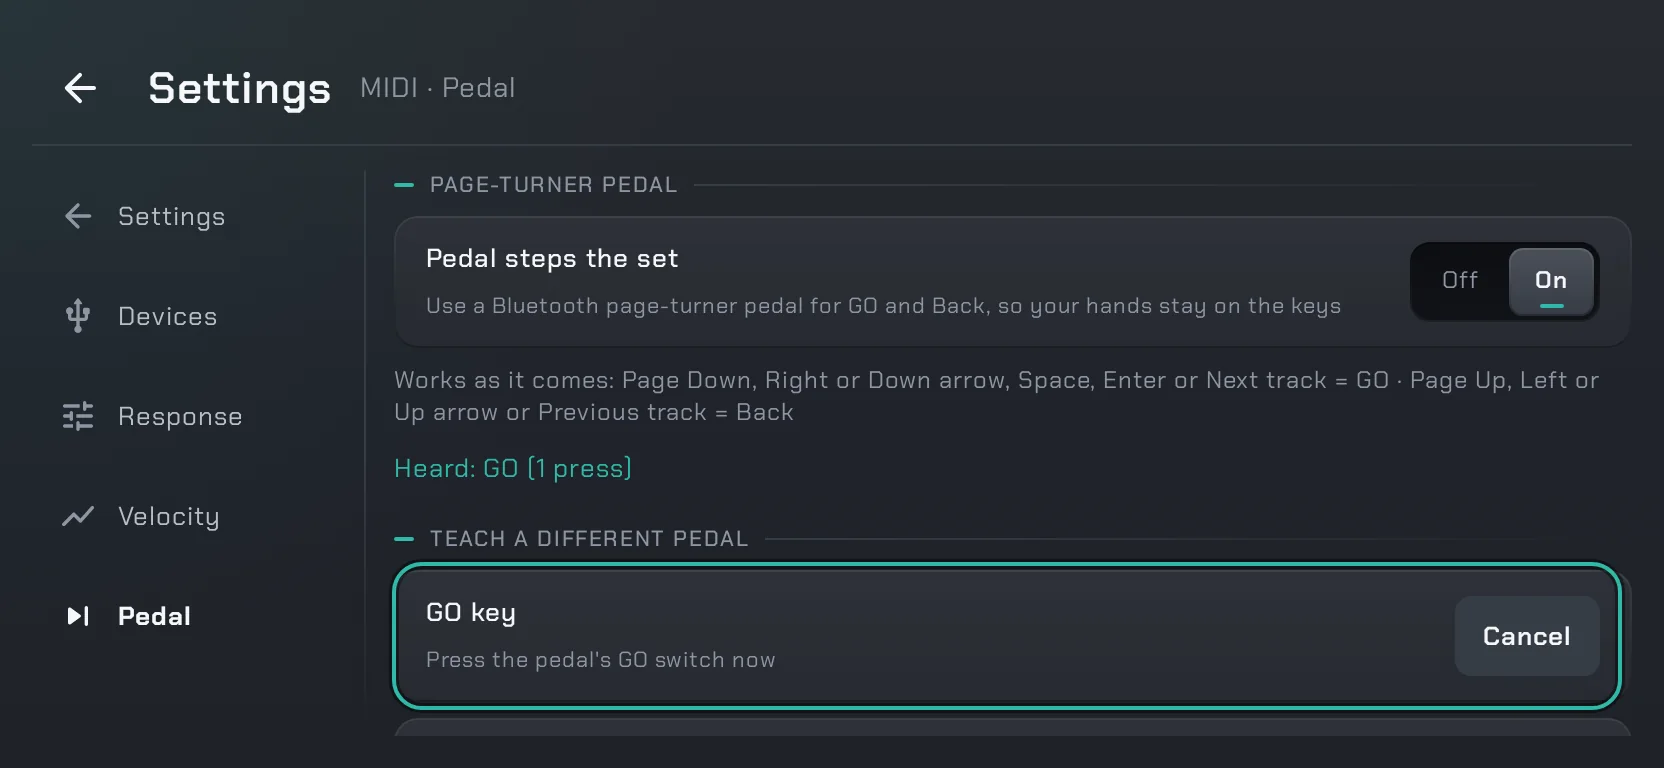
3 · If yours sends something else, tap Teach beside GO key and press the pedal’s GO switch, then do the same for Back.
Step 1 of 3
11 · STAGE
Hands-free with a pedal
- Pair a Bluetooth page-turner pedal with your device.
- Give it a press. Most pedals work as GO and Back straight away.
- If yours doesn’t, set it up in Settings › MIDI › Pedal.
-
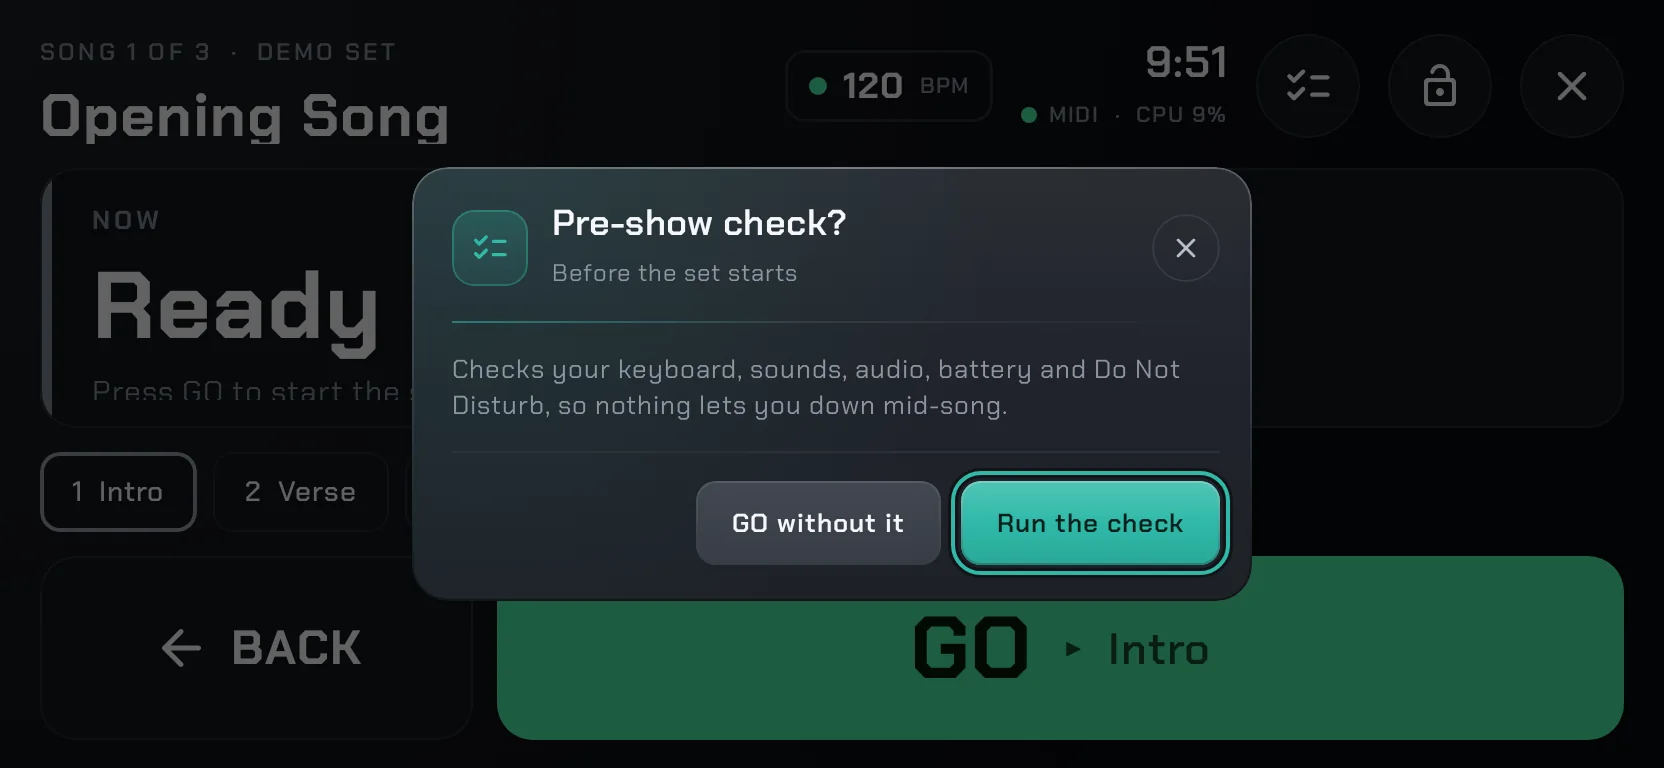
1 · Tap STAGE at the top of the mixer, then press GO. The first GO after you open the app asks about the pre-show check: tap Run the check.
-
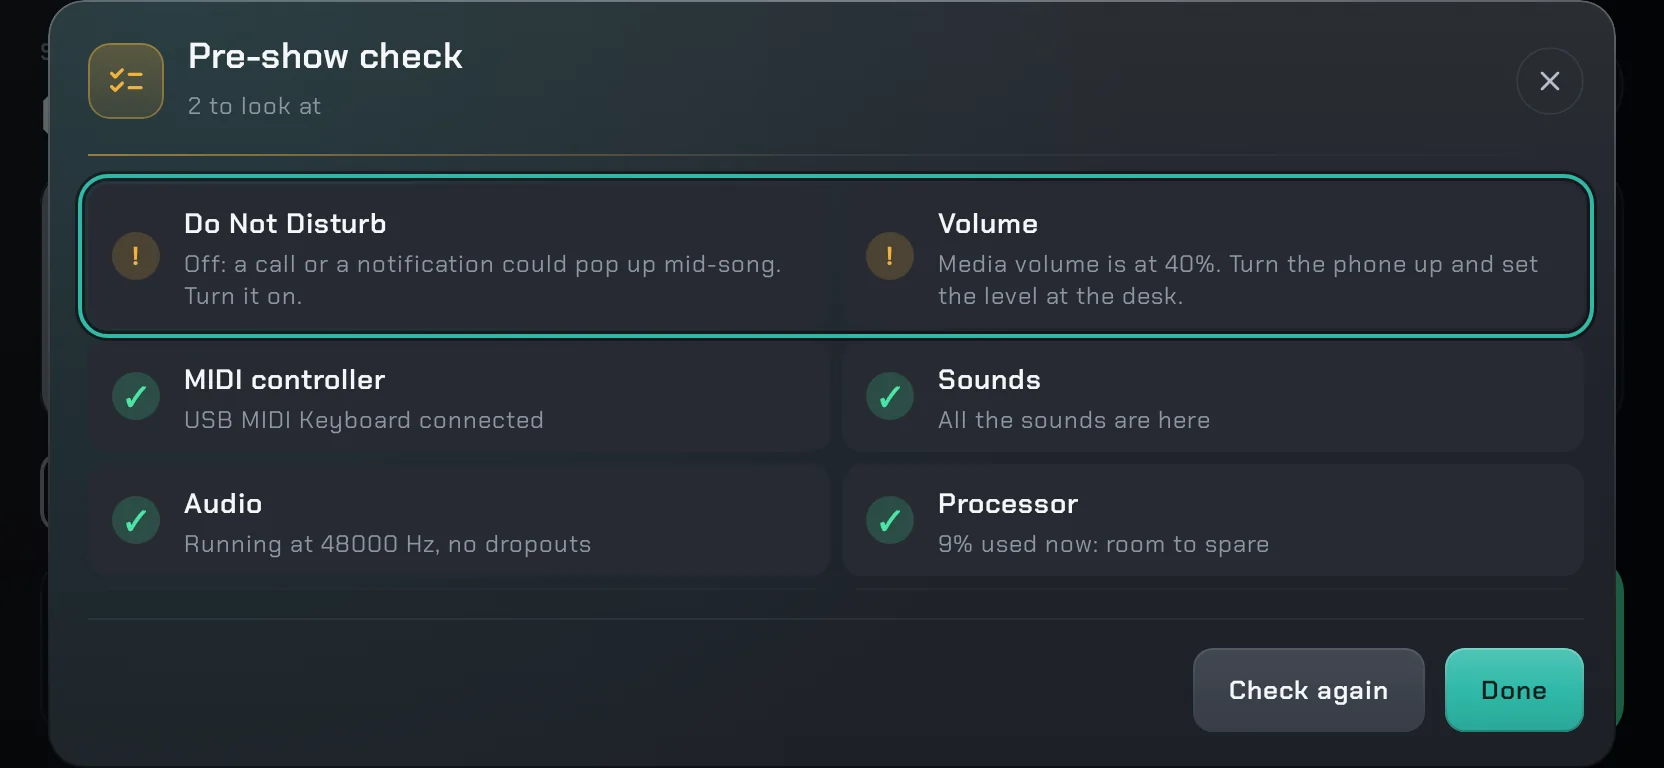
2 · Sort out anything it flags, like Do Not Disturb, the volume or the battery. A green tick means that one’s ready.
-
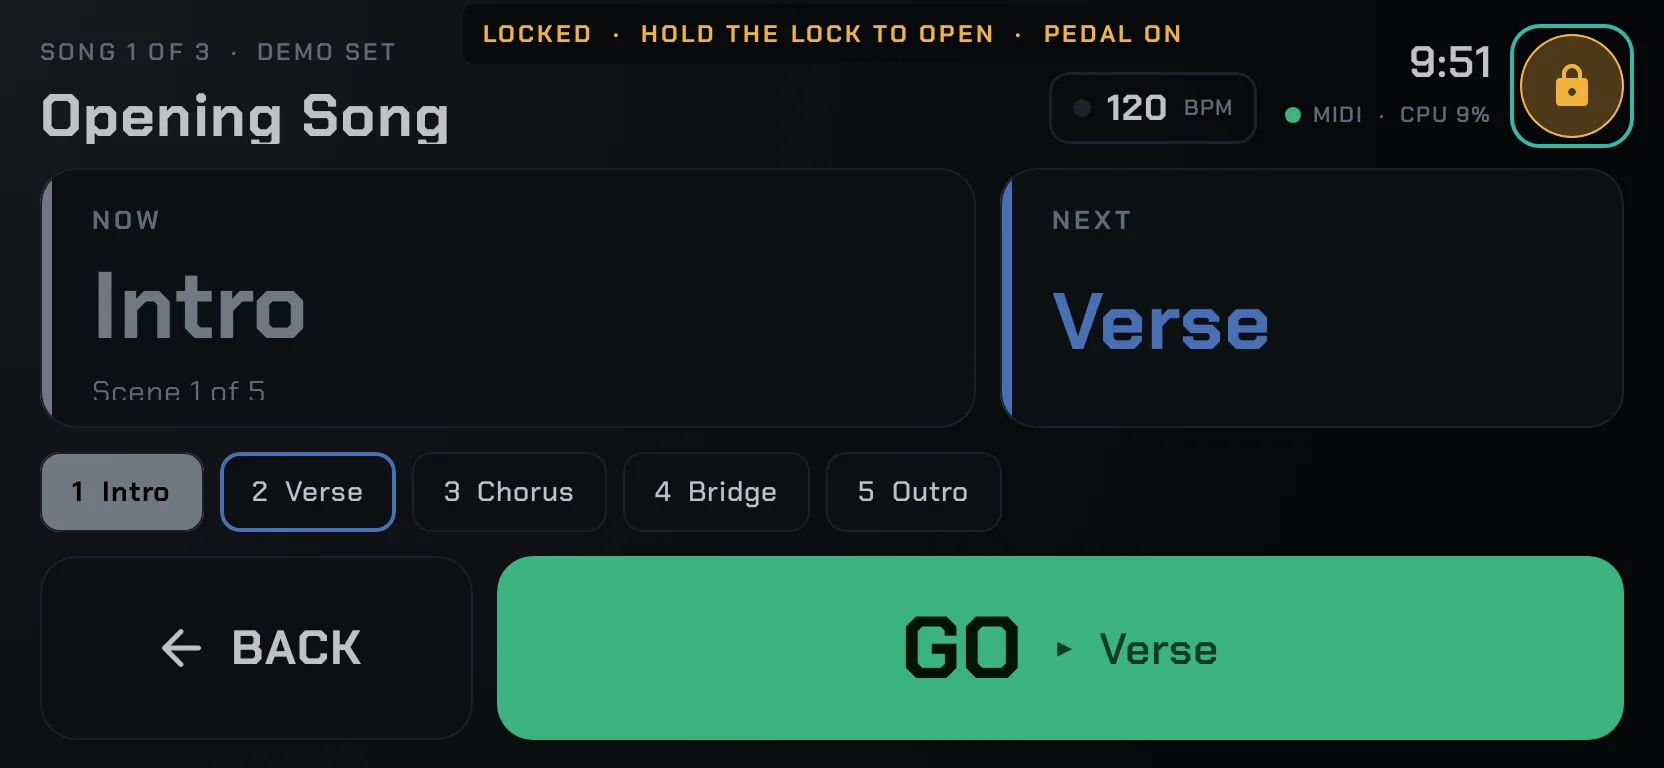
3 · Tap the lock and play the set from your pedal. The screen ignores every touch until you hold the lock for a second.
Step 1 of 3
12 · STAGE
Showtime: Stage view
- Tap STAGE at the top of the mixer, then press GO. When it asks, tap Run the check.
- Sort out anything it flags, like Do Not Disturb, the volume or the battery.
- Turn the lock on and play the set from your pedal.
Want a tutorial on something else?
Tell us what you’d like to learn.