1. Getting started
You play WaveStage with your device held sideways. Install it from Google Play, open it, and plug in your MIDI keyboard if you've got one. WaveStage picks it up as soon as it's connected.
Opening WaveStage
Each time you open WaveStage, you see the splash (the five wave lines), then a short loading screen, then the main screen with your session already open. There's no start screen and nothing to choose. The very first time, that's the Demo Set. After that, it's the Event you had open last, just as you left it. If nothing was saved (say, after the app's data was cleared), it opens the Demo Set again. If an Event's sounds are missing, WaveStage asks about them over the loading screen; Cancel starts a fresh session instead.
The first launch
The Grand and the Orchestral Strings are big recordings, so Google Play brings them down separately once the app's installed. You'll see how far along they are on the opening screen. If you're on mobile data, Play might ask whether to wait for Wi-Fi. You don't have to wait: carry on without them, and the piano and strings will just stay quiet until the next time you open the app with them in place.
The Demo Set
The first time you open WaveStage, it puts you straight into the Demo Set. It's an Event of three songs (Opening Song, Upbeat Song and Quiet Reflection), each with its own scenes. They play on six channels: piano, pad, strings, electric piano, organ and a bass on the low keys. Press GO and step through it to get a feel for how things work. It's saved with your Events like any other, so once you're done with it, delete it. It only comes back if the app's data is cleared.
Casual or Advanced
WaveStage gives you two ways to work, called session modes. You choose in Settings › Preferences › Session mode.
- Casual: one mixer to play on, saved as you go. Next time you open WaveStage, it picks up right where you left off. If a session's worth keeping, give it a title and load it back from Settings whenever you like.
- Advanced: the full rig, with Events, songs and scenes. WaveStage reopens the Event you had open last. New Event, Import, Save as new and your saved Events are all on the Event page, from the rail on the left.
Each mode keeps its own session. When you switch, one is put away and the other comes back, so you never lose anything.
2. The main screen
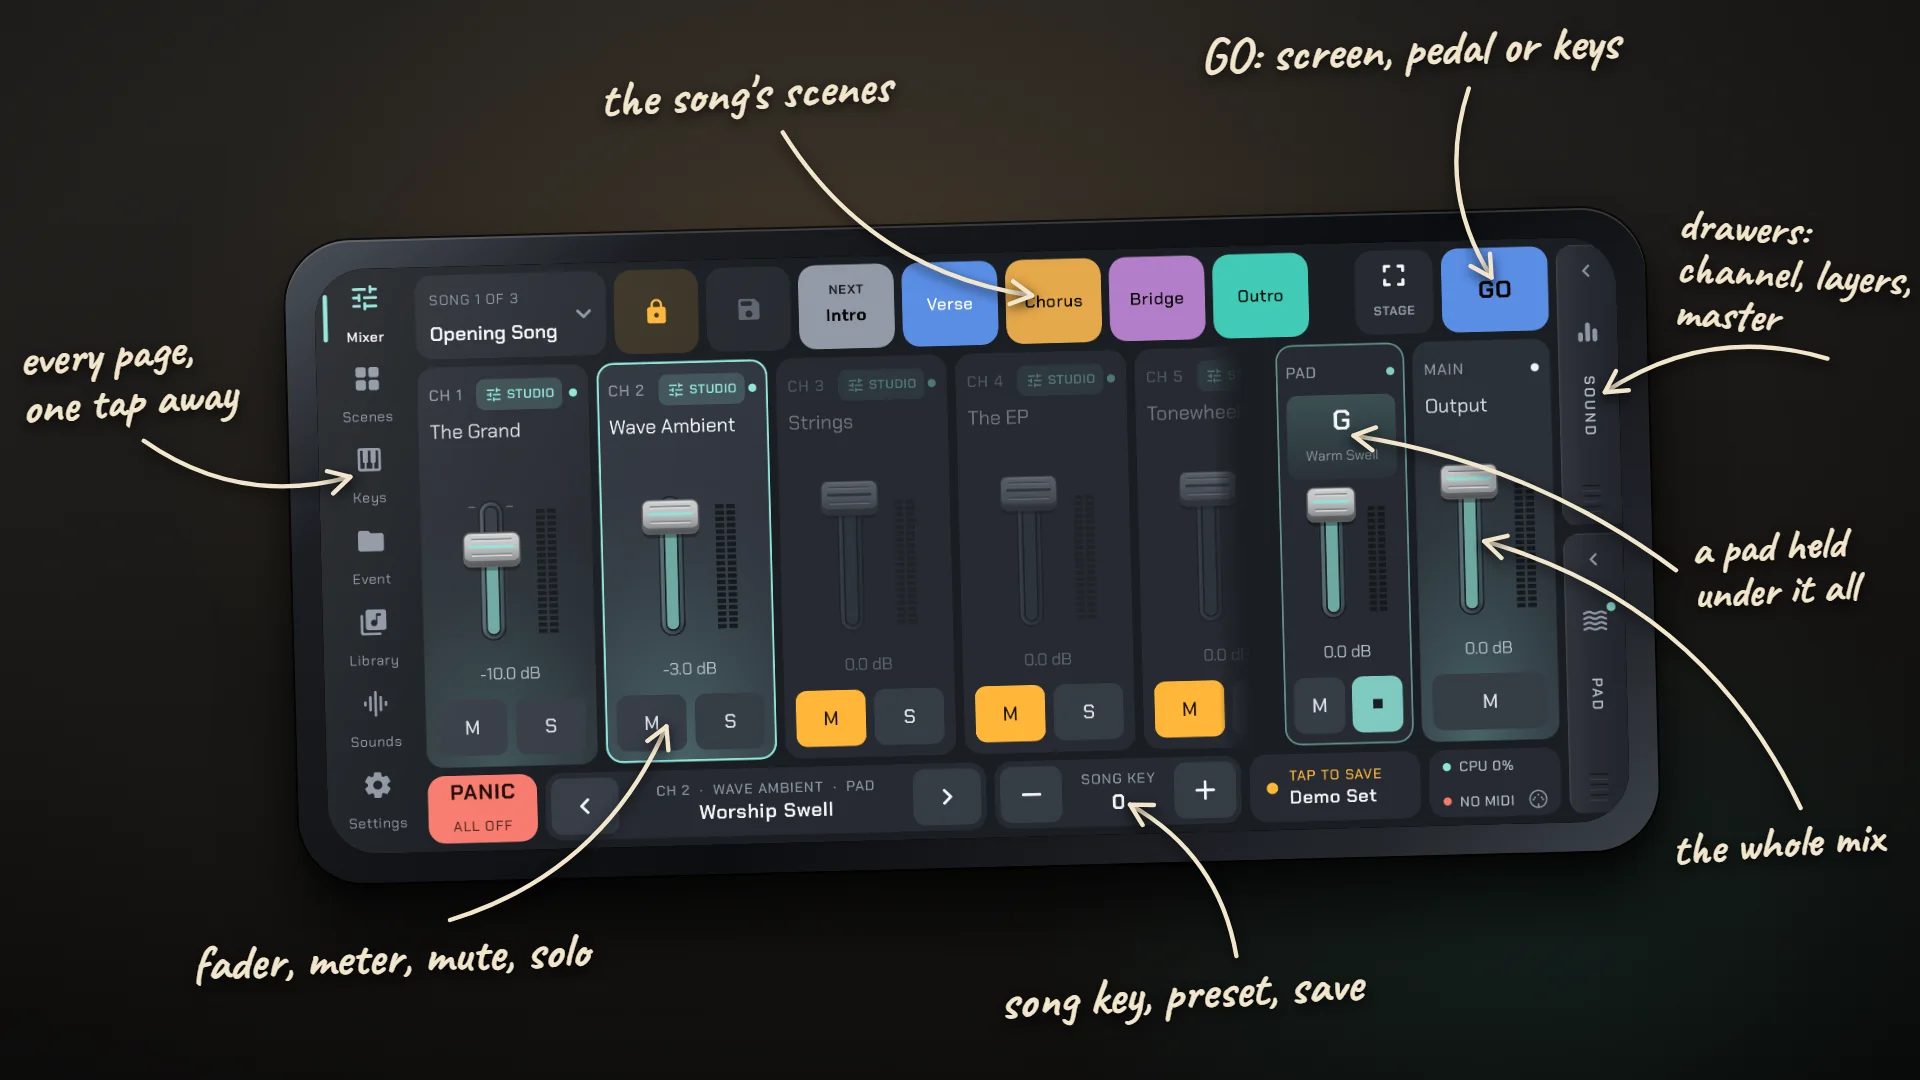
The nav rail
The rail down the left side never goes away, so nothing's ever more than one tap away. It runs from the things you reach for while playing, at the top, down to setup at the bottom:
Mixer: your channels and their faders
Scenes: your songs, scenes and GO
Keys: the on-screen keyboard
Event: save, open and share your Events
Library: your instruments and SoundFonts
Sounds: find a sound, hear it and put it on a channel
Settings: the app and your MIDI gear
The bottom bar
Big tiles, with the most urgent on the left, so you can hit the right one mid-song without a second look:
- PANIC: silences every note at once, for when something sticks.
- Preset: the selected channel's sound and preset, with keys to step through its presets.
- SONG KEY: down, the song's key, and up. In Casual it's called TRANSPOSE.
- EVENT: tap to save the Event you have open. Its lamp glows amber while there's something to save (Advanced only).
- Status: the CPU and MIDI lights. Tap it to start MIDI Assign (see MIDI).
The side drawers
On the right edge you'll find two handles. SOUND opens Drawer 1, with three tabs: Channel, Layers and Master. PAD opens Drawer 2, the pad drone. A drawer always opens where you left it. To shut it, tap its handle again or its close button.
Going back
Android's Back closes whatever's on top, one layer at a time: a drawer, a card, a menu, a Studio page, MIDI Assign, or Stage view (unless it's locked). On the mixer itself, the first Back tells you how to leave, and a second one sends WaveStage to the background without stopping the sound.
3. The mixer
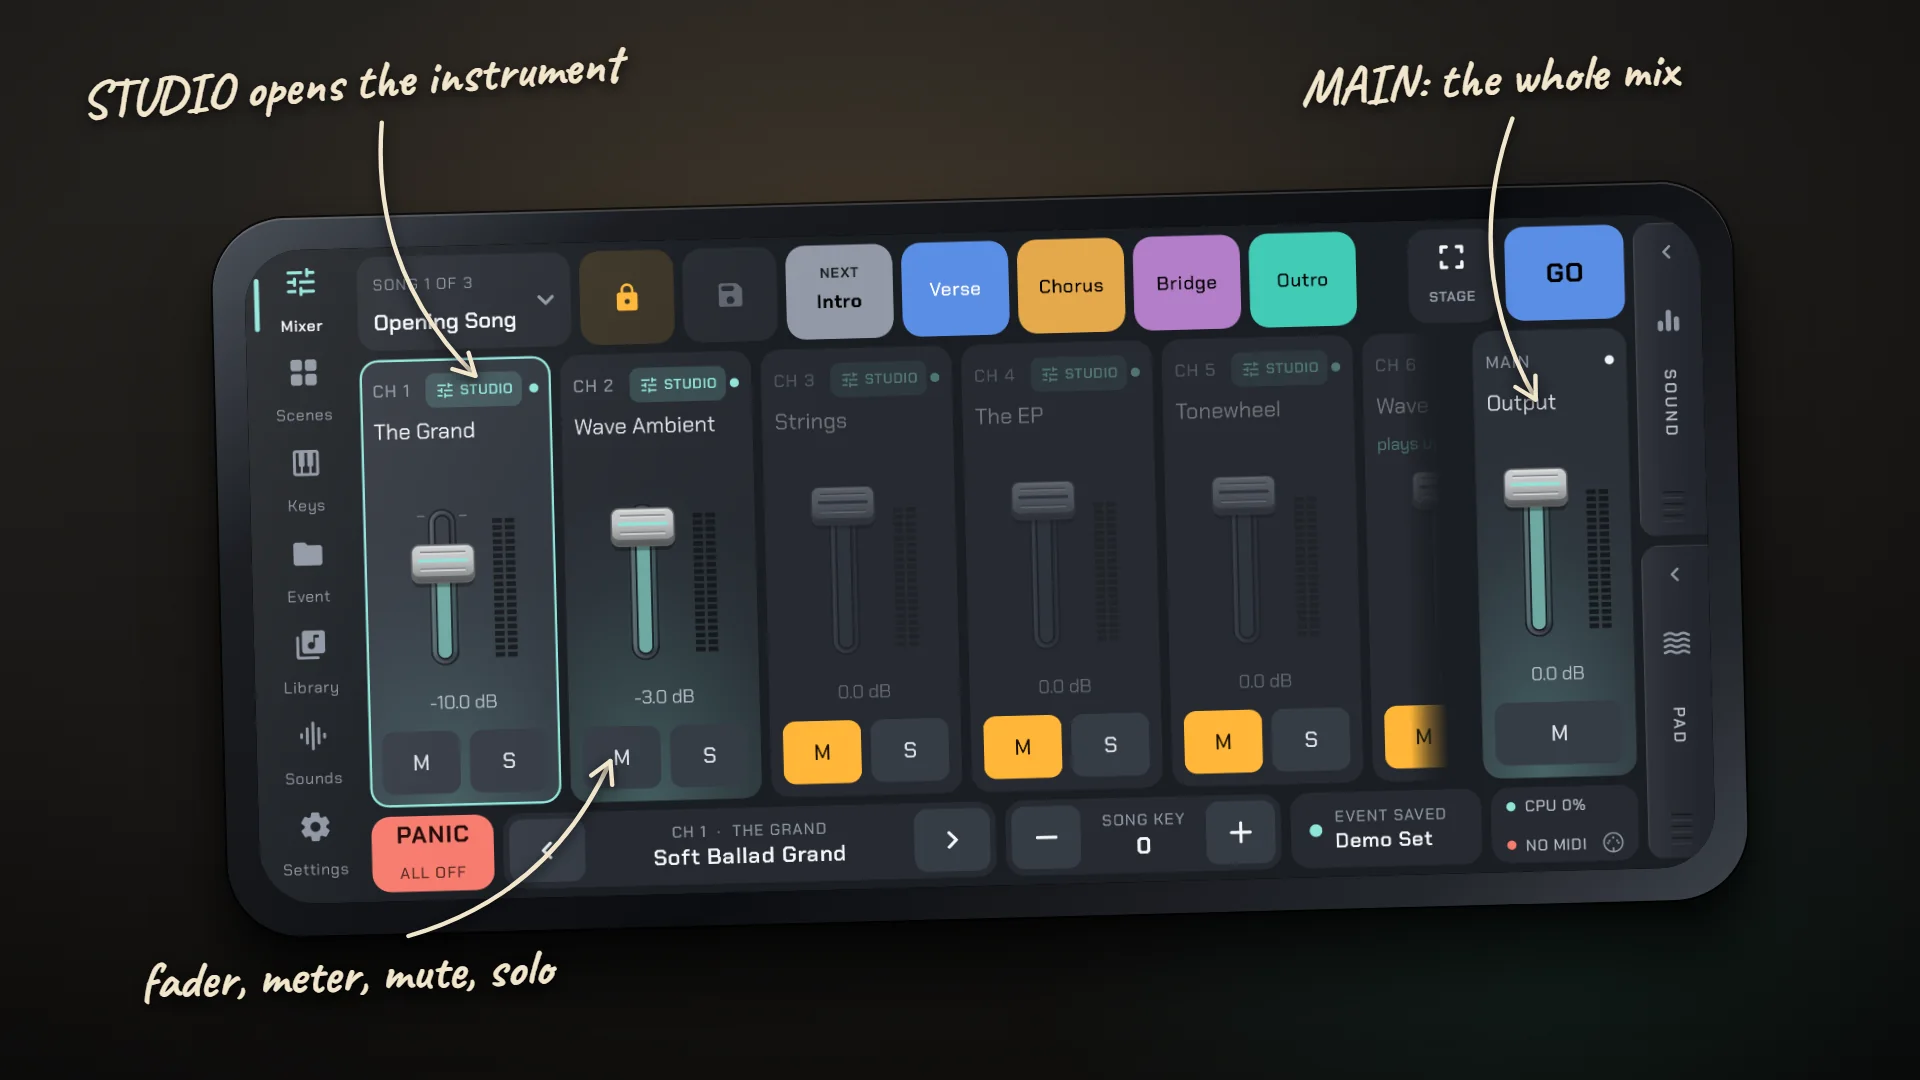
You start with eight channels, and those always stay. To add more, tap the + at the end of the strips and choose how many, up to sixteen in all. Any channel you've added (9 and up) can be removed again. Removing it also takes it out of any scenes that use it, and WaveStage tells you how many before it does.
- Tap a strip to select its channel. The preset tile in the bottom bar follows along.
- Split channels: a channel that plays only some of the keys says which ones under its name, like "plays up to E3". You set splits in Layers (the SOUND drawer).
- Mute and solo: if anything's soloed, you only hear the soloed channels. Otherwise, mute decides.
- Studio: if a channel's playing an in-app instrument, it has a Studio button that opens that instrument's own panel.
- PAD: the pad drone's own strip, with a play-again button.
- MAIN: the level of your whole mix.
How the faders move
The faders feel like a real mixing desk's: fine control near the top, and a smooth fade all the way down to off.
4. A channel's page
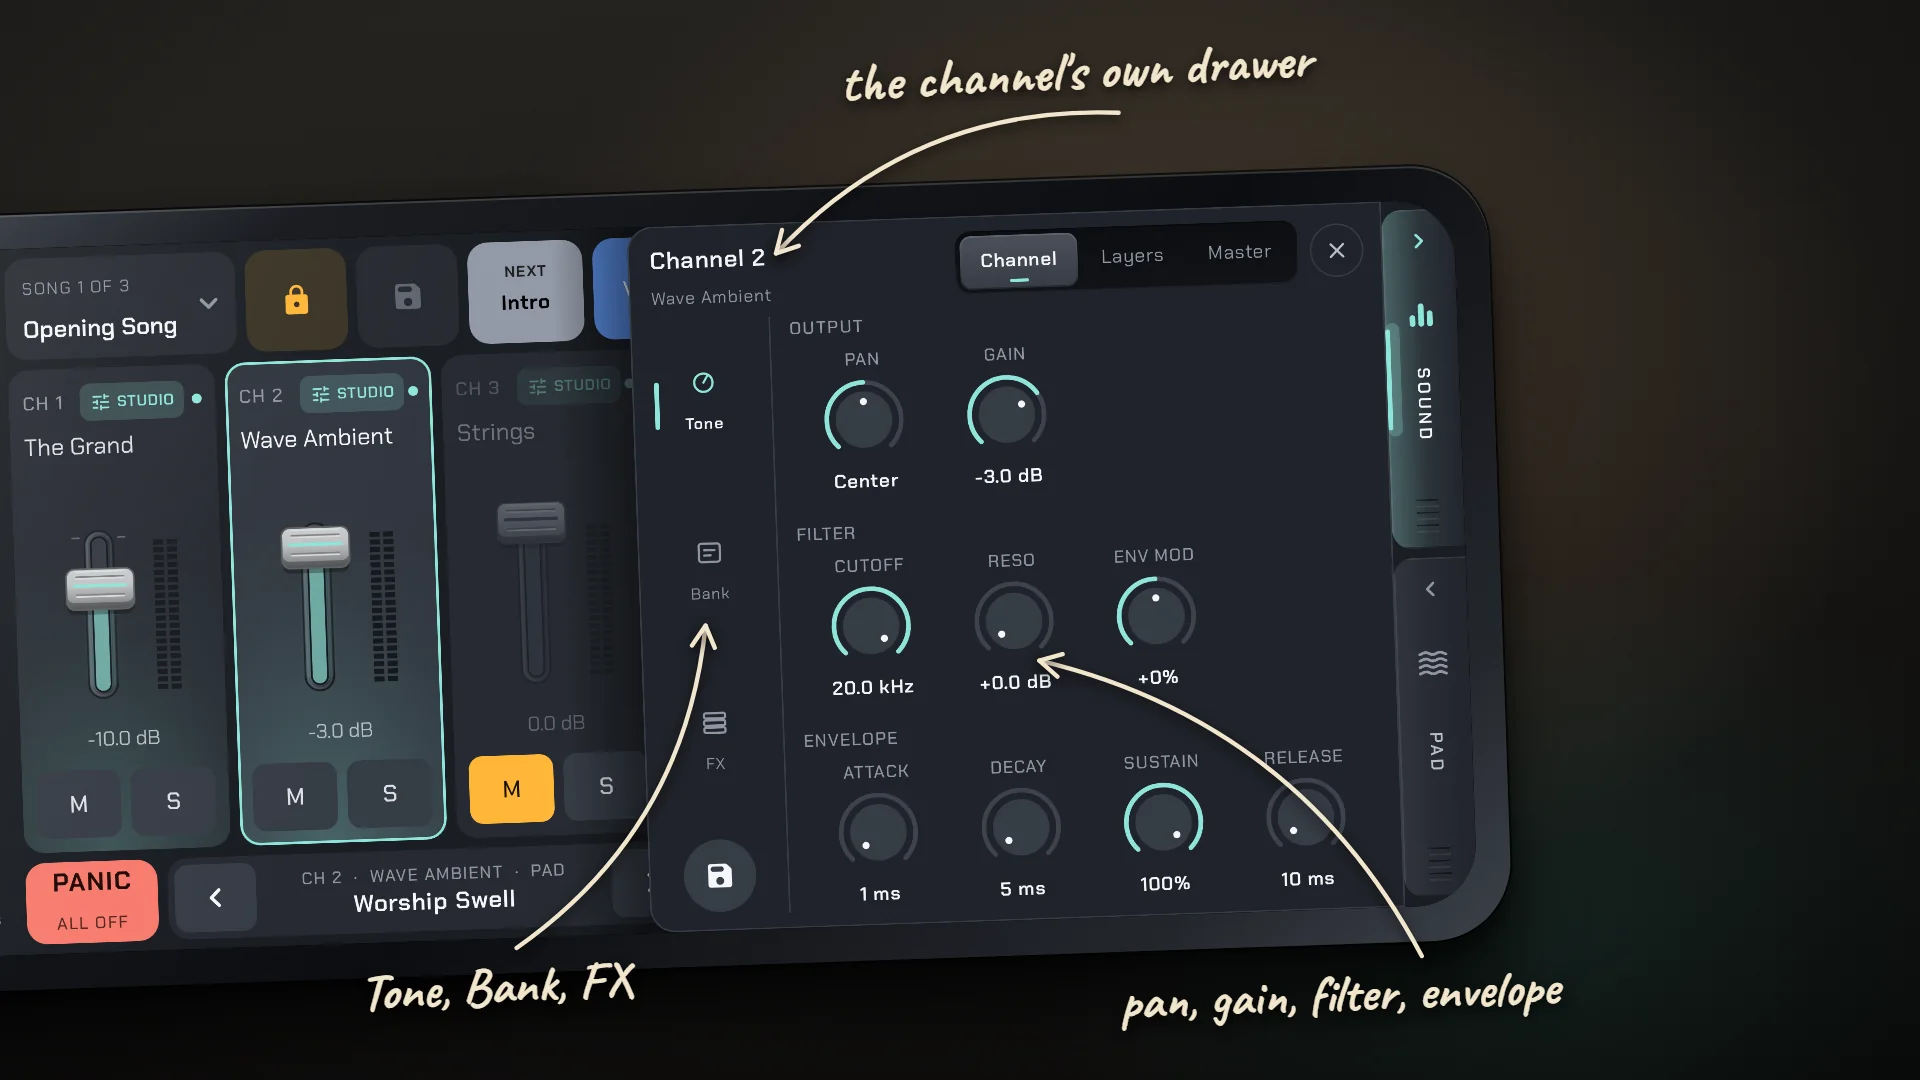
To see everything about one channel, select it and open Drawer 1 › Channel. Down its left side are three pages:
- Tone: pan and gain at the top, then a filter (cutoff, resonance and how far its envelope opens it) and an envelope (attack, decay, sustain and release). They work on every sound, so you can shape a SoundFont just like an in-app instrument.
- Bank: what the channel plays: its sound, bank and preset.
- FX: the channel's seven effects (see FX).
Change a preset's knobs and a star appears by its name. The save button under the three pages keeps it as a preset of your own. Which controller and keys play the channel is set in Layers and splits or on its channel card.
The channel card
For a quicker look, double-tap a channel's name on its strip. Its card opens with four sections:
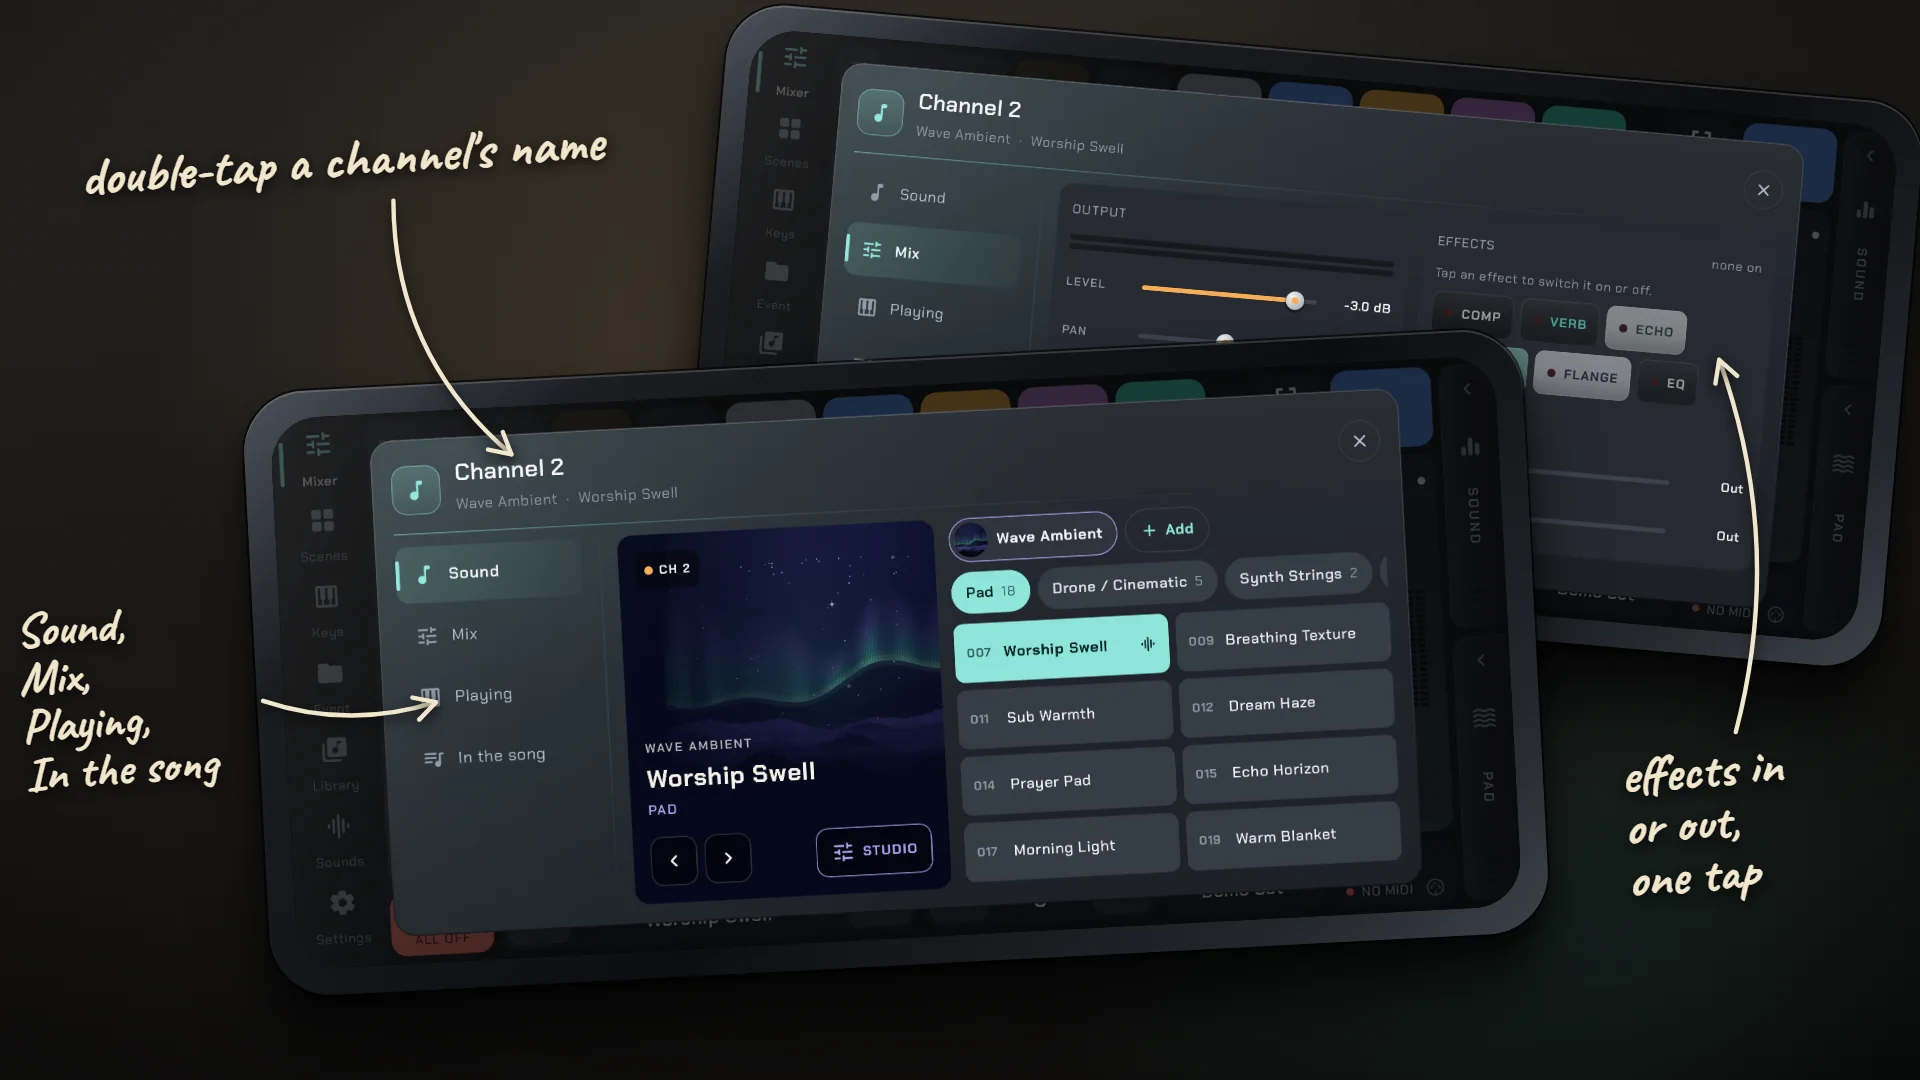
- Sound: what the channel plays, its sound and presets, and a button that takes you to the Studio page. You can add another sound from the Library here too.
- Mix: level, pan, mute and solo, the channel's effects as chips you tap in or out, and how much reverb and echo it gets. You can teach a controller its fader, pan, mute and solo from here as well.
- Playing: the channel's keys on an 88-note keyboard that lights up as you play, its lowest and highest key (step them, or press SET and play the key), its velocity range, and which controller and MIDI channel play it.
- In the song: every scene in the song, showing whether this channel is in or out and its level and sound in each. Tap a scene to bring the channel in or take it out, as long as the scenes are unlocked.
5. Sounds and the Library
Sounds
Sounds opens Sound Stage, where you find a sound, hear it and put it on a channel.
- Find it by instrument, by group, or by searching across all of them.
- Hear it: tap its tile, play the on-screen keys (HOLD latches them), or just play your own keyboard, which plays the page while it's open.
- Put it on a channel (you'll see what's already on each one), or on a new channel.
The Library
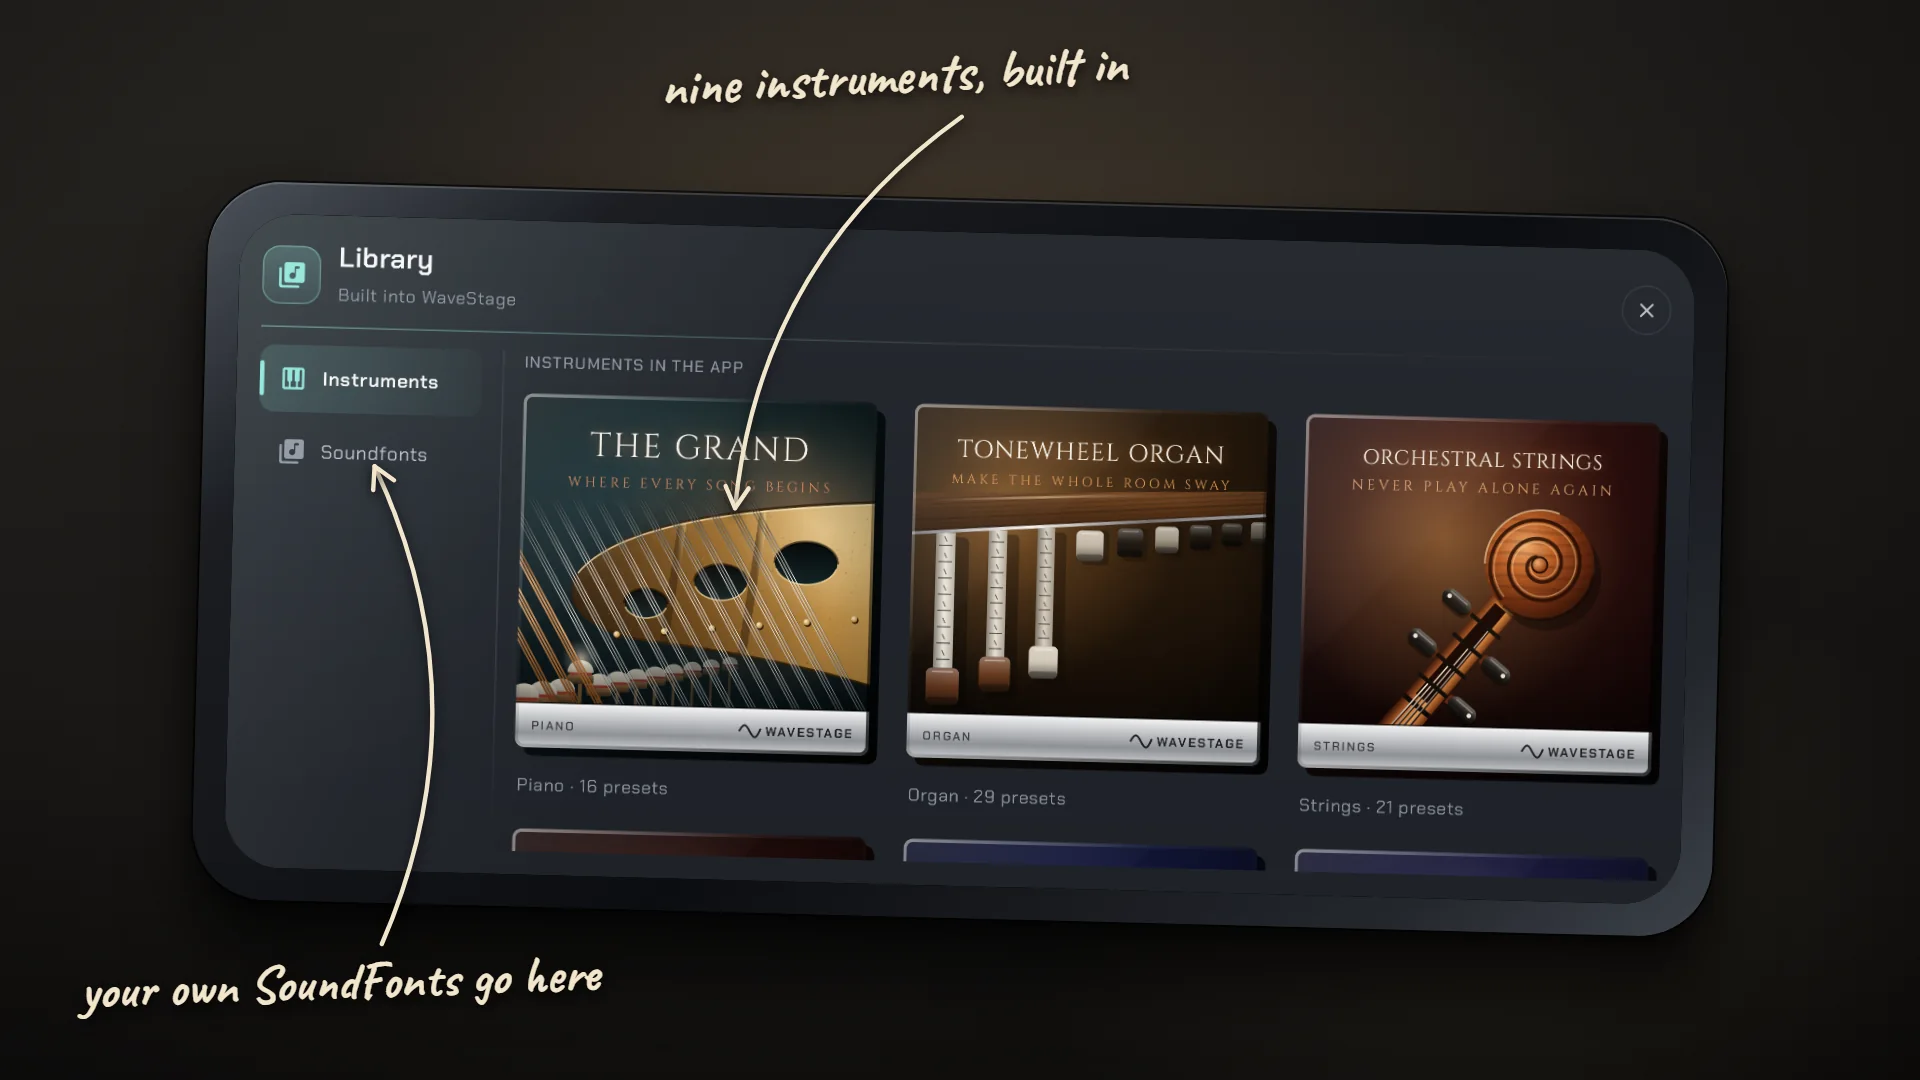
The Library has two pages. Instruments lists the nine instruments that come with WaveStage (see Instruments). Soundfonts is where the SoundFonts (.sf2) you've imported live: import one there. To remove one, tap its delete button and confirm.
Good to know: Events and songs find SoundFonts by their file name. Keep the names the same on all your devices and your Events will open anywhere.
6. Layers and splits
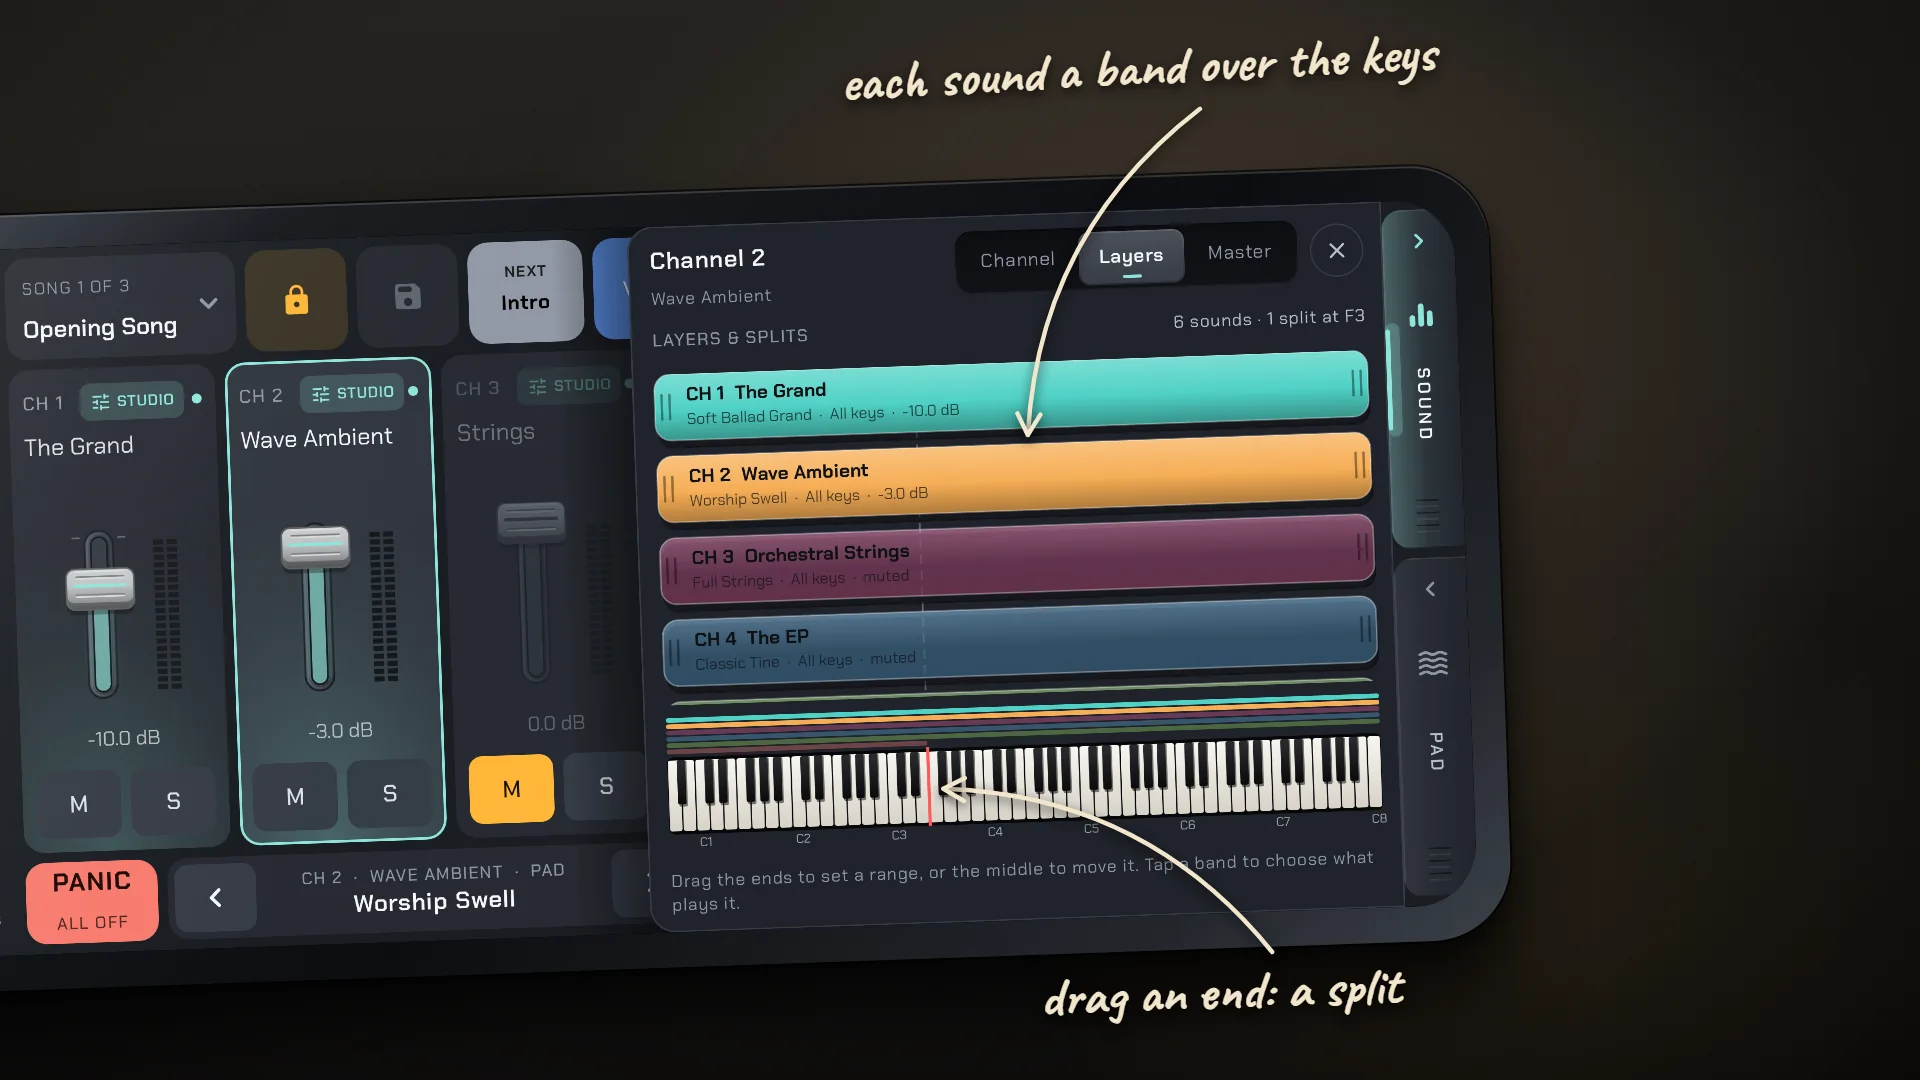
This is where you decide which sounds play where on your keyboard. Open Drawer 1 › Layers and you'll see every channel with a sound as a band in its own colour over an 88-key keyboard, A0 to C8.
- Bands stacked over the same keys are layers. Bands side by side make a split, and each split point is marked down through all of them.
- Drag a band's ends to set the lowest and highest key it plays. Drag its middle to slide it along the keyboard.
- Tap a band to see what plays it: controller, MIDI channel and keys.
- If a band reaches either end of the keyboard, it keeps playing past it.
7. FX, EQ and Master
Every channel's rack has seven effects: Concert Reverb, Tape Echo, Ensemble Chorus, Jet Flanger, Channel Compressor, Peak Limiter and the 7-band EQ. Each one stays off until you switch it on. In the list, each looks like the unit it's modelled on: rack units with a live meter or display, a tape echo with turning reels, and stompboxes with a footswitch. Tap one to open its own page. On top of that, every in-app instrument has a room of its own.
Using the EQ
- Switch the EQ on in the rack. It starts flat, with a low shelf, five bells and a high shelf.
- Play something. Behind the curve, the analyzer draws what the channel's putting out.
- Drag a band's point: left and right changes the frequency, up and down the gain (±12 dB).
- Set its Q, or change its type to a low cut, low shelf, bell, high shelf or high cut. Cuts don't have a gain.
The Master page
Drawer 1 › Master is the channel page for your whole mix. You can also get there by double-tapping the MAIN strip. Its output section shows the MAIN level, the output meter, and the gain reduction: how hard the compressor, limiter and safety are working right now. Its rack runs Reverb, Bus Compressor, EQ and Limiter, in that order, all off until you switch them on. After them sits a safety stage. It's always on, but it does nothing until your mix would clip.
8. The pad drone
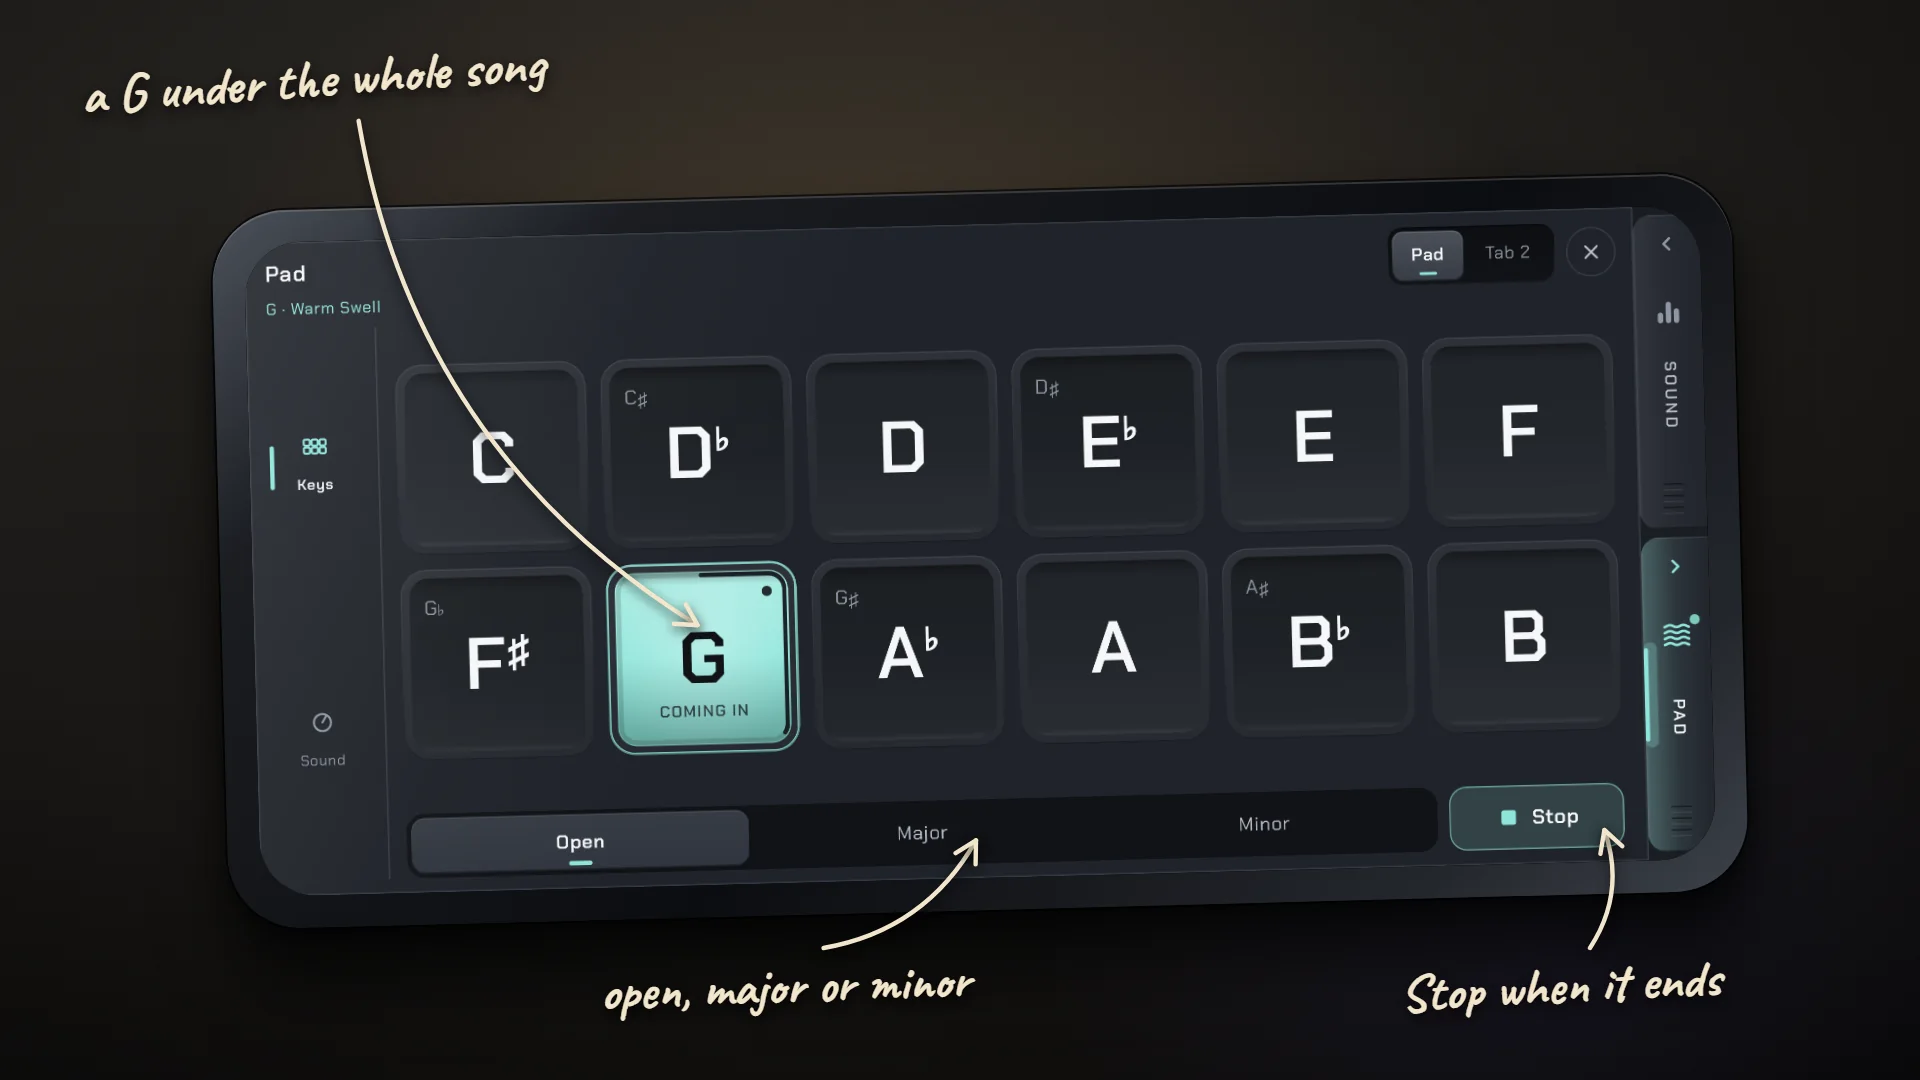
A held pad in one key, played from tiles so your hands are free for something else. It's a simple way to keep a bed of sound going under a whole song. Open it with the PAD handle.
- Keys: twelve big tiles. Tap one to start the pad in that key, tap another to move to it (the old key fades away under the new one), or tap the one that's playing to stop. Choose open, major or minor. The open voicing sits happily under major and minor chords alike.
- Sound: the pad types, plus five knobs every type responds to: TONE, TEXTURE, MOTION, SHIMMER and SPACE.
- Level: the PAD strip on the mixer, with gain, pan, mute and a play-again button.
The pad's settings are saved with your session, but a session never opens with the pad already playing, so you won't get a surprise drone when you open the app.
9. Songs and scenes
A scene is a snapshot of the mixer: each channel's sound, preset, level, pan, mute and solo. A song holds up to sixteen scenes in the order you'll play them, along with the song's key and tempo.
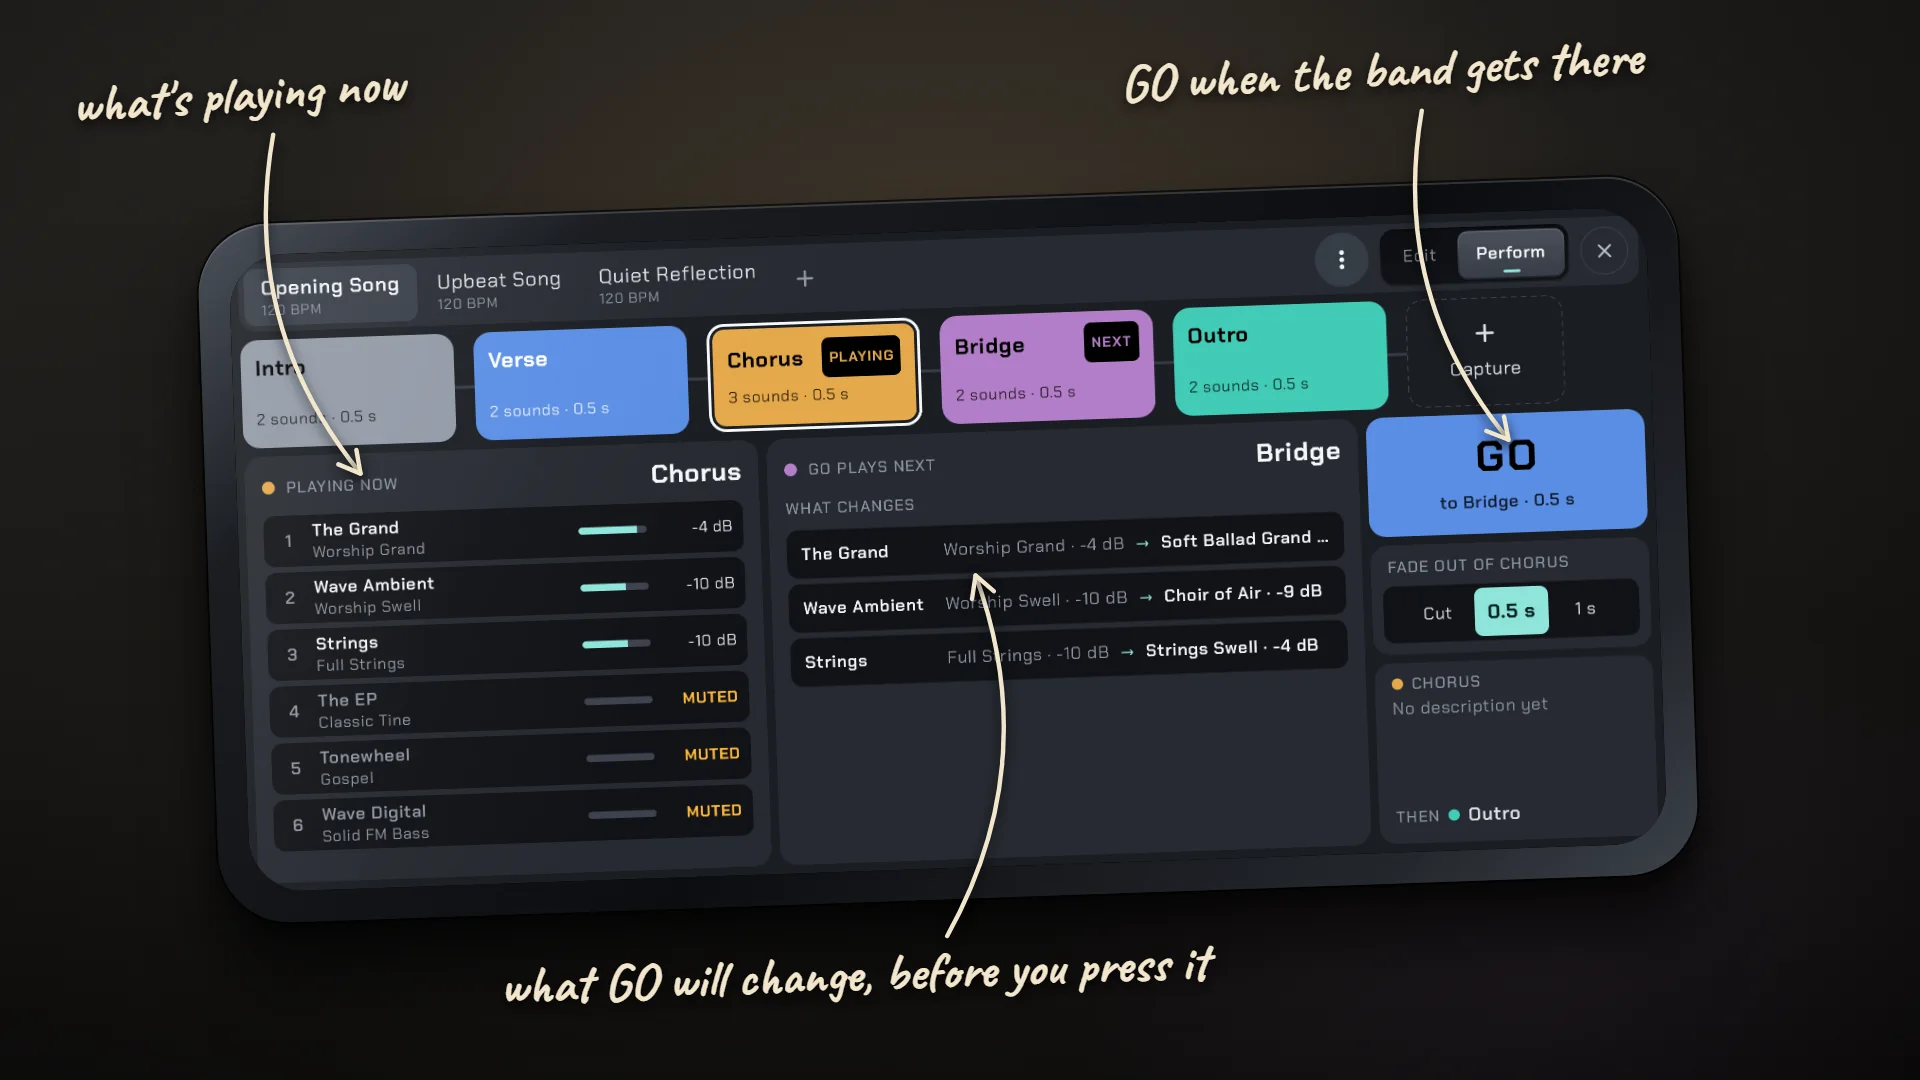
The Scenes page
- Across the top: the Event's songs, with their key and tempo.
- Below that: the scenes of the song you're looking at, in order.
- Under those: what's playing now, what GO plays next, and exactly what that'll change, channel by channel.
- GO, with the fade it makes: a straight cut, or anything from half a second up to eight seconds.
Perform and Edit
In Perform, tap a scene to cue it, then press GO to play it. After a song's last scene, GO takes you into the next song. In Edit, tap a scene to open its settings; Save puts the mixer, as it is now, into the scene that's playing.
Making a scene
- Set up the mixer the way that part of the song should sound.
- Tap + Capture. The scene card opens with Capture at the top.
- Give it a name and pick its colour.
- Add a few words about it ("Pads only, no drums"). They show under GO while it plays.
- In Edit, write its cue line ("GO on the downbeat"). You'll see it while the scene's up next.
Key and tempo
As soon as one of a song's scenes plays, the whole rig moves to that song's key and tempo. If you change either while the song's playing, the change is kept with the song.
Sharing a song
From the song menu you can import a song from a .wssong file, or, with Pro, export one, so a song can move from one Event to another, or over to another player's device. Importing works in the free version too.
10. Events
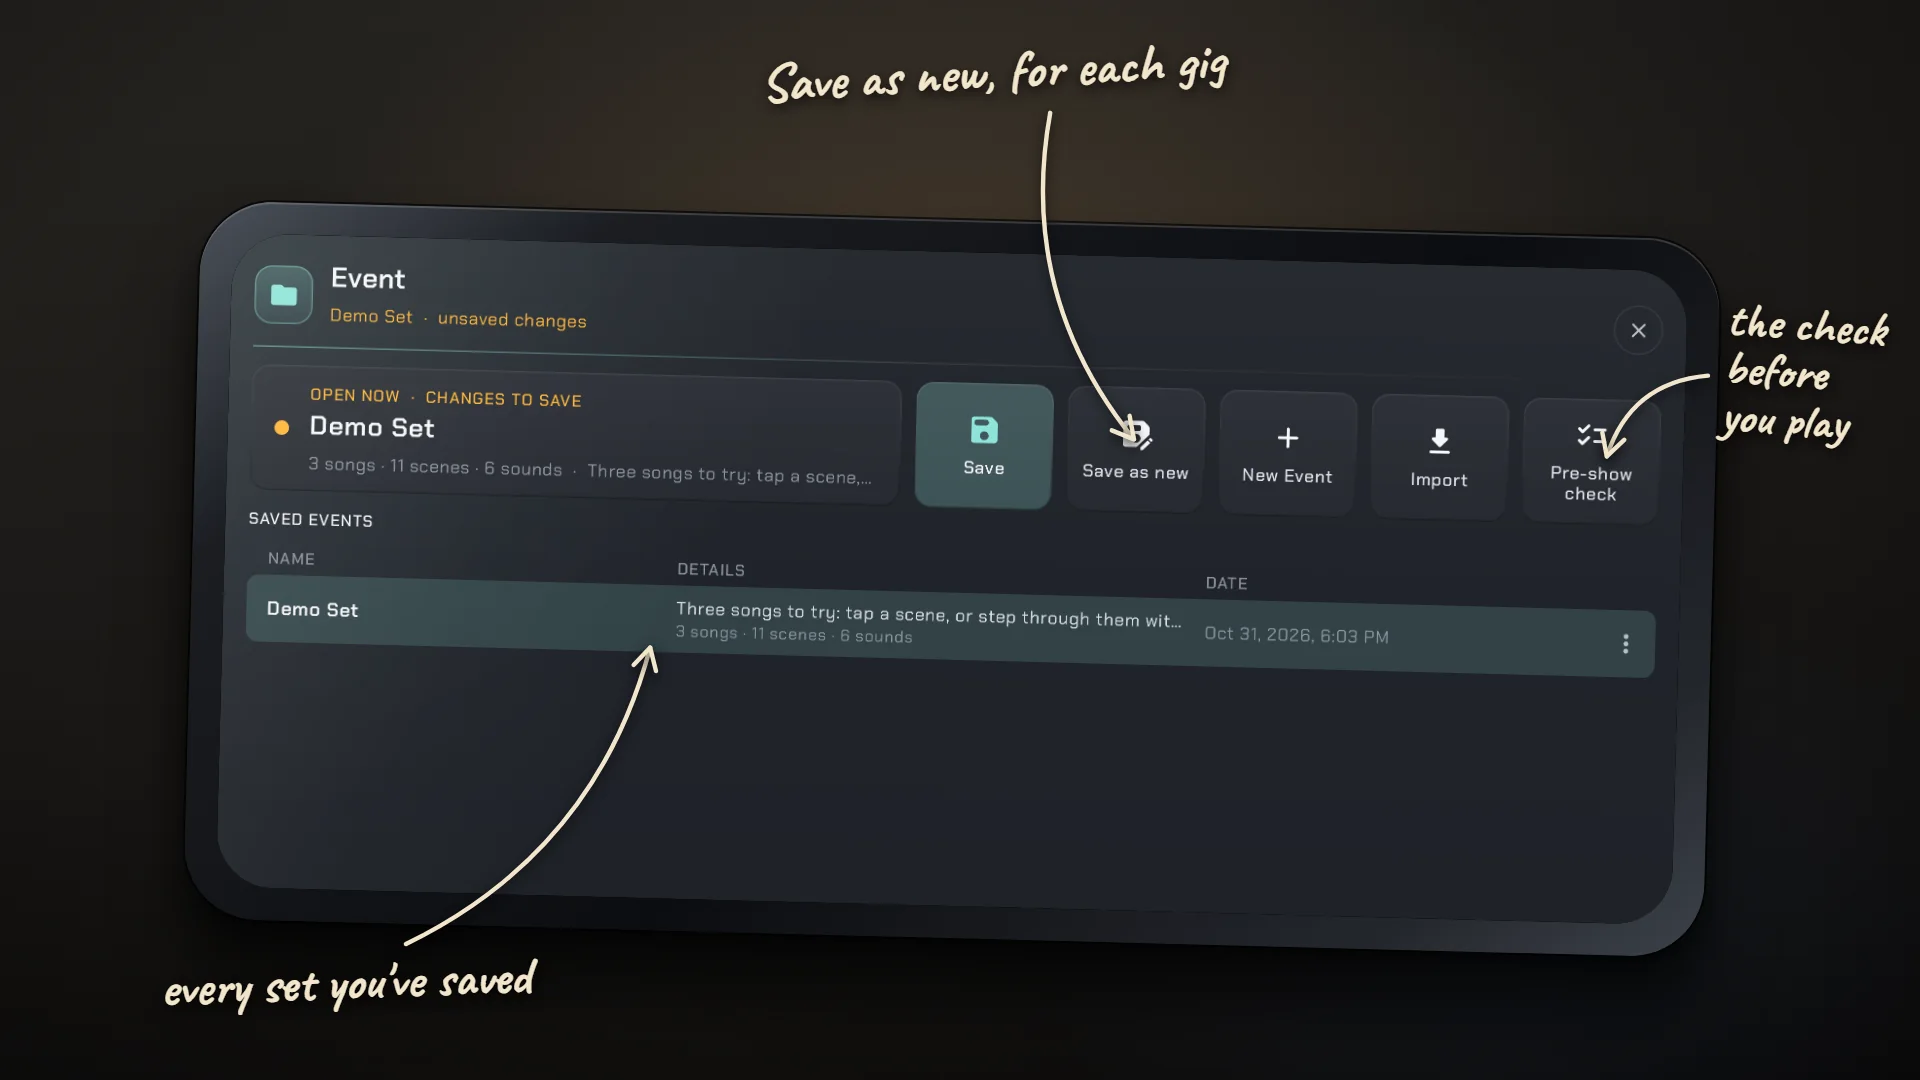
An Event is a whole session saved under a name: every channel and its sound, your Tone edits, and all your songs and their scenes. Make one for each service, gig or tour.
The Event page, from the rail on the left, shows what's open and whether it's saved (its lamp glows amber while there's something to save), with keys for Save, Save as new, New Event, Import and Pre-show check. To open a saved Event, tap it, then Open. Its ⋮ menu has Export… (with Pro) and Delete. Import works in the free version too. Your saved Events are listed with their details ("2 songs · 9 scenes · 4 sounds") and the date.
- Exported Events are sealed. They can't be read outside WaveStage, and if a file's been changed after export, it's refused.
- They don't carry SoundFonts. The device that opens one needs the same .sf2 files under the same names. WaveStage lists any that are missing before it opens the Event.
- Nothing gets overwritten. If you import an Event with a name you already have, it's numbered: "Sunday (2)".
11. Stage view and pre-show check
Stage view
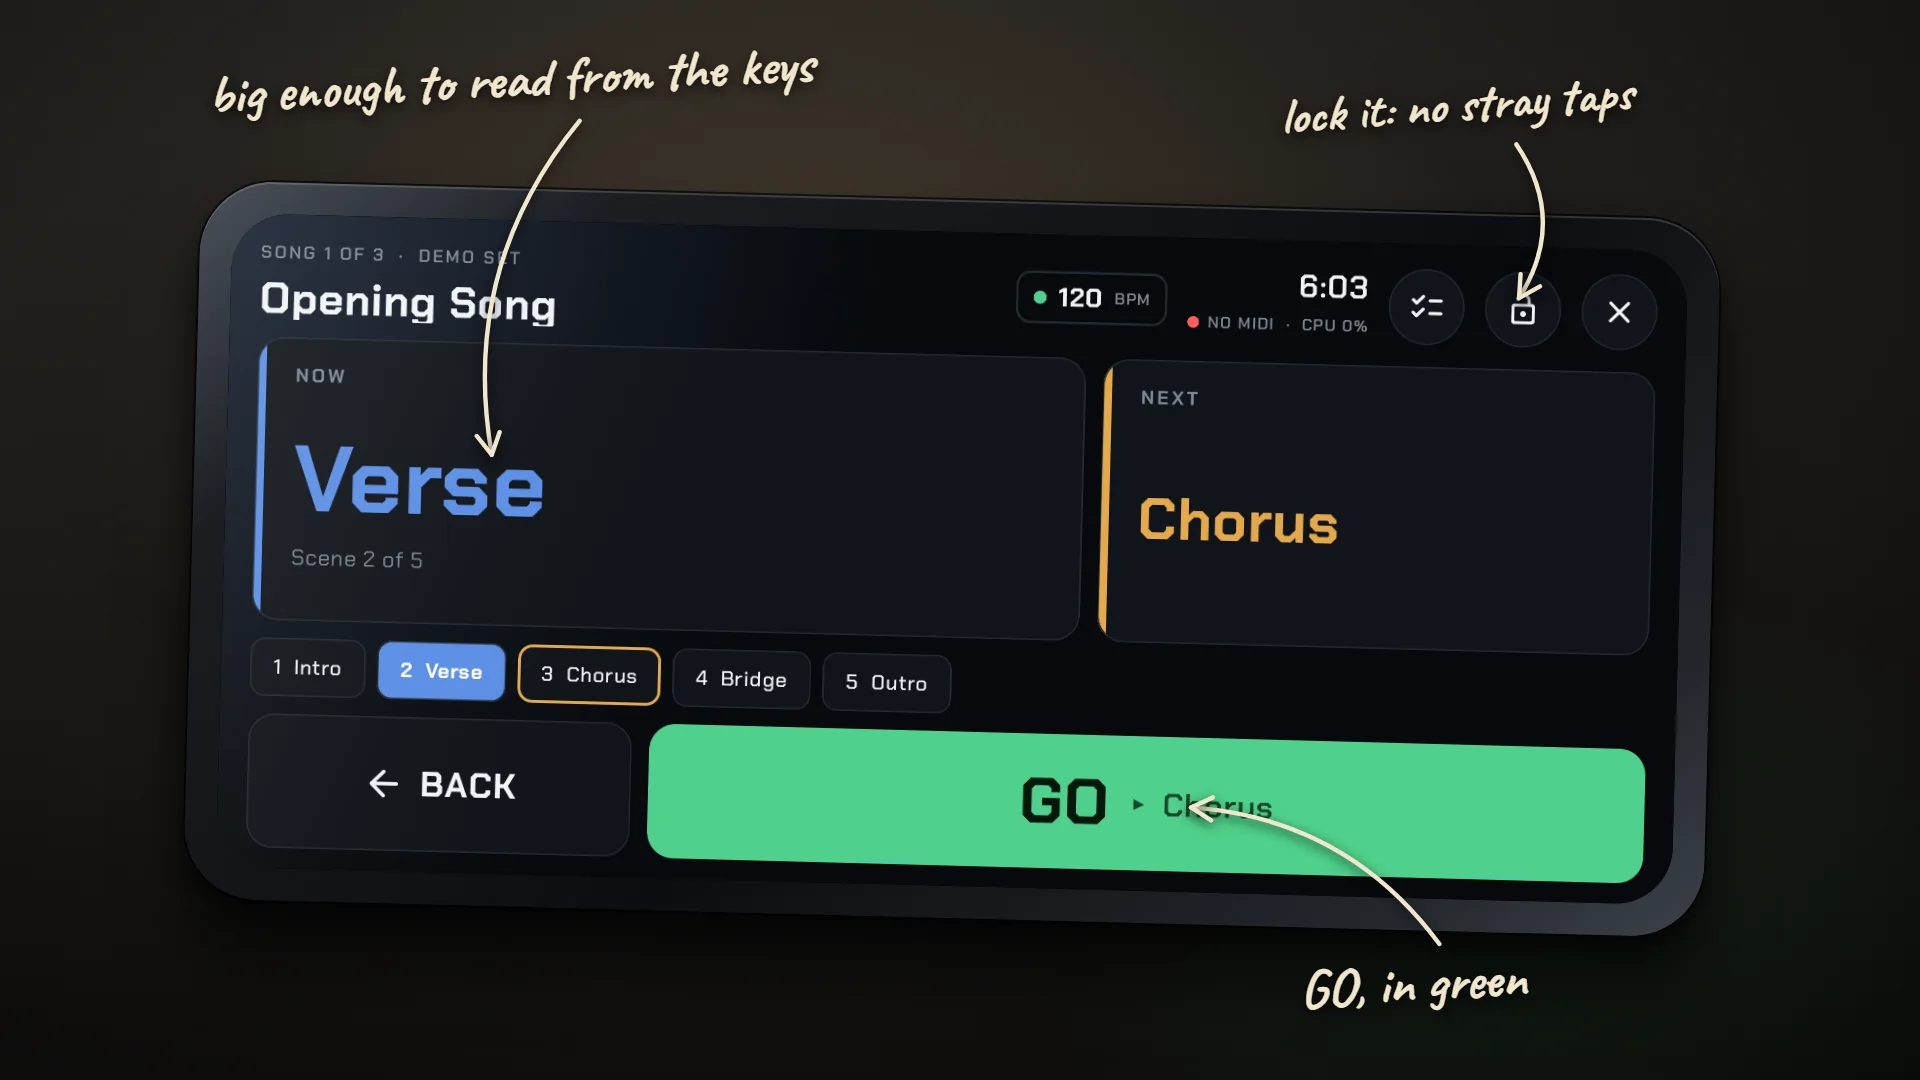
Open it with STAGE, just left of GO at the top of the mixer. This is your set as you play it, easy to read from a step back under stage lights: the song and its key, the scene playing in its colour, what GO plays next, the song's scenes in a row, and GO and Back as big as your screen allows. It uses its own dark stage colours and keeps the screen awake.
The lock: once it's on, the screen ignores every touch, so a sleeve brushing it mid-song won't change a thing. Hold the lock for a second to undo it. Your pedal and controller buttons keep working while it's locked.
Pre-show check
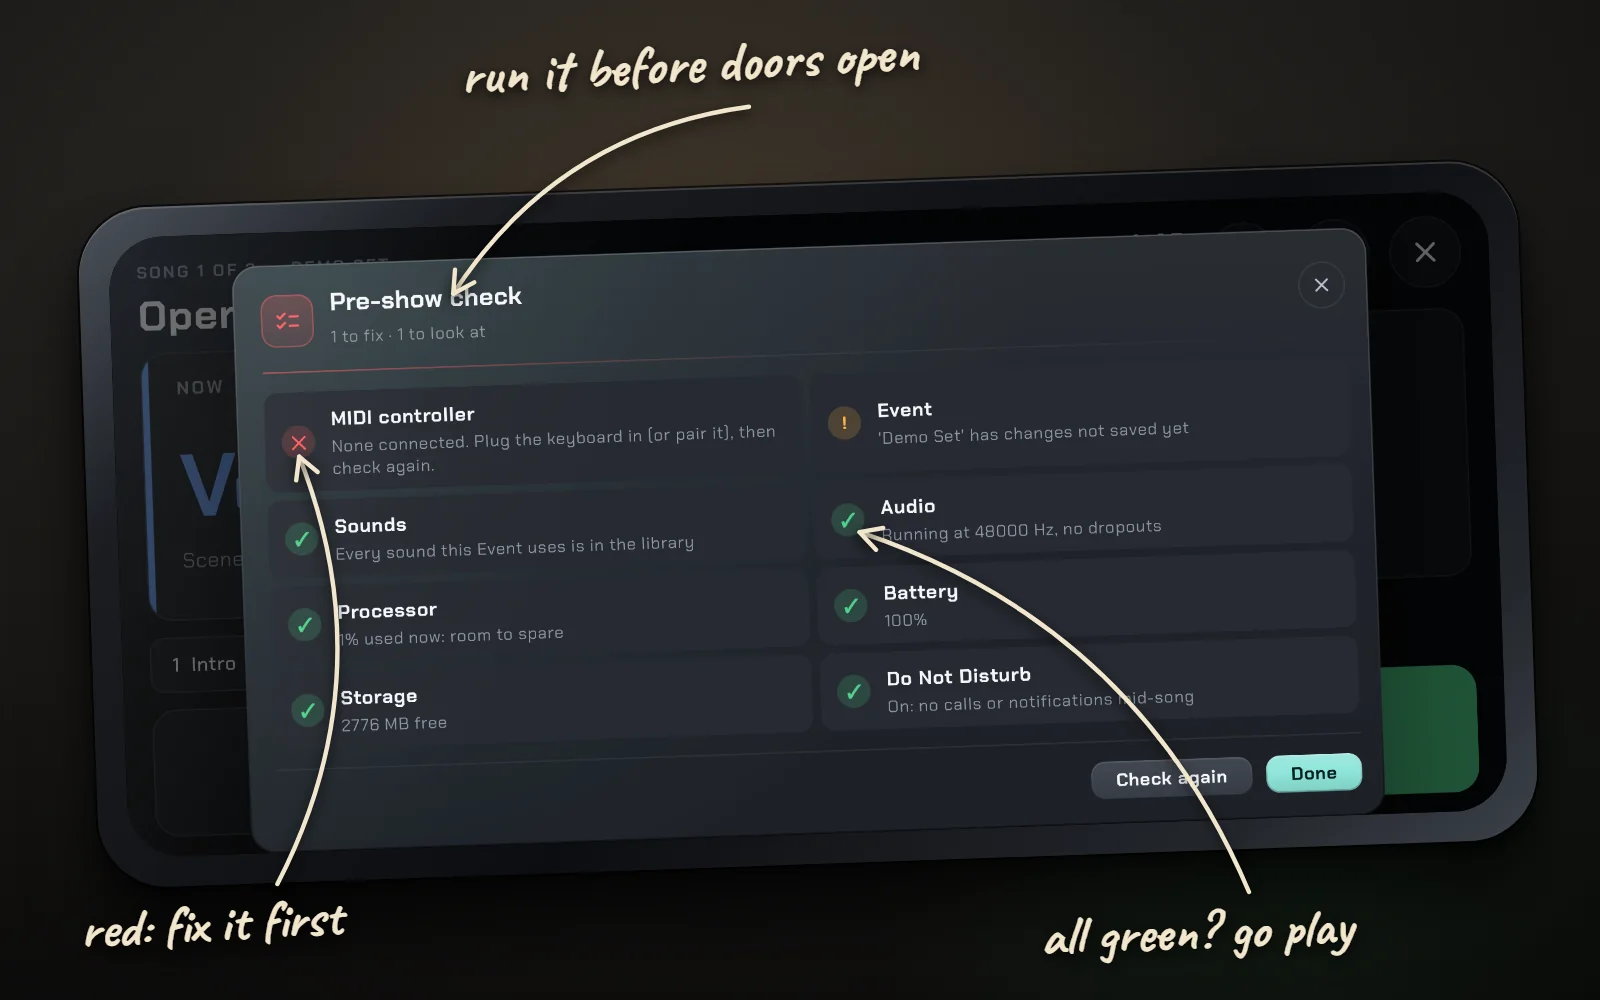
The first time you press GO in Stage view, WaveStage offers to run the check. You can also run it any time from the Event page. It looks at everything that could let you down on stage, and tells you what to do about each one:
- Your controller's connected
- Every sound the Event uses is in your Library
- The sound runs without dropouts, with room to spare
- Your battery and storage will last
- Your phone won't ring or pop up mid-song
- The volume's up
12. Tempo and transpose
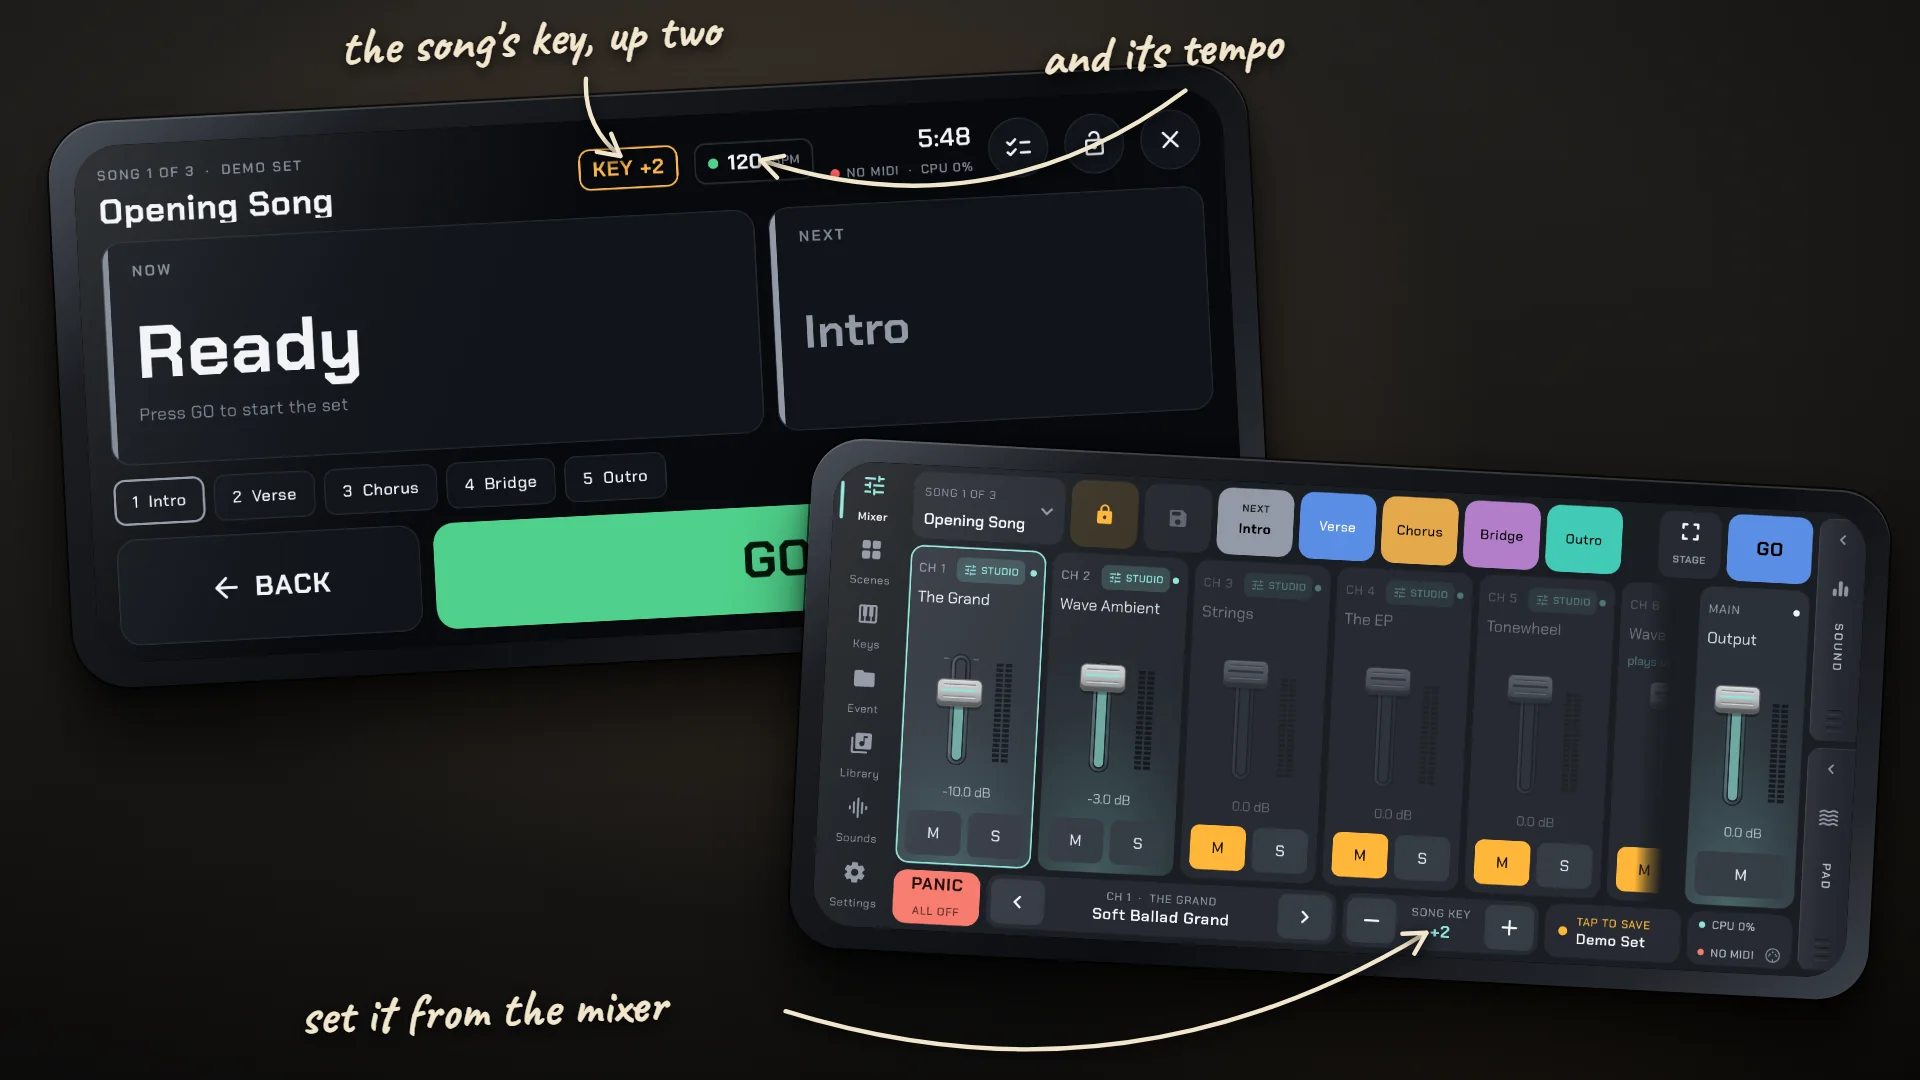
Tempo is one clock for the whole rig, in whole beats per minute. You set it by tapping: tap the tempo badge in Stage view in time with the music. From your second tap on, the tempo is the average of your last few taps, and the beat lands where you tapped. Stop for two seconds and tapping starts fresh. With songs, the tempo you tap is kept with the song that's playing. A lamp on the badge shows you the beat. Echoes, arpeggios and patterns can follow each song's tempo: switch on SYNC where you see it, and they keep time as you move from song to song.
Transpose moves the whole rig up to 12 semitones either way, from the bottom bar's SONG KEY tile (TRANSPOSE in Casual) or a controller. When you're using songs, the key belongs to the song. In Casual, Settings › Preferences › Remember transpose decides whether the app starts next time where you left it.
13. MIDI and controllers
Settings › MIDI
- Devices: what's connected, and which MIDI channel WaveStage listens to each one on.
- Response: pitch bend range, and inverting a sustain pedal that works backwards.
- Velocity: place one point on the curve ("a key played this hard sounds this loud") and set how tightly it turns there with Q. You can give each controller its own curve, so a light keyboard and a heavy one both feel right under your fingers.
- Pedal: teach a page-turner pedal its keys.
- KeyLab: appears while an Arturia KeyLab Essential mk3 is connected.
MIDI Assign
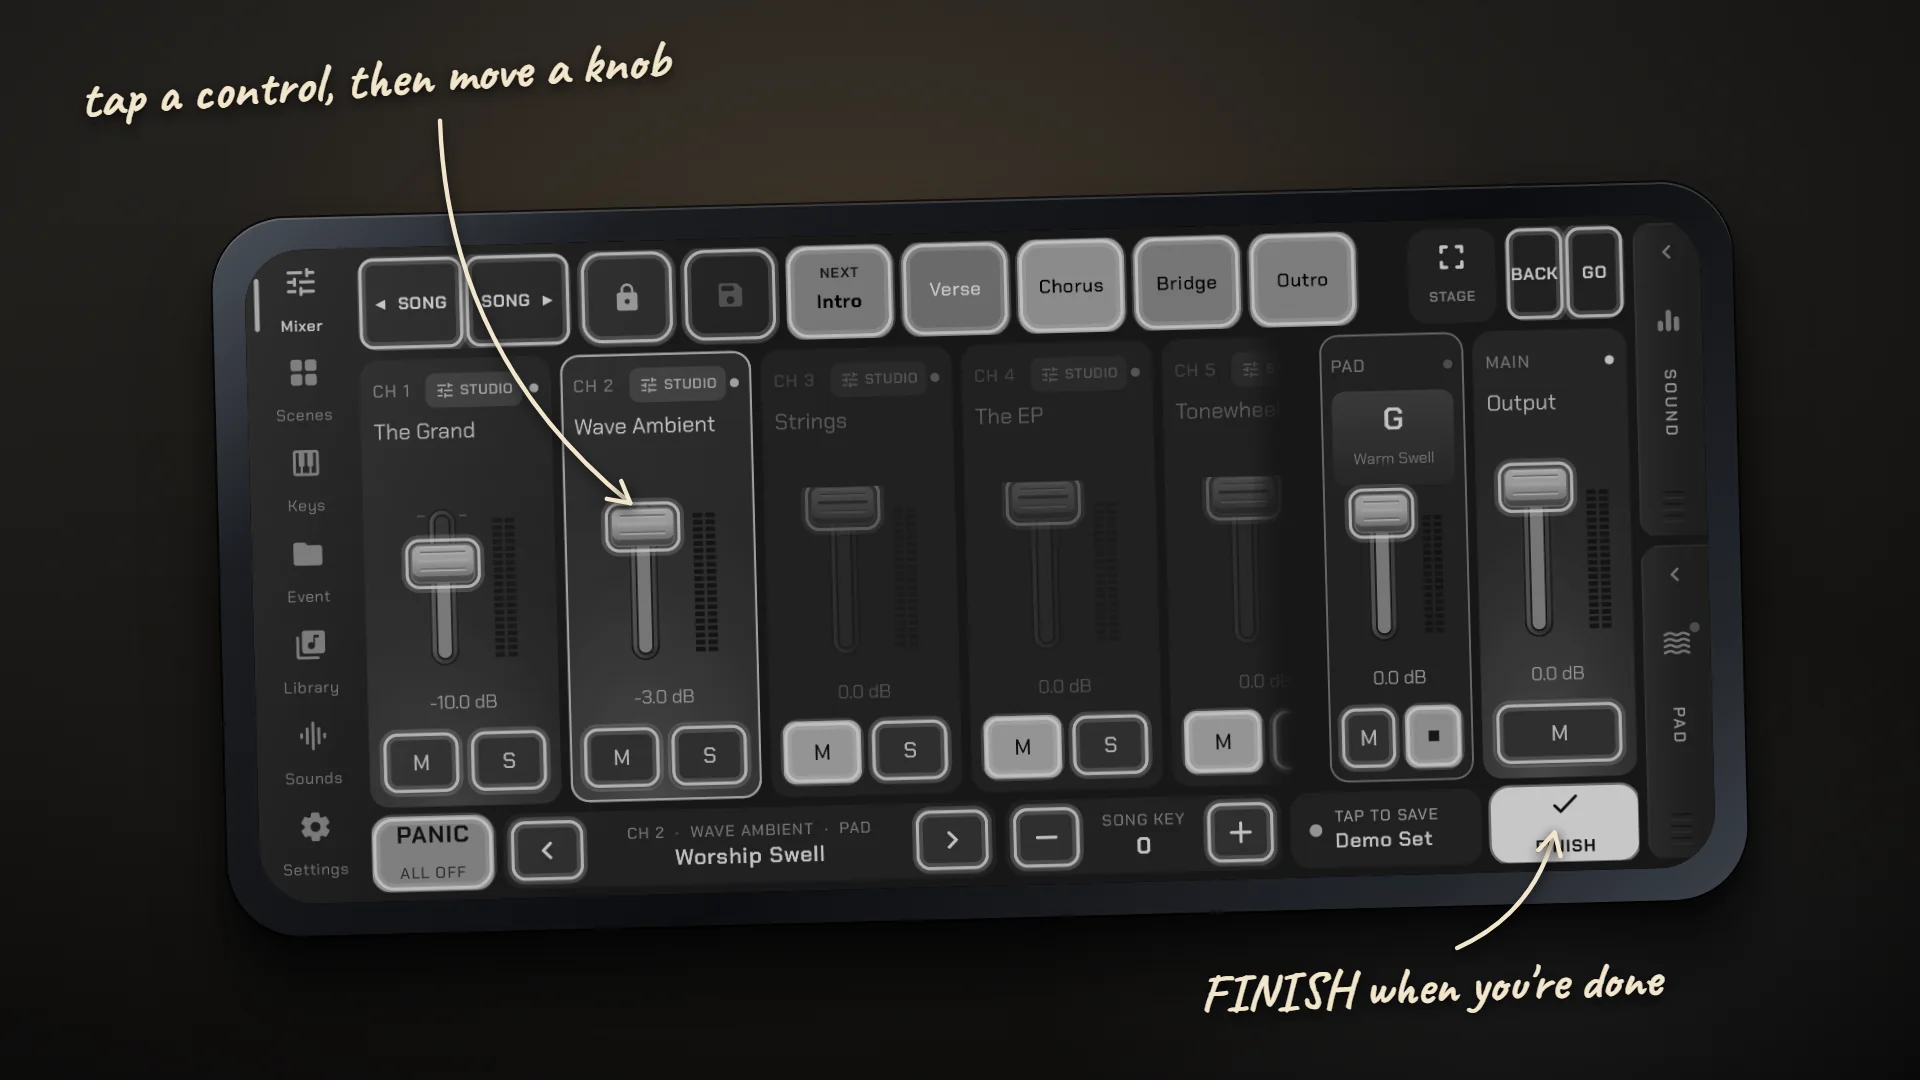
- Tap the status tile at the right end of the bottom bar, the one with the CPU and MIDI lights. The screen greys out and every control you can assign gets an outline.
- Tap a control. Its outline pulses while it waits for you.
- Move a knob or fader, or press a button, pad, key or footswitch. It now drives the control.
- Tap FINISH, on the same tile.
To remove an assignment, hold its control down while you're in MIDI Assign. Assignments belong to your rig, not to an Event, so they work in every Event. Faders and knobs on screen need a knob or fader to drive them; anything you press can be driven by a button, pad, key or program change.
Arturia KeyLab Essential mk3
Plug it in with its DAW program selected and it hands its screen and buttons over to WaveStage. Its faders and knobs drive the mixer and sounds, its screen shows you what they're set to control, Undo and Redo step through the channel's presets, and Save and Punch step through banks. It has its own mapping, so MIDI Assign leaves it alone.
Other ready-to-play keyboards
These are mapped the moment you plug them in: the Arturia MiniLab 3, the Novation Launchkey MK4, Launchkey Mini MK4 and Launchkey MK3, the Akai MPK Mini MK3 (its knobs), the M-Audio Oxygen Pro 25, 49 and 61, and the Alesis V25, V49 and V61 (their knobs). Their faders drive the channel faders and their knobs the sound's eight knobs; on a keyboard that has them, the main knob steps through presets and the arrows through songs. Their screens and lights aren't driven; only the KeyLab's screen is. Any other class-compliant keyboard plays as soon as it's connected, and you map its controls with MIDI Assign.
Arturia, KeyLab, MiniLab, Novation, Launchkey, Akai, MPK, M-Audio, Oxygen and Alesis are trademarks of their owners. WaveStage isn't made by or affiliated with any of them.
Page-turner pedals
A Bluetooth page-turner pedal steps you through the set: one key is GO, another is Back, so your hands never have to leave the keys. Pedals that send Page Down / Page Up, the arrow keys or the media keys work straight out of the box. For any other pedal, teach it in Settings › MIDI › Pedal.
14. Settings
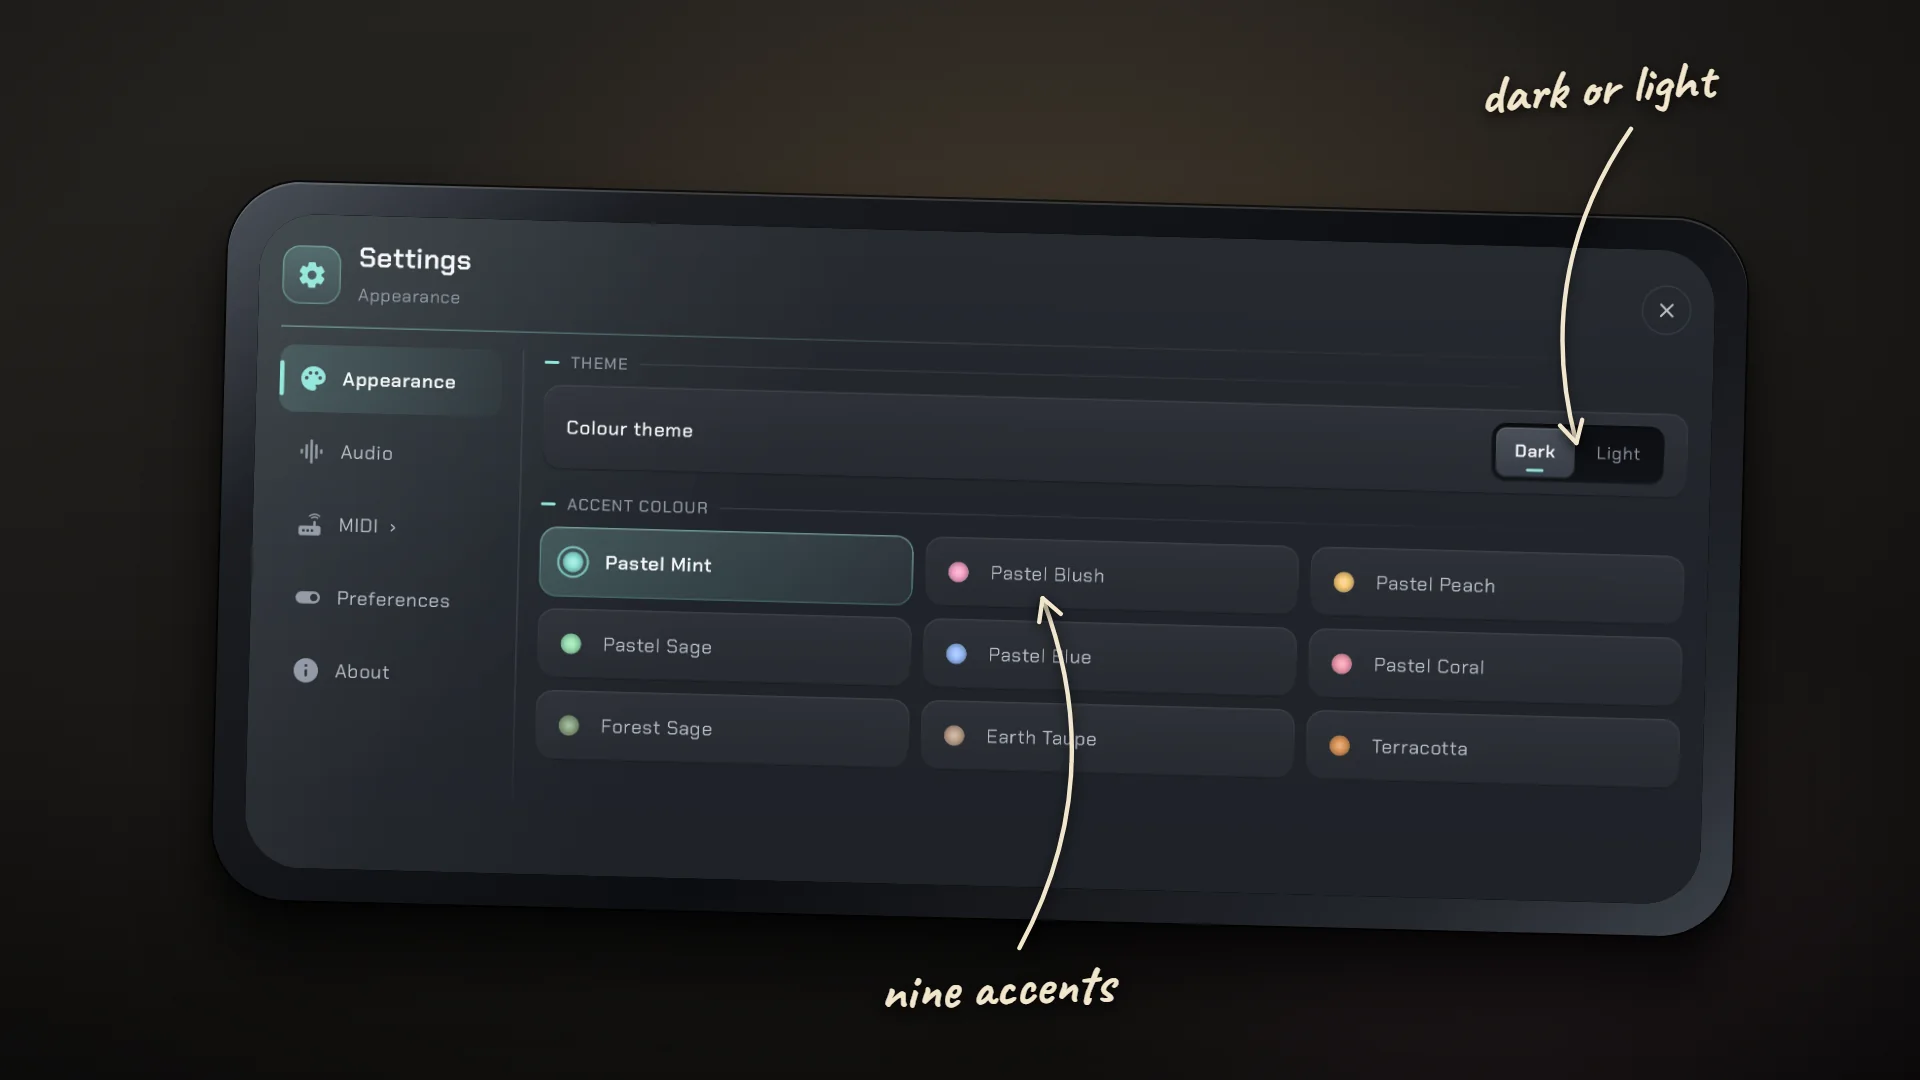
Appearance: light or dark, plus nine accent colour sets to choose from: Pastel Mint, Pastel Blush, Pastel Peach, Pastel Sage, Pastel Blue, Pastel Coral, Forest Sage, Earth Taupe and Terracotta.
Audio: the audio buffer and sample rate. A bigger buffer helps prevent dropouts; a smaller one feels quicker under your fingers.
MIDI: devices, response, velocity, pedal and KeyLab (all covered above).
Preferences: session mode, whether scenes start locked (under Start-Up), remembering transpose, keeping the screen on, feeling the controls, double-tap to reset a fader, what happens to an unsaved scene when you switch songs, how hard the on-screen keys play, and whether hardware faders jump or pick up. Casual's saved sessions are listed here too.
Feel the controls (in Preferences): your phone taps back as you press a button. Knobs tick at their ends and at the preset's own setting, faders tick at 0 dB, GO gives a firm tap so you know it went, and PANIC a heavy one. Switch it off if you'd rather not feel anything.
About: the version, the privacy policy, and the licences for everything WaveStage is built with.
15. Troubleshooting
The Grand or the Strings make no sound (or a synth preset is missing its brass)
They come with Pro: Google Play brings them when the Pro trial starts or Pro is bought, and it hasn't finished yet. Open WaveStage on Wi-Fi and give the download time to finish.
Clicks or dropouts
Raise the audio buffer in Settings › Audio, then run the pre-show check to see how much room the sound has to spare.
A note won't stop
Press PANIC on the left of the bottom bar. If your sustain pedal holds notes when it's up, it's working backwards: invert it in Settings › MIDI › Response.
An Event says sounds are missing
WaveStage tells you as it opens the Event, over the loading screen if it's the one you had open last. Import the SoundFonts it lists in Library › Soundfonts, using the same file names they had on the device the Event came from. Cancel starts a fresh session instead.
WaveStage closed unexpectedly
It keeps a short report on your device and asks if you'd like to share it. Sharing it helps get the problem fixed. Nothing is sent unless you say so.
Still stuck?
Write to us with your device model and what happened.